In past days people use different kinds of lights for e.g. bright light while they work and low light while they sleep or watch movies.
So is it possible so that we need not to use many lights and can change the brightness according to our requirement? Yes it is possible. We'll see this in next section.
Wait, wait, wait.
Everyone wants their work to be done just by saying a command. We can do all our work without even moving our chair and by just giving and order. So we'll also see how will turn on and turn off LED's by giving command to google assistant.
->If you want to use only one LED
Take one LED and a 10K resistor. Connect one leg of resistor to the positive leg(longer leg) of LED and then put the another leg of resistor into one of the GPIO pin. I am using pin 0. Now put the negative leg(shorter leg) into the GND(ground) of Bolt IoT WiFi module. Always use resistor with LED otherwise your LED will be burnt if you try connect without resistor.
->If you want to use multiple LED's
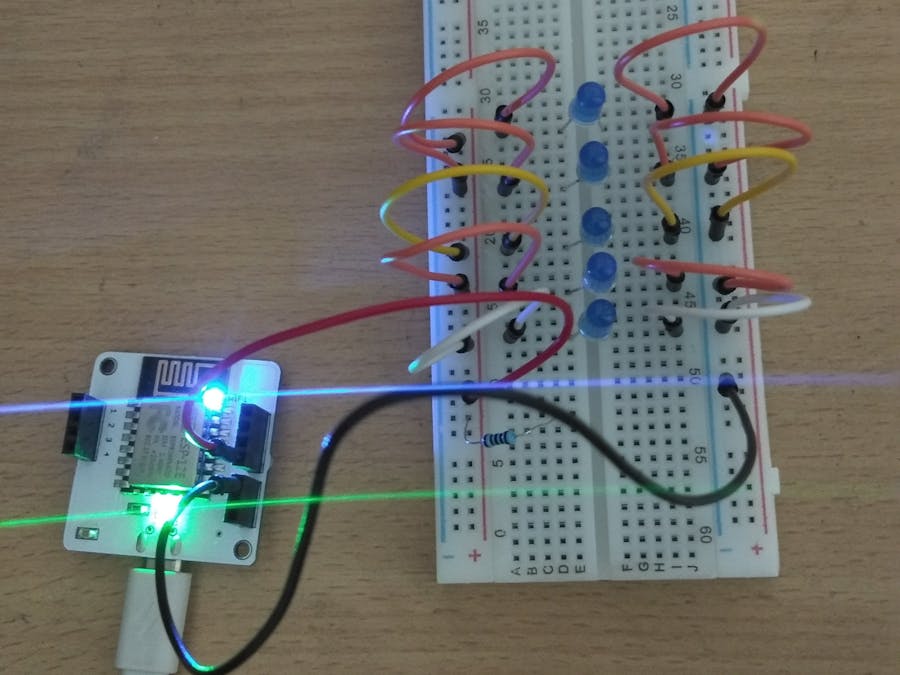
To connect multiple LED's you have to make connections on breadboard. Our motive remains same to connect resistor with the positive leg of LED, in case of multiple you must have to study about the breadboard and how the pins the connected in breadboard. The first and second last row in the breadboard denotes positive pins. Every positive supply must be connected to these pins. The second and the last row denotes negative pins. Every ground must be connected to these pins. The all positive pins from 0 to 30 are connected internally in horizontal manner and similarly negative pins are connected internally. The pins in rows: A, B, C, D, E are connected internally in vertical manner.
The connection for our circuit will be as per the given instructions in the video.
We'll use Bolt WiFi module in place of 9V battery. Setup the Bolt WiFi module and connect it to Bolt cloud. The negative wire(black wire) is connected to pin GND of module and the positive wire (red wire) is connected to GPIO pin 0 as shown in the above pictures.
Step 2: Generating Bolt API KeyLogin to https://cloud.boltiot.com. And if you haven't generated API key click on generate API key and make sure to enable it then copy and paste it somewhere safely your API key may look like this :- 44b2de6b-7e68-40e7-a27f-814b58afe008.
And You will be able to find your bolt ID easily on the dashboard it may look like it :- BOLT1234567 copy it too.
Step 3: CodeIf you are using ubuntu, then to install tkinter open terminal and run the command:
sudo apt install python3-tk
Now write the below code:
#!/usr/bin/env python3
from tkinter import *
from boltiot import Bolt
import json
import os
start=Tk()
start.geometry("500x350+100+100")
start.title("Led ControL along with brightness")
def on():
   response=mybolt.isOnline()
   data=json.loads(response)
   if data["value"]=="online":
       mybolt.digitalWrite('0','HIGH')#0 is the gpio pin
   else:
       print("Your device is offline")
def off():
   response=mybolt.isOnline()
   data=json.loads(response)
   print(data)
   if data["value"]=="online":
       mybolt.digitalWrite('0','LOW')#0 is the gpio pin
   else:
       print("Your device is offline")#function to change intensity of led
def set_value():
   value=s.get()
   response=mybolt.isOnline()
   if 'online' in response:
       mybolt.analogWrite('0',value)#first arguement is pin number and second is intensity value from 0 to 255
   else:
       print("Your device is offline")
#Creating a top frame
topframe=Frame(start,width=300,height=150)
lab=Label(topframe,text="Led Control")
lab.pack(fill=X)
photo1=PhotoImage(file=os.getcwd()+'/on1.png')
photo2=PhotoImage(file=os.getcwd()+'/off1.png')
Butt1=Button(topframe,text="ON",command=on,image=photo1,activebackground="navy",fg='grey', bd=8)
Butt1.pack()
Butt2=Button(topframe,text="OFF",command=off,image=photo2,activebackground="navy",fg='grey', bd=8)
Butt2.pack()
topframe.pack()
#creating bottom frame for led brightness control
bottomframe=Frame(start)
label=Label(bottomframe,text="Led Brightness Manager")
label.pack(fill=X)
s=Scale(bottomframe,from_=0,to=255,length=200,width=20,sliderlength=20,orient=HORIZONTAL)
s.pack()
butt3=Button(bottomframe,text="Set Value",command=set_value)
butt3.pack()
bottomframe.pack(side=BOTTOM)
#Bolt led control code
API="Your API key"
device_id="Your device id"
mybolt=Bolt(API,device_id)
start.mainloop()
You have to write your API key and your device id. The images used for buttons must be placed in the same directory in which code is placed. The output you'll get after running the code will look like this.
So are you excited!!!
Let's see what happen when click on the buttons and what happen when we set the value.
VideoSo that's our project. Hope you like it.
Now we'll see how we can control LED using our voice or let me say google assistant
Voice Controlled LED Automation1. Create your control URL: Your control URL to control LED using google assistant will look like this:
https://cloud.boltiot.com/remote/YOUR_API_KEY/digitalWrite?pin=GPIO_PIN_YOU_SELECTED&state=HIGH&deviceName=YOUR_DEVICE_ID
The above URL is to turnon the LED. To turnoff the LED just replace the state from HIGH to LOW.
2. Setting Your IFTTT Account
Go to ifttt.com by clicking this URL :- https://ifttt.com. Create your account on it and then click on create new applet or use this URL :- https://ifttt.com/create
Login using your Gmail account. Make sure you use same account which you'll be using on your mobile to interact with Google Assistant.
You can also install IFTTT android app which is much easier to use.
Click on '+This' to create the trigger.
Choose Google Assistant -> Say Specific Phrase.
Type the phrase you want to trigger the action. Make sure to specify the trigger command in different ways for example I used.
1. Turn on the lights
2. Buddy turn the lights on
3. Dude get me in light.
Now click on '+That'.
Select Webhooks and then Make a web request.
Enter the API URL you got in the previous Step. Make sure that you change the API Key and device name.
Method will be GET.
Content type will be Application/json.
Click on 'Create Action' and then Click on 'Finish'.
So your your google assistant is now setup to turn on the LED
Similarly you can create applet to turn off the LED using IFTTT app.
That's It You are done
Now wake your Android phone by saying "OK Google" and say the phrase you had set while creating the trigger to see the magic happen.
VideoHope you like it.
Thank you.


Comments
Please log in or sign up to comment.