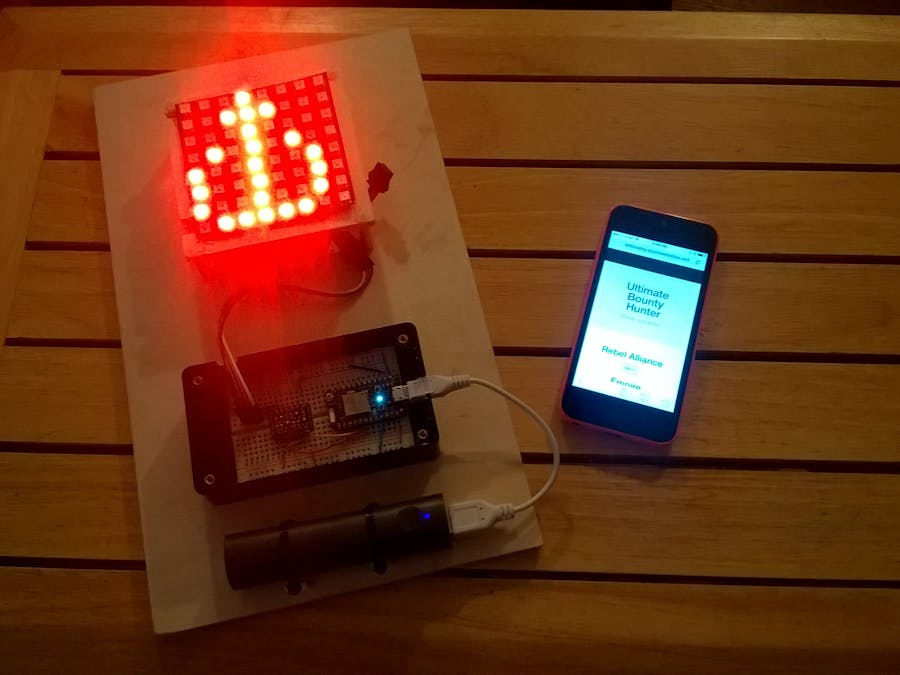
So you need to change your allegiance more often than you change your undergarments. I understand. It happens to me all the time. So I came up with this project. I just couldn't figure out which of my favorite outfits I was going to modify, so I mounted this on a board. The board could easily hang around my neck, or affix to just about any custom I have.
The faction resolution is not the greatest at the moment. I built the mounting board oversized to accommodate a larger(16x16) matrix, and maybe some other sensors in case I need to add more functionality.
Demo Time
Setting up the PhotonThe initial setup contains a couple of steps:
Get a particle user id:
Head over to the particle website and sign up: https://www.particle.io/
Setting up the initial Wifi connection:
This had to be the hardest part of this project. Seems I don't own an Android based device and using the wife's iPhone in any of my development type activities is a way big no-no.
So, I was left to use my windows box to do the initial setup. I found the base instructions here:
https://docs.particle.io/guide/getting-started/connect/photon/#using-windows
There are a number of steps to follow. Suffice to say it does work. The process did take a couple of attempts to make the correct entries and get the photon online. I will admit adding the second wifi connection was more simple. You can even set the wifi connection programmatically if you wish.
As designed, the photon will "remember" the last 5 wifi entries and will connect automatically to which ever entry it matches first.
Claiming your device:
After you get your device online, you will need to claim it. By claiming the device it makes it available from the web dashboard for updating, flashing software, and allows the ability for the device to log to the dashboard.
The procedure is painless and will happen on executing your "Hello, World" or in IoT terms "Blink an LED".
You can get to the web-based IDE by clicking the "Build" link in the upper right-hand of the main particle.io page, or if you want a direct link: https://build.particle.io/build/new
It looks something like:
In the lower left-hand, click the "Target" reticle to set the target of this new project. That action will bring of a window asking for your device id. Just enter it in.
Once the device is "claimed", it cannot be claimed again. It can be given to another user if they request transfer, but you will have to allow that.
Then, click the "BLINK AN LED" in the example app, click the lightening bolt at the top on the left hand side.
The light on the Photon will blink indicating it is being flashed. When that is done, the onboard LED should be flashing. Gratz!
What is this DotStar MatrixI will leave it so Adafruit to give a complete description of the Adafruit DotStar 8x8 Matrix. But here is the short list:
- Really likes 5 volt
- Uses SPI for communication.
- Can be used in a chain.
- Can receive updates much faster than Neopixels.
- Based on the APA102C RGB LED
The SPI based communication adds an extra wire, but also removes the need for precise timing that their Neopixels and other WS2812 based RGB LEDs have. This allows for a non-real time OS to be able to use these awesome devices.
Here are the connectors and what that matrix looks like from the backside:
Since the matrix is flexible, I decided to mount it on a sturdy board to keep the board from flexing too much and possibly breaking the solder joints.
So how do you program that matrix:
That "matrix" is nothing more a long strand of pixels that zigzag back and forth. By adding the DotStar library into your project from the library. Some very nice person ported the Adafruit DotStar library, and I can tell you it works really well.
I decided to map out the matrix, as I was doing the layout by hand didn't have any of the slick matrix routines. Here is my cheat sheet on the matrix:
And for some more artwork, here is the layout of the images:
You will see in the code that images are just integer arrays. Each entry represents on of the pixels. All that is needed to set the byte to the color wanted.
The format is as follows: 0xRRBBGG
You should be able to use any color selector on the web to come up with those values.
Let's talk about PowerWe are talking LEDs here. Much like the ol' death by a 1000 cuts, the unassuming LED doesn't use much power. However, get 64 together and you could start to have a problem.
While this project is not going to draw a ton of juice, as I have the colors set to about 50% of normal. 0xFF0000 would be full brightness red, but I have the value set to 0x770000. That is about %50 on the color. There is also a brightness entry, but I don't think that does a very good job.
In this project I was able to use a 2200 mAh power cell. These things are usually used for charging cells phone and the what not. It is capable of delivering up to 2.1 Amps. At least that is what the package says. I am not drawing anywhere near that.
If you do end up chaining these things, notice that additional power connector on the back of the board. I would make liberal use of those. The Photon is not going to be able to provide enough power for very many of matrixes. If you get to display full brightness on every LED, this power setup will not work for you. This guide talks about Neopixels, but the power requirements are the same for DotStars.
I had this running for about 4 hours during a convention. It lasted longer than I expected. Your mileage my vary.
So how do you get that website to workThe website is one of the 10 free websites you get when you sign up for Azure.
I am gonna leave that up to Microsoft to show you how todo that. It was way easy. The process took like 10 minutes for me to setup the website and get the base stuff up online. I could do it faster now, as I was reading the instructions as I was going along. :)
To get started with Azure, here are a couple of links:
Setting up your first Azure website
Once you have that, then go the github repository below and have a great time.
This is a trimmed down File > New > Project base website. Since it uses bootstrap, the site looks good on most mobile devices and desktops by default.
Let's buildStep 1:
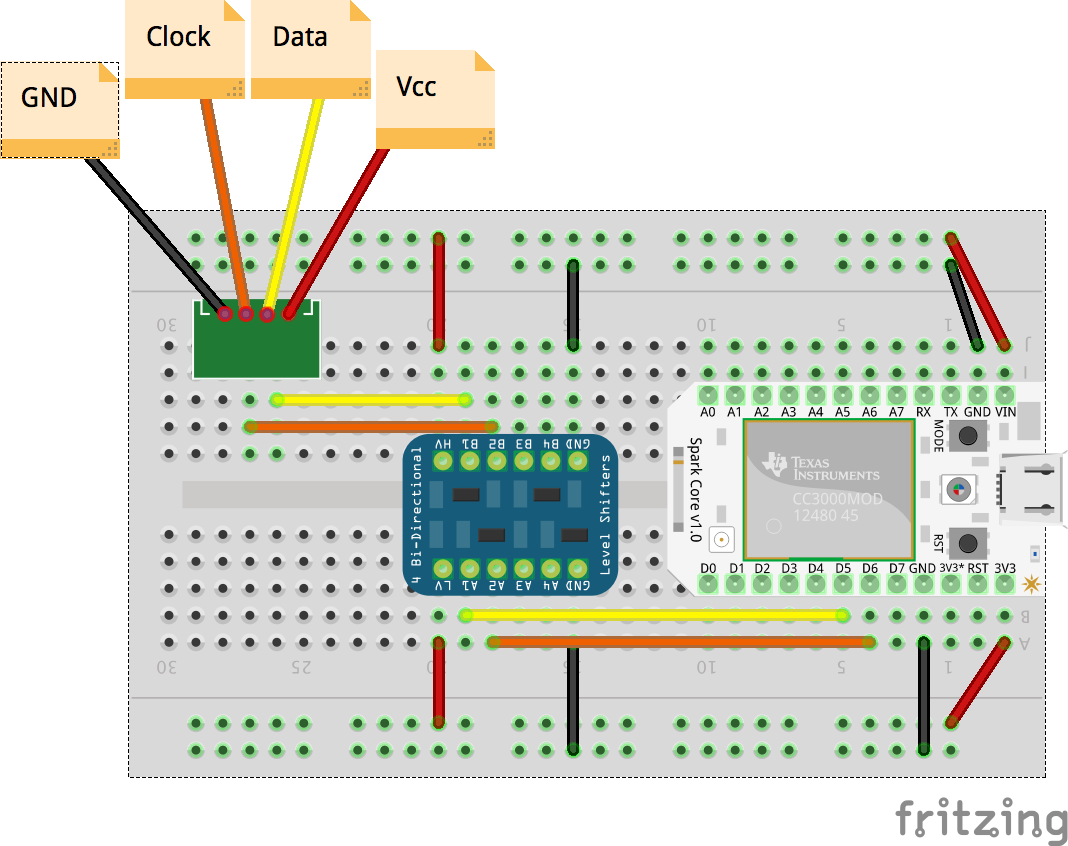
Assemble the breadboard following the circuit layout below.
Ensure you matrix works.
I used Postman to work out the URL's. It is a great tool for working with REST interfaces before you get everything else working.
Step 2:
Cut out the plywood to fit your application. Mine are sized so that I can reuse the board and have space for expansion to a larger matrix.
Nibble out the holes in both the plywood and the project box for the wires to pass through.
I had to trim the USB cable a bit as I made the whole for one cord and ended up using another.
Step 3:
Position the matrix carrier on the larger mounting board and drill through both boards at the same time. This removes errors when lining up holes for the nylon screws and standoffs.
Step 4:
Attach the smaller board to the larger board using the nylon screws and the standoffs. The standoffs are there to ensure that the matrix will be taller than the rest of the board.
Attach the matrix to the just attached board by pushing the wires through the holes/cutouts and securing with hot glue on the corners.
Step 5:
Attach the project box using the double sided tape.
I had my reservations about that tape, as it is "repositionable". With a good bit of effort I can remove it, but It hasn't come off on it's own yet.
Attach the battery with some Zip-Ties. I found that the double sided tape and the shape of the battery just didn't play nice together.
Step 6:
Connect up the matrix and the breadboard.
Step 7:
Upload the website.
Make sure that you change the device id, and the access token to your device.
Step 8:
As a friend of mine says: Profit
Pictures a go go:


Comments
Please log in or sign up to comment.