


Hardware components | ||||||
 |
| × | 1 | |||
 |
| × | 1 | |||
 |
| × | 1 | |||
| × | 1 | ||||
 |
| × | 1 | |||
Software apps and online services | ||||||
| ||||||
 |
| |||||
| ||||||
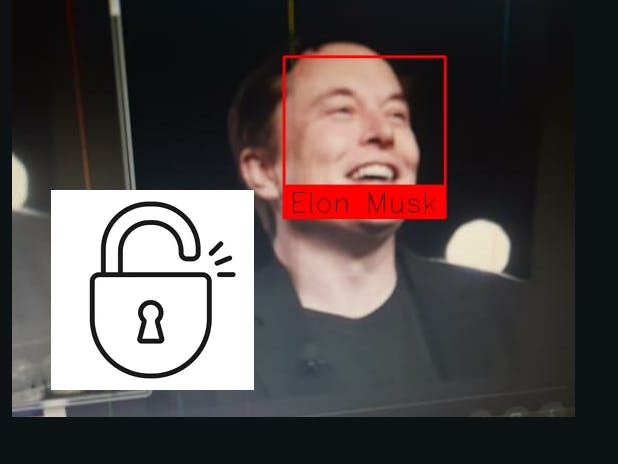
This project turns on the door lock automatically when recognized a known face. I have also used Blynk app to show who have entered the door.
This project is Based on Iot, Serial Communication and Face Recognition.
Before you do anything just copy and paste the code in pycharm and save it. Then please select the pictures of the people you want to give access and paste it to the Python Project File.
Make sure that your NodeMcu is setup.
get the com of the nodemcu and uploading speed and write it somewhere
if you need help these are my contacts:
Insta: www.instagram.com/rakin.anwar.28/
mail: rakinanwar2862@gmail.com

THIS IS FOR NodeMcu
C/C++Please write down somewhere the COM of the nodemcu and uploading speed(usually its 9600) you can check it from serial monitor
#define relay D2// connect the relay module to the D2 of the nodeMcu
#define BLYNK_PRINT Serial
#include <ESP8266WiFi.h>
#include <BlynkSimpleEsp8266.h>
char auth[] = "";// your authorisation code
char ssid[] = "";// your wifi name
char pass[] = "";// your wifi password
BlynkTimer timer;
WidgetTerminal terminal(V1);
// You can send commands from Terminal to your hardware. Just use
// the same Virtual Pin as your Terminal Widget
BLYNK_WRITE(V1){

  // if you type "Marco" into Terminal Widget - it will respond: "Polo:"
  if (String("Hi") == param.asStr()) {
    terminal.println("You said: 'Hi'") ;
    terminal.println("I said: 'Hi'") ;
  } else {

    // Send it back
    terminal.print("You said:");
    terminal.write(param.getBuffer(), param.getLength());
    terminal.println();
  }

  // Ensure everything is sent
  terminal.flush();
}

int data;
void setup() {
    Serial.begin(9600);
  Blynk.begin(auth, ssid, pass);
  timer.setInterval(1000L, Sensor);
  pinMode(relay,OUTPUT);
  terminal.clear();
}
void Sensor(){
  while(Serial.available()){
    data = Serial.read();
  }
{

  if(data == '1'){
    terminal.println("Elon Musk has entered");
    digitalWrite(relay,HIGH);
    delay(5000);
    digitalWrite(relay,LOW);
  }else if(data == '2'){
    terminal.println("Barack Obama has entered");
    digitalWrite(relay,HIGH);
    delay(5000);
    digitalWrite(relay,LOW);

  }else if(data == '3'){
    terminal.println("Joe Biden has entered");
    digitalWrite(relay,HIGH);
    delay(5000);
    digitalWrite(relay,LOW);
   }
    terminal.flush();

}
}
void loop() {
   Blynk.run();
  timer.run();
}
This is for Pycharm or other IDEs
PythonIMPORTANT POINTS:-
1) take the pic of the people you want to give access and paste it to the python project file
2) write the com and uploading speed on the line 6
3) dont forget to install all the libraries you may have to install dlib too
1) take the pic of the people you want to give access and paste it to the python project file
2) write the com and uploading speed on the line 6
3) dont forget to install all the libraries you may have to install dlib too
import face_recognition
import cv2
import numpy as np
import pyttsx3
import serial
ser = serial.Serial('com3', 9600)

# This is a demo of running face recognition on live video from your webcam. It's a little more complicated than the
# other example, but it includes some basic performance tweaks to make things run a lot faster:
#   1. Process each video frame at 1/4 resolution (though still display it at full resolution)
#   2. Only detect faces in every other frame of video.

# PLEASE NOTE: This example requires OpenCV (the `cv2` library) to be installed only to read from your webcam.
# OpenCV is *not* required to use the face_recognition library. It's only required if you want to run this
# specific demo. If you have trouble installing it, try any of the other demos that don't require it instead.

# Get a reference to webcam #0 (the default one)
video_capture = cv2.VideoCapture(0)

# Load a sample picture and learn how to recognize it.
obama_image = face_recognition.load_image_file("obama.jpg")
obama_face_encoding = face_recognition.face_encodings(obama_image)[0]

# Load a second sample picture and learn how to recognize it.
biden_image = face_recognition.load_image_file("biden.jpg")
biden_face_encoding = face_recognition.face_encodings(biden_image)[0]

elon_image = face_recognition.load_image_file("Elon_Musk_2015.jpg")
elon_face_encoding = face_recognition.face_encodings(elon_image)[0]

# Create arrays of known face encodings and their names
known_face_encodings = [
    obama_face_encoding,
    biden_face_encoding,
    elon_face_encoding
]
known_face_names = [
    "Obama",
    "Biden",
    "Elon Musk"
]

# Initialize some variables
face_locations = []
face_encodings = []
face_names = []
process_this_frame = True
engine = pyttsx3.init()


def talk(text):
    engine.say(text)
    engine.runAndWait()


while True:
    # Grab a single frame of video
    ret, frame = video_capture.read()

    # Resize frame of video to 1/4 size for faster face recognition processing
    small_frame = cv2.resize(frame, (0, 0), fx=0.25, fy=0.25)

    # Convert the image from BGR color (which OpenCV uses) to RGB color (which face_recognition uses)
    rgb_small_frame = small_frame[:, :, ::-1]

    # Only process every other frame of video to save time
    if process_this_frame:
        # Find all the faces and face encodings in the current frame of video
        face_locations = face_recognition.face_locations(rgb_small_frame)
        face_encodings = face_recognition.face_encodings(rgb_small_frame, face_locations)

        face_names = []
        for face_encoding in face_encodings:
            # See if the face is a match for the known face(s)
            matches = face_recognition.compare_faces(known_face_encodings, face_encoding)
            name = unk

            # # If a match was found in known_face_encodings, just use the first one.
            # if True in matches:
            #     first_match_index = matches.index(True)
            #     name = known_face_names[first_match_index]

            # Or instead, use the known face with the smallest distance to the new face
            face_distances = face_recognition.face_distance(known_face_encodings, face_encoding)
            best_match_index = np.argmin(face_distances)
            if matches[best_match_index]:
                name = known_face_names[best_match_index]
                if name == "Elon Musk":
                    print(1)
                    val = "1"
                    ser.write(str.encode(val))
                    talk("Welcome, Elon Musk")
                elif name == "Obama":
                    print(2)
                    val = "2"
                    ser.write(str.encode(val))
                    talk("Welcome, Obama")
                elif name == "Biden":
                    print(3)
                    val = "3"
                    ser.write(str.encode(val))
                    talk("Welcome, Biden")

            face_names.append(name)

    process_this_frame = not process_this_frame

    # Display the results
    for (top, right, bottom, left), name in zip(face_locations, face_names):
        # Scale back up face locations since the frame we detected in was scaled to 1/4 size
        top *= 4
        right *= 4
        bottom *= 4
        left *= 4

        # Draw a box around the face
        cv2.rectangle(frame, (left, top), (right, bottom), (0, 0, 255), 2)

        # Draw a label with a name below the face
        cv2.rectangle(frame, (left, bottom - 35), (right, bottom), (0, 0, 255), cv2.FILLED)
        font = cv2.FONT_ITALIC
        cv2.putText(frame, name, (left + 6, bottom - 6), font, 1.0, (0, 0, 0), 1)

    # Display the resulting image
    cv2.imshow('Video', frame)

    # Hit 'q' on the keyboard to quit!
    if cv2.waitKey(1) & 0xFF == ord('q'):
        break

# Release handle to the webcam
video_capture.release()
cv2.destroyAllWindows()


Comments