


Hardware components | ||||||
| × | 1 | ||||
 |
| × | 1 | |||
| × | 1 | ||||
| × | 1 | ||||
| × | 1 | ||||
| × | 1 | ||||
| × | 8 | ||||
| × | 1 | ||||
| × | 1 | ||||
| × | 1 | ||||
| × | 1 | ||||
| × | 1 | ||||
| × | 1 | ||||
| × | 8 | ||||
Hand tools and fabrication machines | ||||||
 |
| |||||
 |
| |||||
The Smart Van Box project aspires to be the ultimate personal assistant for on-the-road travel. Born from my passion for the outdoors and my expertise as a software architect, Smart Van Box evolved from initial mobile app versions into something more than a basic home automation system for campers. Instead, it aims to be a true travel assistant—one that alerts you when something needs attention and offers insights into interesting places and activities along your journey.
The Smart Van system is designed with two main functionalities: resource management and travel planning. On the resource management side, it continuously monitors available resources in the camper and uses predictive insights based on personal habits to estimate maintenance needs. This allows the system to notify users at the most opportune moment, suggesting necessary actions—such as adding a maintenance stop to the itinerary.On the other side, the UX has been designed with a focus on enhancing the travel experience, highlighting features like personalized itinerary planning, a travel diary, and contextual recommendations. The travel diary, for example, enables users to document their journey, while recommendations are generated based on personal interests, suggesting local attractions, scenic detours, or even unique dining spots along the route.
You can find more info to the project's website @ www.smartvanbox.org
Project OverviewThe Smart Van Box project architecture consists of two main components: the device itself and the mobile app. These components can communicate directly or through the cloud, depending on the needs of the user. The Smart Van Box device also connects with various systems installed in the camper, such as solar chargers, sensors, diagnostic port and more, providing a comprehensive interface for monitoring and control.
Additionally, Smart Van Box includes built-in environmental sensors and connectivity modules, allowing it to collect data from the surrounding environment. These modules include an integrated LTE modem, which, in addition to being always reachable via the cloud, shares the Internet connection with on-board and personal devices of passengers. There is also a relay module to drive 4 lines at 12/24 volts typical of campers
On the app side, users receive alerts and notifications based on predictive insights derived from the collected data, helping them manage resources effectively and optimize their travel plans.
To transform your vehicle into a smart camper, you’ll need to assemble a Smart Van Box, mount it on your vehicle and configure it via the Smart Van Mobile App.
Step 1: Material PreparationFirst of all you need to order the necessary components. For a complete list you can consult the BOM table here you can find the references for all materials required.It is recommended to order the same components listed or as similar as possible to reduce the customizations of the code to adapt different hardware. If you are an advanced user, modify as you like and send us your feedback so we can share it with the smart van box community.
The project provides 3D models of the case that you can print freely. In total, 3 pieces need to be printed: the base of the case, the cover and the internal panel. If you have a large enough printer you can print them all at once, otherwise print them at different times. It takes approximately 24 hours to complete the print, so remember to plan your time well before starting the printing project.
Make sure to double-check the dimensions of the components, as the case design is tailored to fit and secure the recommended hardware precisely.
To continue, you’ll need to prepare the SD card with the appropriate OS and configurations for Smart Van Box. Follow next steps:
- Install the OSDownload and install the Raspberry Pi Imager. Insert the SD card into your computer, select Raspberry Pi OS Lite (64-bit) – version Bookworm or newer.
- Customize the OS SettingsConfigure the OS by setting a hostname (e.g.,
svbox), username, enabling SSH, and entering Wi-Fi credentials. You’ll also want to set the locale and password for remote access. Then write the OS and his configs to the SD card. - Enable Ports and ConfigurationsAfter flashing the SD card, open the
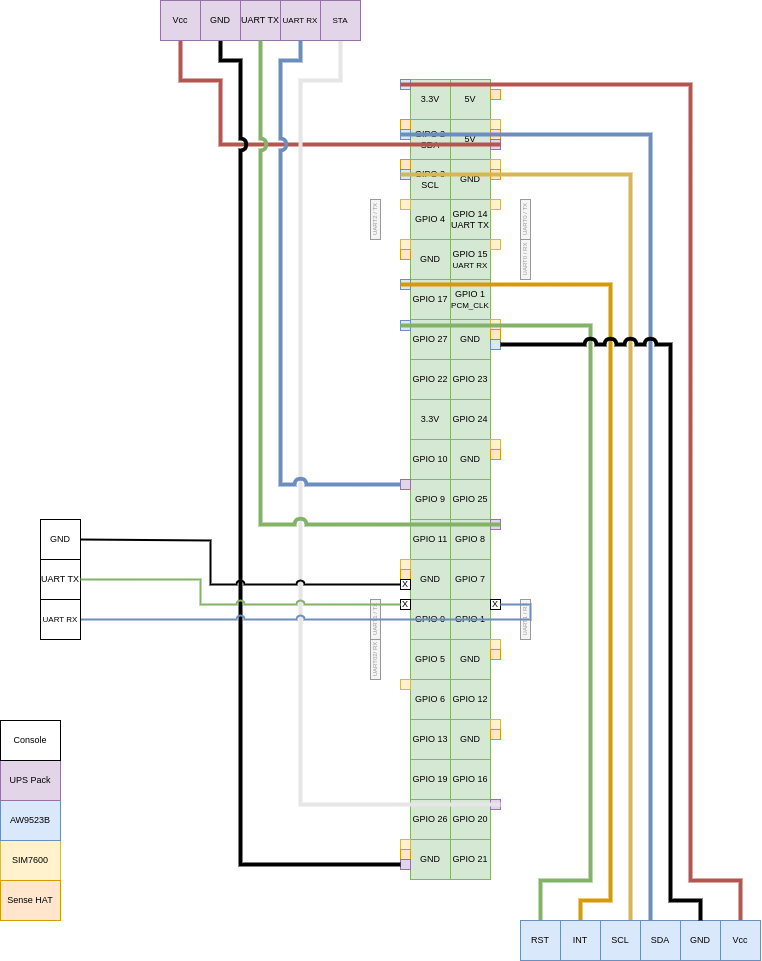
configs.txtfile on the boot partition of the SD card to enable UART ports for communication with the Raspberry Pi.Then set up UART2 for console access, addingconsole=ttyAMA2,115200incmdline.txtfor debugging.
# Raspberry PI OS (Bookworm) and later
# uart0    > Bluetooth
# uart1    > SIM7600  > /dev/ttyS0   - GPIOs 14/15
# --       > --       > /dev/ttyAMA1 - Do Not Exist
# uart2    > Console  > /dev/ttyAMA2 - GPIOs 0/1
# uart3    > --       > /dev/ttyAMA3 - GPIOs 4/5
# uart4    > UPS Pack > /dev/ttyAMA4 - GPIOs 8/9
# uart5    > --       > /dev/ttyAMA5 - GPIOs 4/5

enable_uart=1
dtoverlay=uart2
dtoverlay=uart3
dtoverlay=uart4
dtoverlay=uart5
With these materials in place, you’ll be ready to move on to the hardware assembly steps.
Step 2: Hardware AssemblyThe Smart Van Box device consists of interconnected hardware modules. Those modules includes a LTE modem, a GNSS, various environment sensors, IO expander and relays module. Given the setup, it's recommended to prepare the SD card for the Raspberry Pi and the SIM card for the SIM7600 module in advance to streamline the process.
The hardware assembly can be divided into three sub-steps:
- Preparation of the Internal PanelBegin by assembling the internal panel, which includes the IO Expander, relay module, and power-in connector. Make sure each component is securely attached and properly connected for reliable function.
- Wiring of the CoverNext, wire the cover, connecting buttons and pull-down resistors to achieve stable input readings. This setup allows for accurate control via physical buttons on the device cover.
- Placement in the Main CaseFinally, arrange the components inside the main case in the following order: the backup battery, the pre-assembled internal panel, the Raspberry Pi stack (which includes the UPS module, Raspberry Pi 4, SIM7600 module, and Sense HAT), gas sensors, reset button, and two antennas connected to the SIM7600 module. Carefully secure each component and ensure proper cabling between modules for seamless operation.
This modular approach to assembly simplifies the process and helps ensure each part is connected and functioning before completing the build.
Step 3: Install Smart Van Box DistributionWith the hardware assembly complete, the next step is to install the JOD Smart Van Distribution, which enables communication between the Smart Van Box and the mobile app. Below are the steps and commands required to set up the software.
- Connect to the Raspberry PiUse SSH or a serial connection to access the Raspberry Pi within the Smart Van Box.
$ ssh svbox@svbox.local- Install Software RequirementsUpdate the package list and install required software and libraries:
$ sudo apt-get update && sudo apt-get install -y \
    git curl wget nano \
    openjdk-11-jdk avahi-utils \
    python3 python3-pip python3-venv \
libcairo2-dev libgirepository1.0-dev dbus-x11- Download and Extract JOD Smart Van DistributionDownload the latest JOD Smart Van distribution file, extract it, and navigate to the distribution directory:
$ wget https://github.com/Smart-Van-2-0/com.robypomper.smartvan.jod_smart_van/releases/download/1.0.0/JOD_Smart_Van-1.0.1.tgz
$ tar -xzf JOD_Smart_Van-1.0.1.tgz
$ cd JOD_Smart_Van- Initialize the FirmwareUncomment and set the
VENVvariable totruein theconfigs.shfile. Then, create and activate Python virtual environments for each firmware component, install dependencies, and deactivate each environment as follows:
# For Victron firmware
$ cd deps/com.robypomper.smartvan.fw.victron/
$ python3 -m venv venv; source venv/bin/activate
$ pip install -r requirements.txt
$ deactivate; cd -

# For SIM7600 firmware
$ cd deps/com.robypomper.smartvan.fw.sim7600/
$ python3 -m venv venv; source venv/bin/activate
$ pip install -r requirements.txt
$ deactivate; cd -

# For UPS Pack v3 firmware
$ cd deps/com.robypomper.smartvan.fw.upspack_v3/
$ python3 -m venv venv; source venv/bin/activate
$ pip install -r requirements.txt
$ deactivate; cd -

# For Sense Hat firmware
$ cd deps/com.robypomper.smartvan.fw.sensehat/
$ python3 -m venv venv; source venv/bin/activate
$ pip install -r requirements.txt
$ deactivate; cd -

# For IO Expander firmware
$ cd deps/com.robypomper.smartvan.fw.ioexp/
$ python3 -m venv venv; source venv/bin/activate
$ pip install -r requirements.txt
$ deactivate; cd -- Install JOD Smart Van as a DaemonTo install the JOD Smart Van distribution as a system daemon and verify it, use the following command:
bash install.sh
bash state.sh
tail -f logs/console.log
These steps complete the setup of the Smart Van Box software, allowing it to interact with the mobile app and hardware components within the device.
Step 4: Mount and ConnectOnce everything is ready, we can install our newly created Smart Van Box in our vehicle. Start by running a power line (12V or 24V) to the box and securing it to a panel with the appropriate screws. Now connect the bypass lines of the 12V circuits you want to control to the relays inside the SVBox. For each line, cut the wire coming from the fuse box and connect it to a relay (normally open configuration). In vehicles, it's common to interrupt the positive line since the chassis is often used as a common ground. Finish by connecting the two antennas (GNSS and LTE), and your Smart Van Box is installed.
Once the Smart Van Box is connected to the power supply, the internal battery begins charging. When sufficiently charged, the Raspberry Pi starts the boot process. After a few minutes, the Smart Van Box will connect to your configured Wi-Fi network and become accessible through the Smart Van Mobile App.
- Download the AppFrom your smartphone, navigate to the Smart Van Mobile App page then to the Releases page; or directly to the downloads page of his repository.Download the latest version of the
*.apkfile from your smart phone. - Install the AppProceed with the installation by opening the downloaded
*.apkfile.Your operating system may warn you about the potential risks of installing applications from third-party sources. Accept to continue with the installation. - Launch the AppOnce installed, launch the SmartVan Mobile App. The first screen displays the list of available Smart Van Boxes. Select the one you want by tapping on it.If the SmartVanBox does not appear after launching the mobile app, ensure your phone is connected to the same WiFi network as the SmartVanBox.
Start controlling your camper from your smartphone today! We'll be adding more features soon, so join our community on Facebook and visit our website at www.smartvanbox.org for the latest updates.
CustomizationThe JOD Smart Van distribution is configured to work with a specific set of internal peripherals and external devices. However, you can easily modify these configurations to adapt the distribution to different hardware.
To modify the JOD Smart Van distribution, start by editing the configs/struct.jod file. This file defines all the states and actions of the SVBox device that are available to the Mobile App. It organizes the object's capabilities in a hierarchical structure. Be careful not to modify this structure, as it could prevent the app from accessing certain device features.
Each state or action defined in this file includes configurations that instruct the object's agent (JOD) on how to interact with the underlying hardware/system to provide that state or action. In the JOD Smart Van distribution, interaction occurs via DBus, but other methods are also available, such as HTTP calls, file reading/writing, and shell command execution.The states and actions defined in the configs/struct.jod file can help you determine which firmware is used for a particular state or action. In this case, the firmware are small Python programs that are started and stopped along with the JOD agent. These firmware interact with the underlying hardware and publish the obtained values on DBus.
If you want to support a new type of hardware or external device, it's recommended to use an existing firmware as a base and modify the part that accesses the underlying hardware/system. Available firmwares are contained into deps dir of the JOD Smart Van distribution.
Thanks to this modularity, the Smart Van Box can be easily customized to interact with any hardware or external device. Remember that you can contribute to the growth of the Smart Van Box community by sharing your modifications or new firmware on the project's official repositories. Together, we can make the Smart Van Box even more powerful and customizable. At www.github.com/smart-Van-2-0 page you can find all repositories involved into the project.
Next stepsAfter several months of personal work, Andrea, a developer and marketing consultant, joined the team a few months ago. Since then, we have been moving this project forward with our own resources, showcasing and spreading it among Makers, even presenting it at important fairs like MakerFaireRome. Committed to remaining open source, we are currently launching a crowdfunding campaign to self-finance ourselves with the sale of pre-assembled Smart Van Boxes and continue to develop this exciting open-source project.
After extensive work on defining the device, we have found the perfect combination to have a sufficiently flexible device to obtain all the information necessary for the proper functioning of our project.
We have also studied the user experience of the mobile app extensively, realizing that the initial approach, similar to Home Automation applications, was not suitable for use in a camper. So we revolutionized the concept of our UX, redesigning it around the travel experience. Now, it is much more consistent with our main goal (being the personal assistant for on-the-road travel). We are currently working on the new UX and its implementation. For any advice or help, you can contact us at info@smartvanbox.org.
In parallel, we are also working on the cloud service and data analysis. We plan to make the Smart Van Cloud service available in a few months.
If you like this project, start supporting it by following our Facebook page and sharing it with your fellow camper friends. Only with a large community can we create the true Personal Assistant for on-the-road travels together!


Comments