

Hardware components | ||||||
| × | 1 | ||||
| × | 1 | ||||
| × | 1 | ||||
| × | 1 | ||||
Software apps and online services | ||||||
| ||||||
 |
| |||||
| ||||||
Hand tools and fabrication machines | ||||||
 |
| |||||
A few months ago, BBC posted a story about Mr Goxx, a crypto trader hamster beating human investors. After reading the article, I looked at my hamster and I told him “We live in Argentina my friend… vacation is over”
Well, vacation was over for both of us since I’ve had to create custom parts using 3d modeling, I’ve researched investing APIs, I’ve designed the circuit and coded the system with Python.
My hamster is named Milstein– after César Milstein, novel prize Argentine biochemist – and Milstein only invest in Argentine stocks trading in US markets like MercadoLibre (MELI ticker) and Globant (GLOB ticker) but code is prepared to use any stock or EFT index.
Up to this point, Milstein is loosing around $350, nevertheless I’m not going to give up on him. After all, what are friends for? (And who told Milstein to invest only in Argentine stocks?)
How does it workThe BBC article didn’t provide much technical information (“The office is fully automated, using a wide range of technology including software scripting, micro-controllers, single-board computers, computer-aided design, 3D printing, laser-cutting, and more.”) so I’ve just used the main idea as a reference and I’ve decided to make the project very simple and straightforward so others can replicate the experience.
The hamster will select the stock to trade using the Wheel that has a Rotary encoder as the axis. After selecting the stock, the Buy or Sell signal will be triggered whenever a presence is detected at the Buy-Sell desk house.
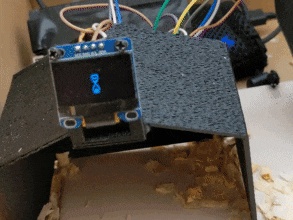
Rotary encoder and PIR sensor are connected to the Raspberry Pi with Alpaca trading API. All operations can be monitored from SSH connection to the Raspberry Pi and also from the Oled screen.
Requirements- Raspberry Pi
- Rotary Encoder
- Oled screen
- PIR sensor
- 3d printed parts
- A clever hamster from Jerbo species so they are active during stock daily schedule.
Setup the Raspberry Pi with Raspberry Pi OS (download Windows, Mac or Linux software from https://www.raspberrypi.org/downloads to copy the image into the microSD card)
Connect a keyboard and HDMI screen to setup the Raspberry.
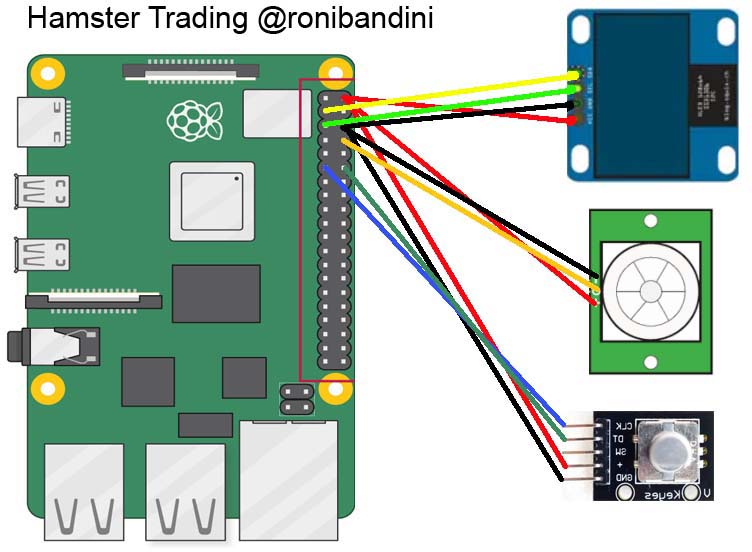
Connect the PIR, Oled and Rotary using jumper cables.
>> Oled screen
- SDA, white to GPIO2
- SCL to GPIO3
- + to 5V
- - to GND
>> PIR movement sensor
- + - 5v
- GND - GND (pin6)
- GPIO14, to PIR signal
>> Rotary Encoder
- CLK - GPIO17 (pin11)
- DT - GPIO18 (pin12)
- + - 3v3 (pin1)
- GND - GND (pin6)
Start the Raspberry Pi. Install Alpaca trading libraries
$ sudo pip3 install alpaca-trade-api
$ sudo apt-get install libatlas-base-devLogin and get your API keys (public and secret) with Regenerate Key button.
Enable SSH at Raspberry Pi
$ sudo raspi-configUse the arrows on your keyboard to select Interfacing Options.
Select the P2 SSH option on the list.
Select <Yes> on the “Would you like the SSH server to be enabled?” prompt.
Now go to Network Options, Wifi and specify your WiFi credentials.
Exit. Now you can disconnect the keyboard and the screen and connect remotely to your Raspberry with Putty or any other terminal.
Upload all project files to root/alpaca folder. You can use any FTP client with the same SSH credentials.
$ nano hamsterInvestor.pyEdit Alpaca api credentials.
api_key = 'AAAAAAAAAAAAAAAA'
api_secret = 'AAAAAAAAAAAAAAAAAAAAAAAA'
base_url = 'https://paper-api.alpaca.markets'
Download and print the 3d parts.
Connect the wheel to the Rotary encoder and the PIR to the support base. Connect PIR to the Buy/Sell house.
Start the system:
$ cd alpaca
$ sudo python3 hamsterInvestor.py
Everything is ready to make your hamster a stock market millionaire.
Note: you can autoexecute the Python script with cronjob everytime you turn on your Raspberry. The script will check if markets are open, so after hours, the hamster will not be able to post trades.
If you are starting with Raspberry I do recommend the book Fun Projects with Raspberry
Customizations
For customizations and Raspberry Pi projects quotes

_t9PF3orMPd.png?auto=compress%2Cformat&w=40&h=40&fit=fillmax&bg=fff&dpr=2)


Comments
Please log in or sign up to comment.