


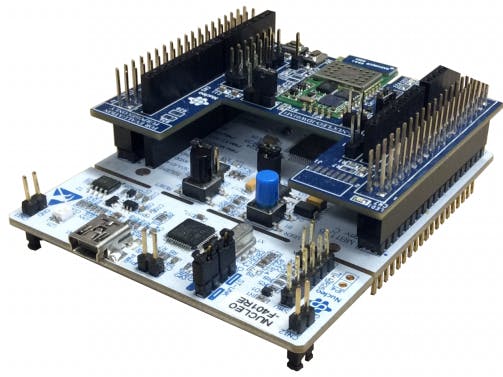
Hardware components | ||||||
 |
| × | 1 | |||
| × | 1 | ||||
Software apps and online services | ||||||
| ||||||
This tutorial explains how to send datas to the Ubidots site using the STMicroelectronics ODE ecosystem:
- NucleoL476 with STM32L476RG
- X-Nucleo-IDW01M1 wifi shield
- MBed OS online compiler
I was looking for an IoT platform that would allow to post data and also be able to define alerts in the case where a value of a sensor crossed a critical threshold.
On the web today there is a multitude of cloud service and most offer a free plan (limited to a handful of devices and in number of data sent)
IoT providers public and Open Source :
https://www.postscapes.com/internet-of-things-platforms/
Then after doing some concluding test with Thingspeak, I discovered Ubidots (https://ubidots.com/). There are tons of equivalent projects based on hardware Arduino, ESP8266 and others. We can also find for each IoT cloud provider the specific libraries of each of the popular platforms (Arduino familly, Energia ...)
But I wanted to present the possibility of the microcontroller STM32. This opens up an infinity of aplication projects, metering sensors, home automation and so on.
Let's go.
STEP 1: Ubidots settingsFirst you need to create an Ubidots account
On Devices Tab. And we will create a new device (with Add Device)
Set "NucleoL476 " to device name. Then clic to open device settings.
Now inside NucleoL476 we will create 3 variables with following name, level, temperature and battery.
Each variables are ready to be updated by Nucleo board over Wifi.
STEP 2: API credentialWe need to write a code for STM32L476RG to communicate over wifi and update values of 3 variables.
This will be done later by using Mbed online compiler.
For Wifi local acces point, we define 2 strings.
/* Wifi Acces Point Settings */
#define AP_SSID         "YOUR_WIFI_SSID"
#define AP_PASSWORD     "YOUR_WIFI_PASSWORD"
And to be able to connect the hardware and authenticate it with Ubidots with TCP, we need to define 2 other strings.
#define UBIDOTS_TOKEN   "YOUR_UBIDOTS_TOKEN"
#define UBIDOTS_DEVICE  "YOUR_UBIDOTS_LABEL_DEVICE"
The first string UBIDOTS_TOKEN should be read from your account API Credentials (see below)
The second string is the Device Label Name that we create in Step 1: "NucleoL476"
You only need to change these define to implement this tutorial.
STEP 3: Hadware and MbedNow we can attach the X-Nucleo-IDW01M1 over NucleoL476RG board with Morpho connector.
Important note: Some X-Nucleo-IDW01M1 board have a little modification to perform. Check if R21 resistor is mounted. If R21 is soldered, you must remove it.
Now go to Mbed OS (https://os.mbed.com/), sign in and open the online compiler.
Create a new project and configure it with your hardware (here NucleoL476)
Connect the Nucleo mini USB to your computer, and note Virtual Com port assigned by your operating system.
Open a serial terminal at 115200 bauds, 8 bit and 1 stop bit Xon/Xoff disabled (like Teraterm or Putty)
STEP 4: Mbed CodeThe code is available as attached file below.
You can copy and paste it into Mbed Compiler. It is well commented and should not be an issue.
You must include some additionnal library such:
- NetworkSocketAPI
- X_NUCLEO_IDW01M1v2 as well
- and mbed
level variable is a boolean and show the status of the User blue button on the Nucleo Board.
temperature variable is updated with STM32 Internal temperature sensor connected to ADC.
Then battery variable is updated with VBAT / 3 Internal ADC Channel.
After reset, the program will convert ADC internal channel for VBAT and internal temperature sensor of the mcu. It's an example and you can use any data. The converted values are stored into vbat and temp variables.
It will also get the status of the User button of the Nucleo Board (the blue button).
And try to connect to a wifi network, with SSID and WPA key you have provided.
Then it wil make a TCP socket connection with Ubidots api.
If connetion is etablished, the application will constuct the a Rest API command HTTP request, and POST the HTTP command.
POST /api/v1.6/devices/{LABEL_DEVICE}/?token={TOKEN} HTTP/1.1
Host: things.ubidots.com
Content-Type: application/json
Content-Length: 76

{"temperature": %0.2f, "battery": %0.2f, "level\": %d}
For more informations, see https://ubidots.com/docs/api/#rest-api-reference
By using a terminal console you will see each step of the program. And the feedback response for HTTP request (if you get 200 it's OK)
Now you should see your data online.
The application will enter into a blinky loop. And you need to restart it by a reset if you want to send data again.
This is a simple tutorial and it is fully functionnal.
You can use it for your own project, and it'easy to implement other data posting for real environmental sensors.
I hope you enjoy it. Any feedback is welcome.


Comments
Please log in or sign up to comment.