

Hardware components | ||||||
| × | 1 | ||||
 |
| × | 1 | |||
| × | 1 | ||||
| × | 1 | ||||
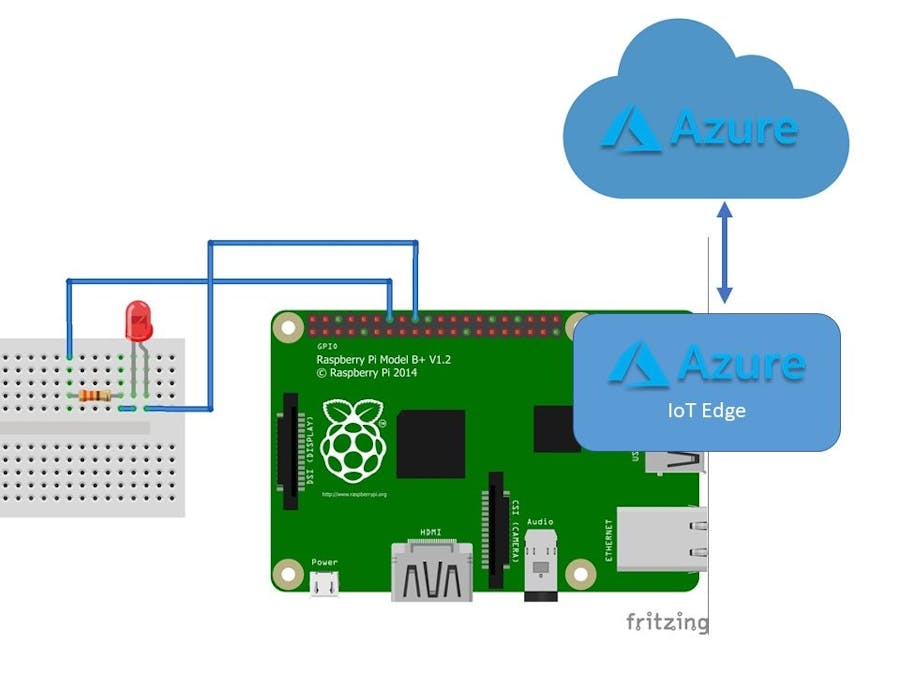
Azure IoT Edge is a very powerful way to containerize cloud workloads. It enables to run AI, functions, analytics deployed from the cloud on a local computer, in a secure and convenient way. It enables a consistent development environment between the local and cloud workloads, and takes the notion of distributed computing to a practical implementation. However, while (or because) of how powerful options it offers, starting can be overwhelming. This project shows the basic concepts and steps to blink a LED. While this might sound as trivial, once you get through the container deployment with basic Python code, you can easily build on this with progressively more complex projects.
Azure IoT Edge currently runs on either Linux or Windows, on HW as cheap as Raspberry Pi. This project used RPi 3 Model B (or B+).
Follow Jon Gallant instructions:
https://blog.jongallant.com/2017/11/azure-iot-edge-raspberrypi
Please note you don't need a special display for Raspberry Pi indicated in the article. Any monitor that you can connect through HDMI port would do (including your TV set). If you have a monitor with DVI connector, there are cheap DVI<->HDMI adapter cables available online.
Set Up DockerYou need Docker running on your machine, whether is Windows or Mac you can download the software from here:
https://www.docker.com/community-edition
Install Docker and create an account.
Set Up Azure EnvironmentYou need an Azure subscription. A free trial is fine. Go to the Azure portal to sign up for Azure:
Next you need Visual Studio Code, download and install from:
https://code.visualstudio.com/
You need to add the following extensions to Visual Code Studio:
- Docker (Microsoft)
- Azure Account
- Azure IoT Toolkit
- Azure IoT Edge
- Python
Go to View | Extensions and look for the above ones (there is a search function), and you'll see an "Install" button associated with the extension.
Login in Visual Studio Code to your Azure subscription. Go to View | Command Palette and find Azure: Sign in. Follow the instructions to log in.
Next you need to create the resources in Azure:
- IoT Hub
- IoT Edge Device
- Container Registry
Azure Container Registry
In the Azure Portal, select Create a resource and create a new Container Registry.
Azure IoT Hub
You can use Azure Portal to create a new Azure IoT Hub. However, you can do it directly in Visual Studio Code:
Go to View | Command palette and select Azure IoT Hub: Create Azure IoT Hub. Go through the steps:
- Subscription- you can use Free Trial
- Resource Group- create a new one or use existing
- Location- preferably close to you
- Pricing Tier- you can use F1 Free
- Name- name you hub
Azure IoT Edge Device
Similarly, use the Azure Portal or directly in Visual Studio Code:
Go to View | Command palette and select Azure IoT Edge: Create IoT Edge Device. Go through the steps:
- Name- name you device
Follow the steps described here:
https://docs.microsoft.com/en-us/azure/iot-edge/how-to-install-iot-edge-linux-arm
Use the manual configuration option. The connection string you can find in the Azure portal or in Visual Studio Code go to View | Command palette and select Azure IoT Edge: Copy Device Connection String and select the device you created in the previous step.
Program the Blinking LED DeploymentIn Visual Studio Code:
Go to View | Command palette and select Azure IoT Edge: New IoT Edge Solution
- Select/ create the folder where you want to store your solution
- Name your solution
- Select Python Module
- Name the module, e.g. BlinkLED
- When you get prompted for the Docker Image Repository, change localhost:5000/blinkled to blinkcr.azurecr.io/blinkled (or however you named the container registry instead of blinkcr)
Select deployment.template.json and replace the content with the attachment available in code section of this project.
Rename (right click) Dockerfile.amd64 to Dockerfile.arm32v7 and copy content from the attachment available in the code section of this project.
Select main.py and replace the content with the attachment available in code section of this project.
Select module.json and replace the content with the attachment available in code section of this project.
Remember to save all the files (right click all the files visible in the OPEN EDITORS and click Save).
Deploy Your Solution to Raspberry PiIf you followed the steps you should be ready with the deployment. Make sure the Raspberry is switched on, connected to WiFi and running Azure IoT Edge. You check the status of Azure IoT Edge with the command:
systemctl status iotedge
Right click deployment.template.json and select Build IoT Edge Solution. It might take a while to create the containers for the solution, you'll see the progress.
Right click deployment.template.json and select Generate IoT Edge DeploymentManifest. You should now see a deployment.json file created under config folder.
Right click deployment.json and select Create Deployment for Single Device. Select your IoT Edge device name.
Wait few minutes and your LED should start blinking on the Raspberry Pi.
What's NextUsing Azure IoT Edge to blink a LED feels like taking out a cannon to kill a fly. However, hopefully it established the foundation how to deploy containers using Azure IoT Edge. You can start adding modules doing AI, functions, or complex computations. A good example of what you can do is illustrated by deployment of custom vision module:
https://azure.microsoft.com/en-us/resources/samples/custom-vision-service-iot-edge-raspberry-pi/


Comments