


Hardware components | ||||||
 |
| × | 1 | |||
As a prerequisite, we should mention that this project was built for NetBurner 3.x, which is the latest version of our tools and libraries. This supports NetBurner’s MOD54415, the MOD54417, the NANO54415, the SB800EX, and the aforementioned MODM7AE70. Porting this project back to earlier versions of our tools is certainly possible, but it won’t be quite as straightforward as we have laid out here.
We will assume that before beginning, you have the latest version of our tools (NNDK 3.x) downloaded and installed, and that your is module up and connected to your network. We are also going to assume that you have downloaded or cloned the source code from the repo, here.
If you’re unfamiliar with using GitHub, you can either download the repository in a.zip file, or clone it using the steps listed here. Regardless of whether you clone it or extract the contents of the.zip file to your computer, you should end up with a folder containing two sub-folders named src and html. These folders contain the code for the application. The folder containing them will be the root folder for our application. For us, this folder will be \AwsIotCoreMqttBase, and it will be used as a point of reference throughout the remainder of the tutorial.
Finally, we recommend having a way to view the serial data coming directly from your module via the development board. There are two easy ways to do this. First, if you have the USB to micro-USB cable that came with your development kit, you can set the jumper configuration on your development board so that it both sends serial output to and receives power from the micro-USB jack. Alternatively, you can set the jumpers on the development board to use the DB9 port (UART0) for serial output. Please see the “Quick Start Guide” that came with your development board for further information on how to configure the jumpers on your board.
If you don’t happen to have a serial port on your computer (many don’t these days) and are missing your USB to micro-USB cable, you can use a USB to serial adapter to get the job done. This of course assumes you have a USB port.
Program OverviewOur application is very straight forward, and implements four distinct pieces of functionality:
- Initial setup
- Publish an MQTT message ever 5 seconds
- Subscribe to an MQTT topic to receive incoming messages
- Provide a web interface to view the last message sent and received
We expect the messages to be published and received in the JSON format and use the ParsedJsonDataSet class extensively in processing the MQTT payload data.
Before setting up an AWS IoT “thing”, as they are affectionately termed, you will need to create an AWS management console account. The account itself is free (though service pricing varies, check out this link for specifics regarding IoT Core), and will open the gateway for a ton of different AWS cloud services. If you haven’t done this already, you can take care of that here. Go ahead, we’ll wait.
Now that you have officially joined the club, go ahead and log into your account if you haven’t already. As a side note, we are going to use our root account to avoid running into permissions issues during the course of the tutorial. If you want to do this the way AWS recommends, you will have to create a secondary user account that you will then need to give the required IoT Core permissions to through IAM. After you log in, you should be greeted with the “AWS Management Console” page, shown in Figure 1.
From here you will want to navigate to the IoT Core service. You can do that by using the “Find Services” search field on the page, as we have done above, or clicking on the “Services” drop down menu found in the top banner of the page.
From here, you will hit the AWS IoT landing screen, as shown in Figure 2, above. There’s some great info here, and we encourage everyone to take a look around when they can. We’re on a mission, though, so we’re going to bypass this and get straight to adding a device. Click on the “Get Started” button, and you should see a welcome screen as shown below in Figure 3.
Before we can register our device as a “thing”, we need to setup a “policy” for it. This policy will be assigned to our “thing” during the registration process, and will grant it the permissions needed to access the MQTT topics that we will use to send and receive messages. From the left hand menu, select “Secure”, and then the submenu of “Policies”, as shown below in Figure 4. This should take you to the console displayed, which notifies us that we don’t currently have any policies.
Click on the button labeled, “Create a policy”, which will take you to the screen shown below in Figure 5.
From the policy creation page, we will add the statements that will dictate what our connected devices are allowed to do. We assign our policy the name “NBTutorial”, and add four statements with the information listed below. Notice that when you type in the action, the field labeled “Resource ARN” will be automatically populated. Check “Allow” under the “Effect” field, and replace the last portion of each Resource ARN that reads, “replaceWithA”, with an asterisk (*). When finished, you should have the following statements:
Please note that in a production environment, you will want to be a lot more selective with your policy creation (e.g., don’t use an asterisk at the end of a Resource ARN). We are keeping it very straightforward here to get the ball rolling, but we by no means endorse these sorts of cavalier policy settings in a live production environment.
When they have been entered, click “Create”. Now it’s time to register our “thing”.
Back at the main menu on the left pane, click on the “Manage” menu option, and then the “Things” submenu. Amazon kindly reminds us that we don’t actually have any “things” yet, so let’s take care of that now by clicking on the button labeled, “Register a thing”, as we see in Figure 7, above.
This will take us to a window that allows us to register a single “thing”, or multiple “things”. For this tutorial, we are going to stick to one, so go ahead and click on the button labeled, “Create a single thing”. This should bring us to the screen shown in Figure 8, where we will get to provide the details of our device.
The only thing we are going to add here is the “Name”, which we will set to “NBTutorial”. Hit “Next”, and you will be taken to a screen where you can select how to associate your “thing” with the certificates that will be used to authenticate it with the AWS IoT Core service. We are going to let Amazon do the dirty work for us here, so go ahead and click the button at the top labeled, “Create certificate”.
As of this writing, using their certificate creation process is recommended way to go and after running through all of the steps in this tutorial, we could see why. When the certificate has been generated, you will be taken to a screen similar to that shown in Figure 9, below.
Short Aside: After hitting “Next”, you might instead get the following message: “We are provisioning a Device Gateway endpoint for your account. It may take a few minutes for the endpoint to be ready, after which you can connect devices to AWS IoT, publish/subscribe to topics, and access device shadows.” In this case, navigate back to the dashboard and click “Manage”, followed by the sub-menu item “Things” in the left pane. You should see your registered “NBTutorial” thing waiting for you there. Click on it, followed by the “Security” menu item that will be listed on the left side of the screen. Finally, click the button labeled “Create Certificate” to move on.
We need to do a few things here before we can proceed. First, we will want to download the certificate and the private key. We actually recommend downloading all three (the certificate file and the public and private key files) and tucking them away someplace safe, but you only need the certificate and the private key to have your device connect using our application. For now, we are going to put them in the root directory of the project, \AwsIotCoreMqttBase. After you have these moved appropriately, click the button labeled, “Activate”.
Last but not least, we are going to attach the policy that we created earlier to our device. Click the button labeled, “Attach a policy”. This will advance you to a screen that will let you attach any of the policies you have created previously to the certificate, as we see in Figure 10 below.
Because we’ve only created the one, that’s all we should see. Click on the checkbox next to it in order to select it, and then hit the final button, “Register Thing” or “Done” (depending on if you were able to complete the registration all the way through in one go or not).
Success! If all went according to plan, you should be taken back to a list of your currently active “things”, which includes the one we just created, as shown in Figure 11.
At this point we are going to step away from AWS, and focus on getting the application up and running on your device.
Compile the Certificate and Private KeyRemember the certificate and private key we created previously? It’s time to whip those bad boys out, because we are going to compile them directly into our application. Before we can do that, we need to turn them into something the device can actually understand.
On a command-line terminal, navigate to the folder where you tucked those files away (\AwsIotCoreMqttBase for us) and run the command:
compfile privatekey PRIVATE_KEY_LEN privatekey.cpp
Substitute with the name of the private key file you downloaded previously. This file usually has the format - private.pem.key. If you run into problems running compfile, make sure that the directory where all of NetBurner’s tools are installed is on your path. This is typically \nburn\pcbin.
Running the command above creates the file privatekey.cpp, which contains the entire contents of the private key stored in the form of an array. The length of this array is also stored in the file as the constant, PRIVATE_KEY_LEN.
Next, do the same for the certificate with the following command:
compfile privatekey PRIVATE_KEY_LEN privatekey.cpp
Substitute with the file you downloaded in the previous section that contains the certificate. This file usually has the format - certificate.pem.crt. Similar to the command above, it generates the file certificate.cpp, which defines an array that holds the certificate data as well as the length of that array, which is stored in the variable CERTIFICATE_LEN.
If this all worked out, you will now see the two new C++ source files, privatekey.cpp and certificate.cpp, in our root directory, \AwsIotCoreMqttBase, each with a size greater than 0. If not, you may need to repeat the above steps and do a bit of troubleshooting.
At this point, let’s go ahead and move the new files to our \AwsIotCoreMqttBase\src directory, which will save us a step down the road with our NBEclipse project. Speaking of which, let’s go ahead and move on to that now.
NBEclipse is NetBurner’s Eclipse based IDE that provides everything needed to develop, build, and deploy an application to your NetBurner device. It can be found in the NNDK install directory (nburn by default) under the subfolder, NBEclipse. Go ahead and launch that application now, and feel free to accept the default directory for your work space when the dialogue shows up.
Detailed information on creating a project and developing your application in NBEclipse can be found in our documentation, here. We will go ahead and give a brief overview, however, to get you started as quickly as possible.
We are going to use the Project Wizard to get us started and will create our project so that it actually points to our root folder, \AwsIotCoreMqttBase, which will prevent us from having to import any code. To do this, navigate to File->New->Project from the toolbar at the top of the window, as shown in Figure 12.
This should open up the New Project Wizard, as shown in Figure 13.
Make sure that “NetBurner Project” is selected under the “NetBurner” option, and hit “Next”. This should bring you to the window shown below in Figure 14.
Typically, the only thing we do here is give the project a name and move on. However, in this instance we are also going to uncheck the box labeled, “Use default location”, and hit the “Browse” button to navigate to the folder where you have cloned the repo. For us, this was \AwsIotCoreMqttBase. Make sure that in the window labeled “Toolchains”, the “NetBurner Toolchain” is listed and selected.
Hitting “Next” from this window will take us to where we can select which configurations we would like to build. We want to be able to run the application in both “Debug” and “Release” mode, so leave the options checked, and hit “Next” again.
On the next window, shown in Figure 15, we are able to specify which platform we would like to build this application for. We are going to select the MODM7AE70. If you are using one of our other platforms select it accordingly. If your device is already plugged in and connected to your network, you can go ahead and find it’s IP address by hitting the button labeled, “Search”, and then selecting it from the list that pops up on your screen.
If your device isn’t connected, you can pass on this field for now, and just hit the “Next” button. The next window shows some basic components that can be automatically added to the application, but since we are using the code from the folder in the repo, we can skip all of these and just hit “Finish”.
With this complete, you should see your project created and listed in the “Project Explorer” tab on the left side of NBEclipse. You might notice that your project automatically starts to build from the console output in the bottom right. If we did everything correctly with our project setup and remembered to move certificate.cpp and privatekey.cpp to \AwsIotCoreMqttBase\src, then it should build successfully. You will know you’re ready to rock if you see the following at the bottom of your NBEclipse console window:
If, instead, you see an error, ensure that the src folder listed in your project is mapped properly to \AwsIotCoreMqttBase\src by verifying that all of the source files show up in your “Project Explorer” tab under the src folder. Also double check that both the certificate and private key file generated in the earlier section are listed as well.
To get our device to successfully connect to the AWS IoT Core service, we will need to make a few changes to the aws_iot_config.h file in our source code. Open this file from your project’s src folder in NBEclipse. At the top of this file, two macros are defined which will need to be modified. These are AWS_IOT_MQTT_HOST and AWS_IOT_MQTT_CLIENT_ID.
AWS_IOT_MQTT_HOST: This is the endpoint that we will need to connect to and authenticate with. To find this value, go to your AWS IoT Core management console, click “Manage” followed by the submenu item, “Things”, in the left pane, and then click on your “NBTutorial” registered “thing”. On the left side of the main window, you will find a list of menu options. Of these, click on “Interact”, which should bring you to a page that looks similar to the one in Figure 17.
The value that we are looking for is the obnoxiously long one listed under the “HTTPS” heading. Copy and paste that value in place of the text,, in your aws_iot_config.h file.
AWS_IOT_MQTT_CLIENT_ID: This is a unique client ID for your device and should be unique for each device connecting to this endpoint. We chose to be boring and used our MAC address, but you can feel free to come up with something as creative and interesting as you like (as long as it’s unique). If you’d like to use your MAC address as well, you can find it at the bottom of the barcode sticker on your module, or by visiting https://discover.netburner.com. Whatever you choose, copy that value over the text, in your aws_iot_config.h file.
When you save your NBEclipse project, it should again automatically build the project and show a “Build Finished” message as mentioned earlier. If not, you can manually trigger the build by choosing Project->Build Project from the NBEclipse menu.
At this point, we are ready to load our application on the device. You should be able to automatically set up a run configuration from the top menu of the IDE by selecting Run->Run As->As Neturner Application. Please see our documentation for more details on run configurations.
You can add your device’s IP address to the project if for some reason your device wasn’t associated with the project during the creation process. Do this by right clicking on the project in the “Project Explorer” tab, and selecting the “Properties” option at the very bottom of the list. From there, select “NetBurner Options” from the list on the left hand side of the window that shows up, and then type in your devices IP address in the appropriate field under the “Device Options” section, as shown in Figure 18 below. Again, you can find your device IP via: https://discover.netburner.com/.
Optional (and Recommended) Step: You can monitor the serial output of your application through a MTTTY terminal when the program has been successfully loaded. Do this by connecting your development board directly to your computer. Depending on your board’s jumper configuration, this will be done through the UART0 DB9 port or through the micro USB jack. If all goes well, after some initial initialization and connection information, you should see the “Publish Success” messages periodically scroll by, as is shown in Figure 19 below:
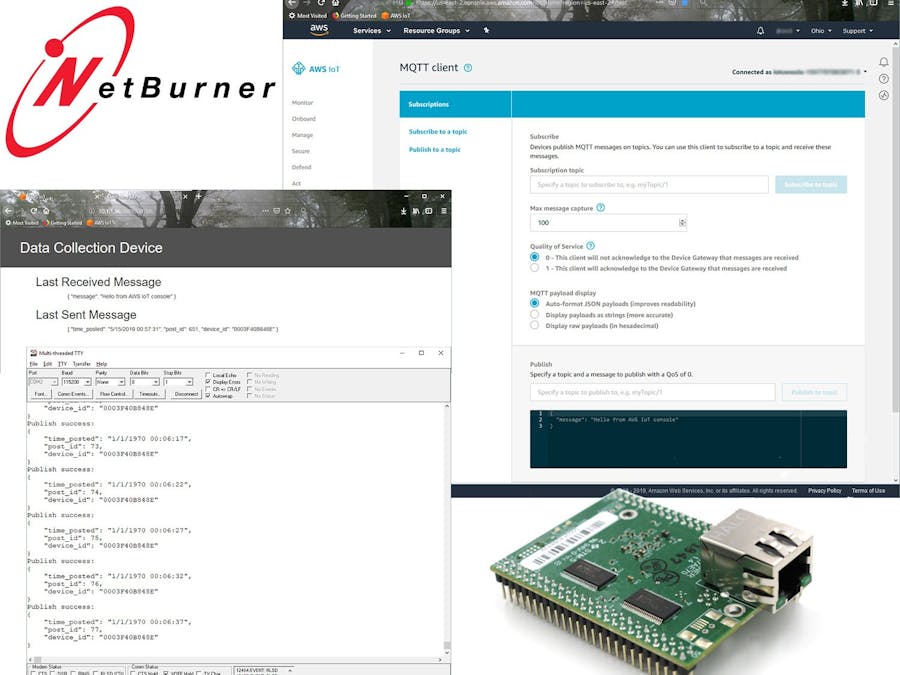
Now comes the moment you’ve been waiting for. It’s time to send and receive messages to the AWS IoT Core service using the MQTT protocol with your NetBurner module. For this next set of steps, we are going to need to head back over to the AWS IoT Core management console. This time, however, we are going to select “Test” from the left hand menu, which should take you to a console similar to that shown in Figure 20.
In our self proclaimed genius, we have cleverly named the MQTT topic being used to post from the NetBurner module to AWS as, “NBTutorial/ToAws”. Go ahead and enter this (without the quotes) in the “Subscription topic” field, and hit the button labeled “Subscribe to topic”.
If all goes well and your device is running, you should see MQTT messages start to show up in the bottom portion of the window, as we see in Figure 21. If not, go back and look at the “Optional (and Recommended) Step” above, and verify that your device is properly initializing the AWS SDK in the serial terminal. Also verify that port 8883 isn’t block on your firewall, as this is the default port for MQTT and restricting it will prevent your NetBurner device from being able to communicate with AWS. Finally, verify that the Resource ARNs in the policy we created above all properly end in the (*).
Next we want to see if our device has successfully subscribed to a channel. In the same AWS console click on the link, “Publish to a topic”, located on the secondary left menu under the heading, “Subscriptions”. The bottom portion of the console where we saw the NetBurner device’s messages coming in should be replaced by a small box titled, “Publish”. It should contain a text field for the topic, as well as a text field for the message to send, and finally a button labeled, “Publish to topic”. This can be seen below in Figure 22.
For this topic, enter, “NBTutorial/ToNb”. This is important as it is the topic that our application is looking to receive messages on. You can leave the message as the default value which is “Hello from AWS IoT console, ” or you can modify to fit your fancy. Notice, though, that it follows a JSON format.
Go ahead and hit that magic button on the side (“Publish to topic”) when these fields have been filled out. If you happen to be connected directly to your device through UART0, look for your message to show up in the serial terminal as we’ve outlined it below in Figure 23.
You can also view the very last message that was sent and received on the device from a web browser if you’re not a fan of serial terminals or don’t have a serial to USB adapter. To do this, open your browser of choice and enter your device’s IP address in the URL bar at the top. Again you can the IP address using the URL, https://discover.netburner.com/. Putting this IP address in your browser will direct you to a simple webpage hosted from the NetBurner module that displays the most recent messages sent and received, as shown in Figure 24 below.
So far, we have walked through a step by step process of how to get started with Amazon’s AWS IoT Core managed cloud service. To do this, we used the lightweight MQTT messaging protocol and a NetBurner development kit as the IoT device. While we covered all of the base requirements from start to finish, we also glossed over an awful lot concerning the actual application running on the NetBurner module. Now, we’re going to look at the functionality of the overall application, review the source code and get up close and personal with the individual bits that do the dirty work. We’ve included a substantial part of the application, but if you want the truly immersive experience, you can find the GitHub repo for the project here.
Source Code ReviewOur project contains several source files, the AWS SDK, and an html folder that includes the index.html we use in our web interface. We will concern ourselves mostly with the six .cpp files directly in the src folder (shown above in Figure 25), their associated header files, and a configuration header file. The following is a brief description of each of these:
main.cpp – This is the starting point of the application. It defines the application name, AWS IoT Core Base, and provides the entry point for our program with UserMain(). More on this bit later.
post-record-data.cpp – This file contains the functions that initialize the AWS SDK, and handles processing both incoming and outgoing MQTT messages.
network_netburner.cpp – This file contains the functions that are required to implement the networking interface for the AWS SDK API and ties it to our networking stack. These are all exclusively related to the TLS network connection.
timer_netburner.cpp – This file contains additional functions that are required by the AWS IoT Core MQTT client, and are related to the timer functionality that is used to manage the MQTT connections.
record-data.cpp – This contains a small function that serializes the JSON data used in the MQTT messages.
html-control.cpp – This file contains two functions used to build the HTML page that displays the most recently sent and received MQTT messages, as shown below.
aws_iot_config.h – This file has all of the config constant values that we need to connect to our service and publish/receive messages. As mentioned before, you will want to change both AWS_IOT_MQTT_HOST and AWS_IOT_MQTT_CLIENT_ID to values that are specific to your account and environment.
Let’s turn our attention to the entry point of our application, UserMain(), found in main.cpp. Inside UserMain(), you will see calls to the following functions, more or less in the given order, before we hit our main while() loop:
init()– This function sets up the network stack for the application, starts the configuration server, gives UserMain() the correct task priority, and sets up a few debug details. If you happen to forget this in your application, you will know very quickly.
StartHttp()– This kick-starts the webserver on the device. It couldn’t be easier.
InitializeAWSSDK() – This does pretty much exactly what you would expect. It sets up the AWS SDK and takes care of the initial MQTT setup. We’ll dive into this a bit more below.
After everything is initialized, we will enter our main while loop, where you will see the following bit of code:
while (1)
{
    // Post our record data
    PostRecordData();
    // Wait 5 seconds before doing it again
    OSTimeDly(TICKS_PER_SECOND * 5);
}
In true embedded systems fashion, we will continue to run our while() loop indefinitely. Every five seconds we will make a call to PostRecordData(), which will post a message to our subscribed MQTT topic, defined as gTopicNameSend in post-record-data.cpp.
As mentioned above, initializing the AWS SDK for IoT Core services takes place in InitializeAWSSDK(), found in post-record-data.cpp.
InitializeAWSSDK()
{
    IoT_Error_t rc = FAILURE;
    IoT_Client_Init_Params mqttInitParams = iotClientInitParamsDefault;
    IoT_Client_Connect_Params connectParams = iotClientConnectParamsDefault;

    iprintf("\nAWS IoT SDK Version %d.%d.%d-%s\n", VERSION_MAJOR, VERSION_MINOR,
    VERSION_PATCH, VERSION_TAG);

    // Set required MQTT parameters
    mqttInitParams.enableAutoReconnect = false;
    mqttInitParams.pHostURL = AWS_IOT_MQTT_HOST;
    mqttInitParams.port = AWS_IOT_MQTT_PORT;
    mqttInitParams.pRootCALocation = "";
    mqttInitParams.pDeviceCertLocation = (char *) certificate;
    mqttInitParams.pDevicePrivateKeyLocation = (char *) privatekey;
    mqttInitParams.mqttCommandTimeout_ms = 30000;
    mqttInitParams.tlsHandshakeTimeout_ms = 10000;
    mqttInitParams.isSSLHostnameVerify = true;
    mqttInitParams.disconnectHandler = nullptr;
    mqttInitParams.disconnectHandlerData = nullptr;

    rc = aws_iot_mqtt_init(&client, &mqttInitParams);
    if (SUCCESS != rc)
    {
        iprintf("aws_iot_mqtt_init returned error : %d ", rc);
        return false;
    }

    connectParams.keepAliveIntervalInSec = 600;
    connectParams.isCleanSession = true;
    connectParams.MQTTVersion = MQTT_3_1_1;
    connectParams.pClientID = AWS_IOT_MQTT_CLIENT_ID;
    connectParams.clientIDLen = (uint16_t) strlen(AWS_IOT_MQTT_CLIENT_ID);
    connectParams.isWillMsgPresent = false;

    iprintf("Connecting...\n");
    rc = aws_iot_mqtt_connect(&client, &connectParams);
    if (SUCCESS != rc)
    {
        iprintf("Error(%d) connecting to %s:%d\n", rc, mqttInitParams.pHostURL, mqttInitParams.port);
        return false;
    }

    rc = aws_iot_mqtt_autoreconnect_set_status(&client, true);
    if (SUCCESS != rc)
    {
        iprintf("Unable to set Auto Reconnect to true - %d\n", rc);
        return false;
    }

    iprintf("Subscribing to topic: %s, %d\n", gTopicNameRec, strlen(gTopicNameRec));
    rc = aws_iot_mqtt_subscribe(&client, (char *) gTopicNameRec, strlen(gTopicNameRec), QOS1, IoTSubscribeCallbackHandler, nullptr);

    if (SUCCESS != rc)
    {
        iprintf("Error subscribing : %d\n", rc);
        return false;
    }

    return true;
}
Near the top of the function, you will see the parameters getting set for the call to aws_iot_mqtt_init(). You should be okay with sticking to the values we’ve provided. However, for the exceptionally curious, you can find out more about each one from the official AWS API documentation, here.
Assuming the MQTT initialization function is successful, we will then set up our connection parameters and pass them into the function, aws_iot_mqtt_connet(). As you might guess, establishes a connection to the AWS IoT Core service. Again, you should be okay with the values we set, but you can find more information on what these represent here. If we’re able to successfully set up a connection, we follow it up with a call to aws_iot_mqtt_autoreconnect_set_status()which includes a parameter of true. This will make sure that we automatically reconnect if our connection fails for some reason.
Finally, we subscribe to our topic with a call to aws_iot_mqtt_subscribe(). The topic that we will subscribe to is gTopicNameRec, which is defined at the top of post-record-data.cpp. We also pass a pointer to the function that is called when we receive a message, IoTSubscribeCallbackHandler().
Now that we’ve established a connection to the AWS IoT Core service, we are ready to start publishing messages using the MQTT protocol. As we mentioned before, we will post a new message once every five seconds from our UserMain() function with a call to PostRecordData(), which is defined in post-record-data.cpp.
void PostRecordData()
{
char buffer[200] = { 0 };
CreateOutMessage(gJsonOut);
gJsonOut.PrintObjectToBuffer(buffer, 199, false);
IoT_Publish_Message_Params paramsQOS1;
paramsQOS1.qos = QOS1;
paramsQOS1.payload = (void *) buffer;
paramsQOS1.payloadLen = strlen(buffer);
paramsQOS1.isRetained = 0;
IoT_Error_t rc = aws_iot_mqtt_publish(&client, gTopicNameSend, strlen(gTopicNameSend), ¶msQOS1);
if (SUCCESS != rc)
{
iprintf("Error publishing : %d\n", rc);
}
else
{
iprintf("Publish success:\r\n");
gJsonOut.PrintObject(true);
iprintf("\r\n");
}
}The first thing you’ll notice we do is call CreateOutMessage(). This builds our MQTT payload and stores it in gJsonOut, which is a ParsedJsonDataSet object. We save this globally so that it can be referenced and displayed via a webpage served up by our module. The contents of the record are a timestamp of when the message was created and a static id that is incremented whenever the function is called. The record is defined by the class PostRecord and is serialized into gJsonOut along with the device id, AWS_IOT_MQTT_CLIENT_ID.
With our payload correctly structured, we dump it into a buffer before setting up our IoT publish parameters.
Receiving MQTT MessagesAs mentioned before, our call to aws_iot_mqtt_subscribe() during our initial setup subscribed us to the topic, gTopicNameRec. One of the parameters to that function, IoTSubscribeCallbackHandler, provided the handler to the function that will be used to process incoming messages.
void IoTSubscribeCallbackHandler(AWS_IoT_Client *pClient, char *topicName, uint16_t topicNameLen, IoT_Publish_Message_Params *params, void *pData)
{
    iprintf("Received Message:\r\n");
    ParsedJsonDataSet jsonIn = ParsedJsonDataSet((char *) params->payload, (int) params->payloadLen);
    jsonIn.PrintObject(true);
    iprintf("\r\n");

    jsonIn.PrintObjectToBuffer( recJson, 256, true);
}
We know what the signature of the function should be because Amazon is kind enough to give us a pretty good breakdown in their API documentation. The function itself is very short, as we simply take the payload data from the MQTT message, and use it to construct a ParsedJsonDataSet object. We then stash the contents of that object into a buffer so that we can serve it up on the webpage and show what the last message received was.
We’ve taken advantage of NetBurner’s ability to generate dynamic web content to display the most recently received and published MQTT messages. To do this, we defined two functions in html-control.cpp that will print the data to the webpage before it served to the requesting browser from the device. These are PrintOutData() and PrintInData().
Specially formatted comments in index.html trigger these functions, and they have the structure,. This makes it very easy to display any sort of application-level data through the web interface. We have extensive documentation on this system and include several fully functional examples with our NNDK.
Implementing the AWS SDK DependenciesOf course, there has to be a way for the AWS SDK to tie into the NetBurner platforms and networking stack. There are two interfaces provided by the SDK that we use here: the network interface and the timer interface. As mentioned above, the functions for these interfaces are defined in network_netburner.cpp and timer_netburner.cpp respectively.
The network interface provides all of the TLS functionality for initiating and closing secure connections, as well as reading and writing data over those connections. The timer interface provides the timeout functionality required to keep the MQTT connections alive and kicking.
The functions for both of these interfaces were required before we could connect to the AWS IoT Core service and start sending and receiving MQTT messages. If you followed the instructions from the beginning on generating and compiling the certificate and private key, there shouldn’t be any need to modify the functions implemented here.
Wrapping UpWe hope you found this project entertaining and educational. We had a lot of fun making it, and would love to hear about your experience too! We’ve provided a solid foundation here, but this is truly just the beginning of where this particular project can go. The sky is the limit so go out and start experimenting!
If you are interested in an in-depth explanation these two Netburner articles have more information.


Comments
Please log in or sign up to comment.