


Hardware components | ||||||
| × | 1 | ||||
| × | 2 | ||||
| × | 1 | ||||
| × | 1 | ||||
| × | 1 | ||||
| × | 1 | ||||
| × | 4 | ||||
| × | 4 | ||||
 |
| × | 8 | |||
 |
| × | 1 | |||
 |
| × | 1 | |||
| × | 1 | ||||
| × | 1 | ||||
| × | 1 | ||||
 |
| × | 1 | |||
 |
| × | 1 | |||
 |
| × | 1 | |||
 |
| × | 1 | |||
 |
| × | 2 | |||
 |
| × | 1 | |||
| × | 1 | ||||
Software apps and online services | ||||||
| ||||||
| ||||||
Hand tools and fabrication machines | ||||||
 |
| |||||
 |
| |||||
 |
| |||||
| ||||||
| ||||||
 |
| |||||
| ||||||
At the beginning of the semester, my ENGI 301 class was assigned a project. While we were going over expectations and grading and all that fun stuff, a thought flashed across my mind: "Did I take my pills this morning?" And that's when I knew what my project would be. I, as well as many other people, take daily medication. Worrying about whether you took your pills, or if you took the right amount of pills, can be distracting: see my experience in class. So I decided to make a project that would ensure that you take your pills, as well as reminding you whether you have taken them.
OverviewThe PocketBeagle Medication Dispenser consists of a laser-cut wooden box that houses a conveyor belt with seven pill boxes on it (one for each day of the week). There is a cut out dispensing area in the front with an IR break-beam system on the sides. When you put your hand into the dispensing area (and break the IR beam), a servo motor will move the conveyor belt forward and deposit the contents of the pill box into your hand. The system will only dispense pills if it has not done so today. Once all pills have been dispensed, it will rewind itself for easy refilling.
FunctionalityWhen you put your hand inside, the conveyor belt moves forward. If you do this again after 10 seconds, the conveyor belt will move forward again.
If you try to reach in before 10 seconds have passed since the last time you tried, the belt will not move, and you'll get a message on the display: "You already took today's dose."
Once all 7 boxes have been emptied, the display will show "Time to refill!", and then the conveyor belt will move backward until the boxes are back in their starting position.
If you have not reached in within 1 minute, a message will pop up reminding you to take your pills:
ConveyorBelt
To make the conveyor belt, I cut out a length of ratchet strap that was a few inches over 24”. I then looped it so the length when folded over into a loop was 12”, then super glued the overlapping ends.
Once the conveyor belt was mounted, I 3D printed 7 pill boxes. I attached Velcro strips to the bottom of the boxes, and put more Velcro strips on the conveyor belt. These were spaced so that the boxes would fit closely together, with about 1/10” to ¼” in between each.
Note: I first tried using actual conveyor belt material, but it was too rigid. Even with increasing friction by adding rubber bands to the front dowel and putting strips of hot glue on the inside, it wouldn’t move when the dowel turned. It also wouldn’t stretch out enough to actually lay flat. The ratchet straps, on the other hand, are lightweight and don’t require a lot of force to make them taut.
Box
To make the box, I used Makercase to create a.SVG file for an open-top box with finger joints. I then modified the file in Illustrator to add in holes for the dowels and a cutout for the servo motor. The front piece also had a rectangle cut out for the display. I sent the.ai file to a laser cutter to cut the box sides out from 1/8” thick plywood. (Note: you might have to play around with the kerf setting if the sides fit together loosely.)
The servo motor was mounted by using a cordless drill to drill 4 pilot holes with a 1/8” bit around the corners of the hole for the motor, then screwing in #2 ¾” screws.
The dowel was superglued onto the circular shaft attachment, then a ring of hot glue was applied.
The IR emitter and receiver were mounted to the inside of the front of the box with double sided tape. They were taped 3” from the bottom of the box.
The display was mounted onto the piece of wood that goes on the front, similarly to the motor, with #1 ½” screws. (Due to spacing issues caused by the wiring, the front piece was left outside of the box.) Each screw was capped from the inside with either a #2 or #1 hex nut, respectively.
Electronics
This project uses a PocketBeagle running the Python code in the code section. The PocketBeagle connects to the servo motor, the IR emitter and receiver, and the LCD display. It is powered from a computer via a microUSB to USB cable. The wiring is as follows:
Servo:
Brown (gnd) to gnd on Pocketbeagle
Red (5V) to red alligator clip (also black alligator clip to gnd)
Orange (signal) to P1_36
Note: the servo can be powered by the 5V power rail, but sometimes it will overload the system and cause the PocketBeagle to turn off. Because of this, I used a 5V wall outlet power supply that ended in alligator clips (like this one).
Display:
Pin 1 on display -> GND
Pin 2 -> 5V
Pin 3 -> middle pin of potentiometer
Pin 4 -> P1_2
Pin 5 -> GND
Pin 6 -> P1_4
Pin 11 -> P2_18
Pin 12 -> P2_20
Pin 13 -> P2_22
Pin 14 -> P2_24
Pin 16, 17 or 18 -> GND (switching pins determines which color backlight shows)
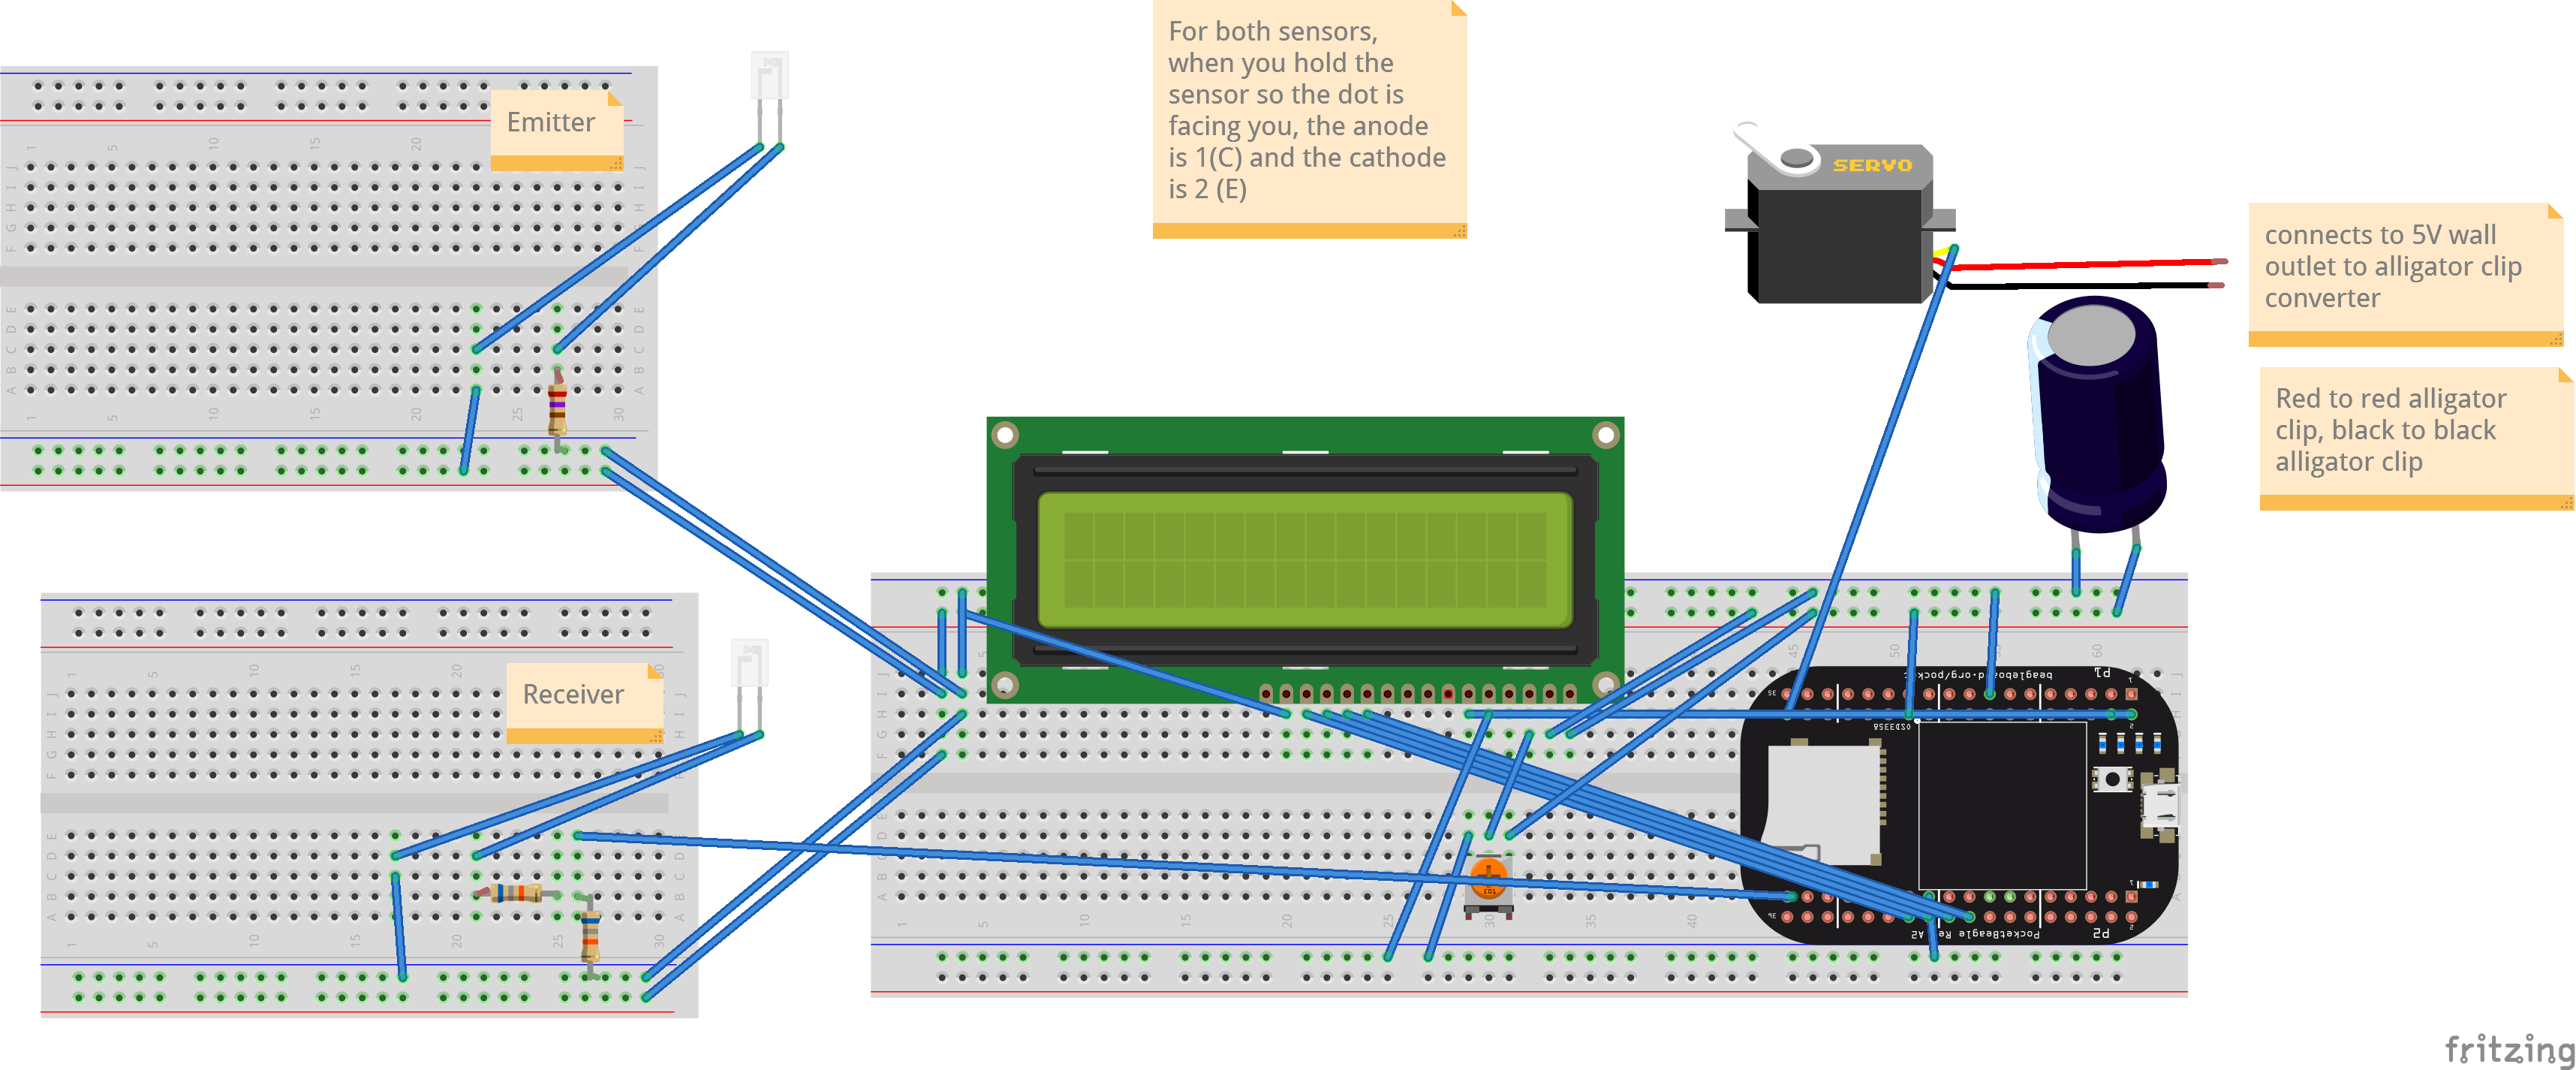
For the IR emitter and receiver, they each needed their own breadboard. Each breadboard had 5V power and GND from the Pocketbeagle. The emitter's circuit had a 270 ohm resistor, and the receiver used two 68k ohm resistors set up as shown in the Fritzing diagram below:
This project is powered by a PocketBeagle, and it runs on one Python file, linked here. More discussion of the code can be found in my Github repository's Readme.
FutureWork
Firstly, the wiring needs to be cleaned up. Currently, the wires are a mess, making it hard to follow where exactly each wire leads to. Three breadboards are needed right now, which prevents it from fitting inside the box. Also, the wiring for the display takes up too much space inside to fit it into the front. Ideally, if the wiring were turned into a PCB, it would drastically decrease the space needed, and all parts would be able to fit inside the box.
The spacing of the boxes is another issue. Since the Velcro is glued to the conveyor belt, it can't be moved around. Furthermore, the strap often catches where the two ends are folded over each other. As a result, the boxes don't always line up in the same position after the refill - sometimes one of the boxes is still on the underside. This would best be fixed by altering the moveFwd and moveBack functions to run for a more accurate interval.
The IR components could also be improved by adding a lid or something that will prevent them from being influenced by ambient light. This way, the threshold for what counts as being "blocked" won't have to be changed in each environment.
Finally, another improvement would be the ability to change the amount of time between doses. The code is currently set so that a “day” is 10 seconds, and the pill reminder message displays at 60 seconds. It would be nice to have the user set the intervals without having to go into the code. Since this would probably require a UI of some kind, this is probably an idea for further down the road.


_3u05Tpwasz.png?auto=compress%2Cformat&w=40&h=40&fit=fillmax&bg=fff&dpr=2)
Comments
Please log in or sign up to comment.