

Hardware components | ||||||
| × | 1 | ||||
| × | 1 | ||||
Hand tools and fabrication machines | ||||||
 |
| |||||
This is a follow-up to my original article which I posted here: https://www.hackster.io/scottpowell69/foldable-3d-printed-drone-368ec7
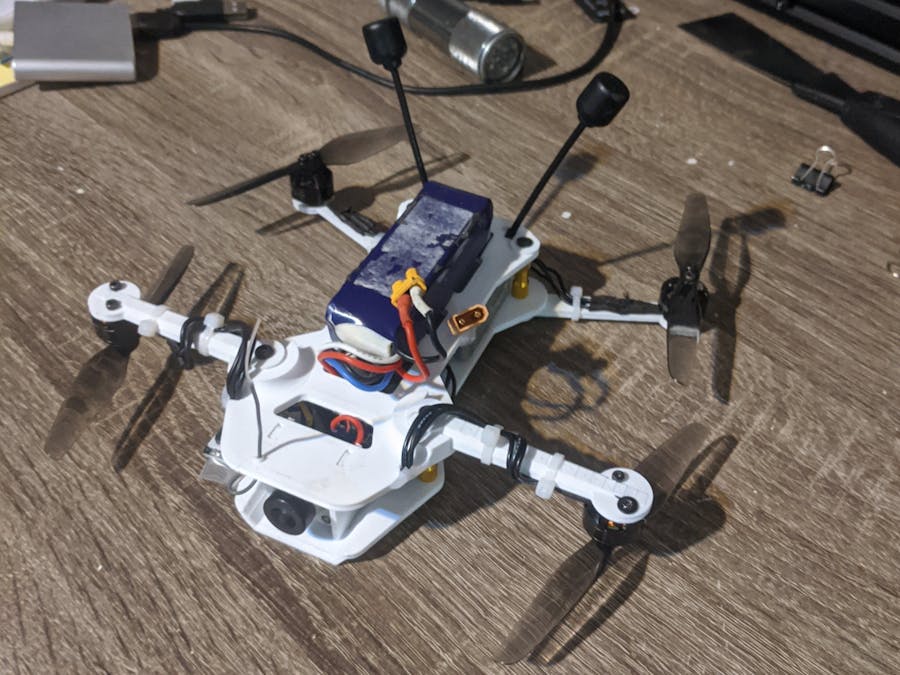
I have redesigned the drone frame from scratch especially for the DJI Digital FPV system. It has the same basic design, although it is kind of flipped upside down now (for various reasons).
I have used the same motors and other drone components, so please refer to the original article for my suggestions. (note, you won't need the Caddx Turtle camera, and video transmitter)
Some SpecsAll up weight: 230 grams
Flight time: about 15 minutes
Just go to thingiverse and download the STL files: https://www.thingiverse.com/thing:4357656
The default print settings are fine for this build. I used Cura for the slicing, at 20% infill, 0.2mm layer height. If you want slightly better strength/quality, you can try 0.15mm, and 25%. I use PLA Plus filament from https://3dfillies.com/
The arms are identical, so just print 4x these. Also, print 2x the CamPost parts (the camera posts).
The assembly is very easy. Please refer to the original article about the main bolts which hold it all together. All up you'll need 8x M3 bolts, and 10xM2 bolts.
WiringI recommend attaching all 4 arms to the standoffs and just the bottom deck of the frame, and install the 4-in-1 ESC and motors, so that you can cut the motor wires to correct length. NOTE: leave some extra length to allow for when the arms are folded! Depending on how you route the wires, this can mean the wires will be pulled up to about a centimeter as the arms fold. Also, you need to keep the wires away from the parts of the arms and frame where they swing in towards the frame. If the wires get pinched when folding, over time they could result in a motor failure.
I found it useful to route the rear motor wires underneath the frame, like this:
IMPORTANT: to prevent the arms gradually folding inwards during flight, you MUST mount the propellers in the reverse direction, and configure Betaflight like below:
Just use some double-sided tape to keep the unit in place towards the rear. Attach the two antennas first to get an idea how far back you will need to place the unit, as the antennas slot into two specially designed cut-outs at the rear of the frame. Once in place, you then place the Antenna-holder part on top and insert the two rear bolts:
The camera is installed by using two M2 bolts and two of the CamPost printed parts, like so:
Since I made my one I have made some small improvements, like the slot in the TopDeck for an XT30 connector:
It's super important to keep the main battery leads from getting into the props!
The ResultsIf you are into FPV and haven't tried the DJI digital system, I can't recommend it enough. It is a real game changer and a much more vivid flying experience. I really love flying this little guy. It's a heap of fun and so portable, plus you get HD cinematic recording!
DonateIf you find this project useful and feel like throwing some Bitcoin my way, I'd be really grateful:
My BTC address: 1CspaTKKXZynVUviXQPrppGm45nBaAygmS


Comments
Please log in or sign up to comment.