For almost all working professionals it becomes really necessary to keep track of time when completing tasks and perform actions like switching a light ON OFF from his/her desk. To solve this problem a small cube is devised wherein just by changing the orientation of the cube kept on a table, the person will be able to:
1) Set timers just by placing the cube on his/her table on different sides of the cube and get alerts in terms of light and sounds after the timer elapses.
2) Trigger events like turning a light ON OFF based on the orientation of cube on the table.
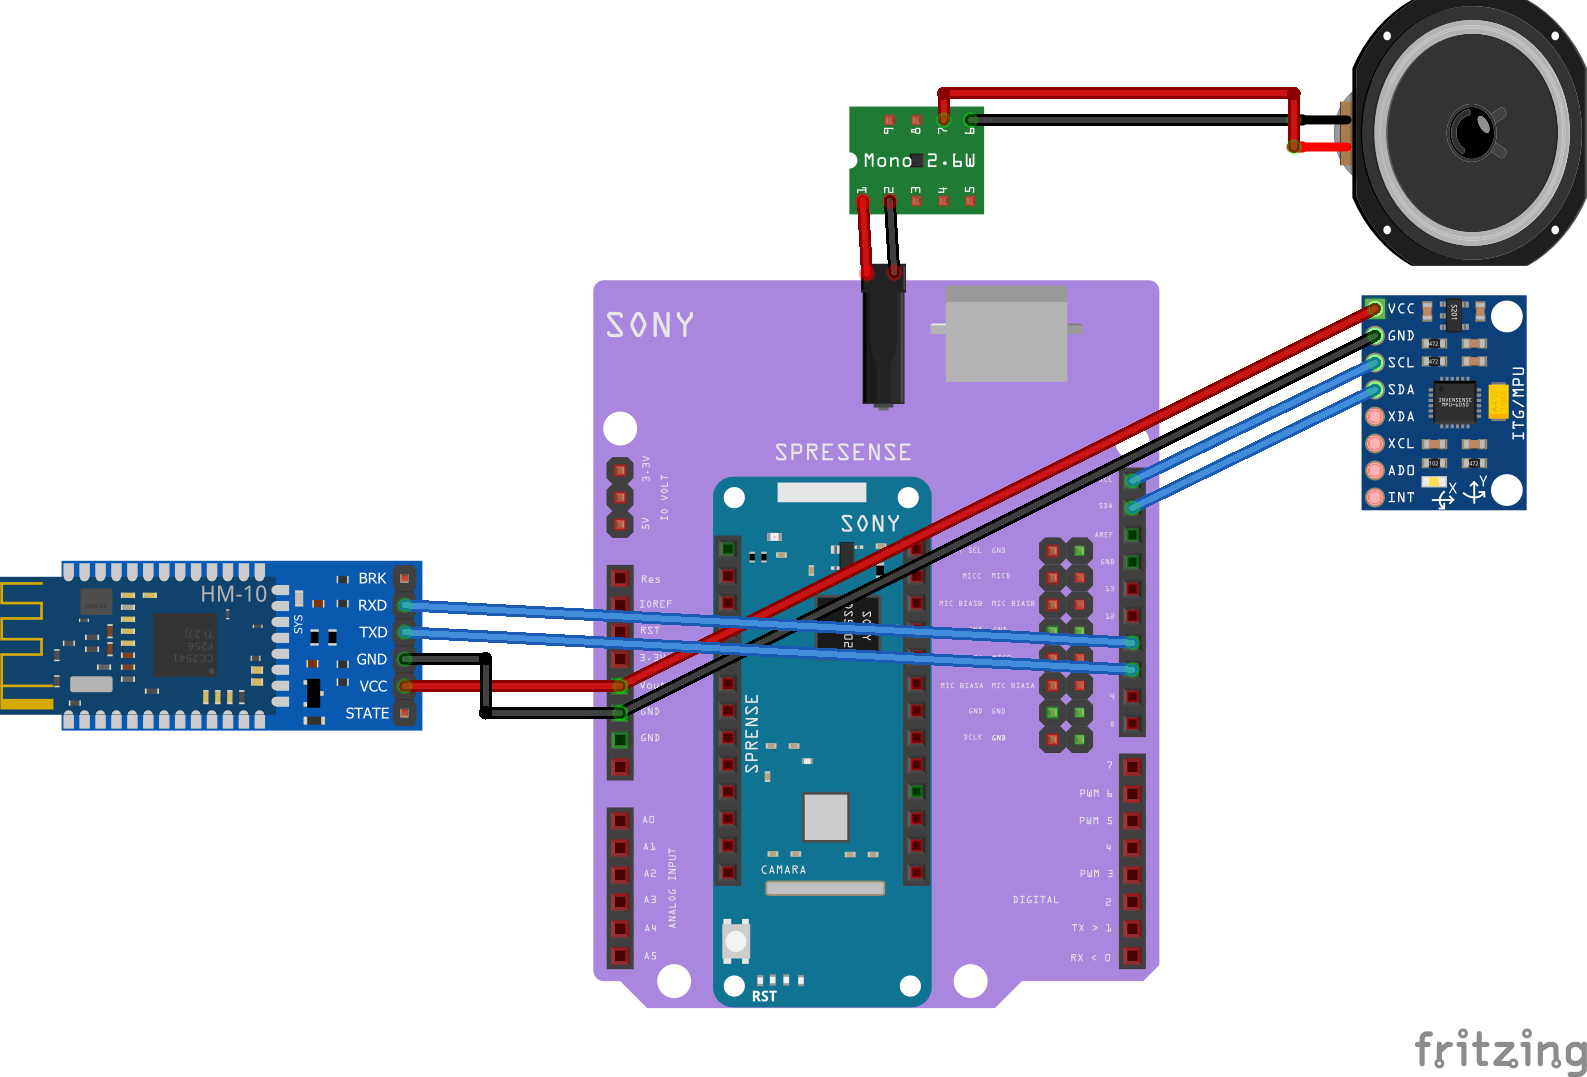
HardwareThe heart of the device is a Sony Spresense microcontroller. IMU sensor MPU6050 is used to provide the sense of orientation for the cube which is connected to the Sony Spresense on I2C lines. An action like timer is completed using the multicore Spresense microcontroller itself or sent via bluetooth to a phone to trigger external events like switching a light On OFF. For alerts a generic LED is being used along with a speaker on the cube itself which will speak out after the action is completed. All electronics inside the cube are powered using a 3.7 V 1000mAh Lithium Ion Polymer battery.
Flow ChartThe flow chart below explains the basic working principle of the cube. Actions are triggered based on the change in orientation of the cube.
The main peripherals that were required for building the cube are: Audio, GPIOs, I2C, UART.
Sony Spresense was a perfect match as it had inbuilt audio codec, many GPIO pins and all peripherals required for building the sense cube. I have used the Spresense Extension Board along with the Main Board in this project.
Power
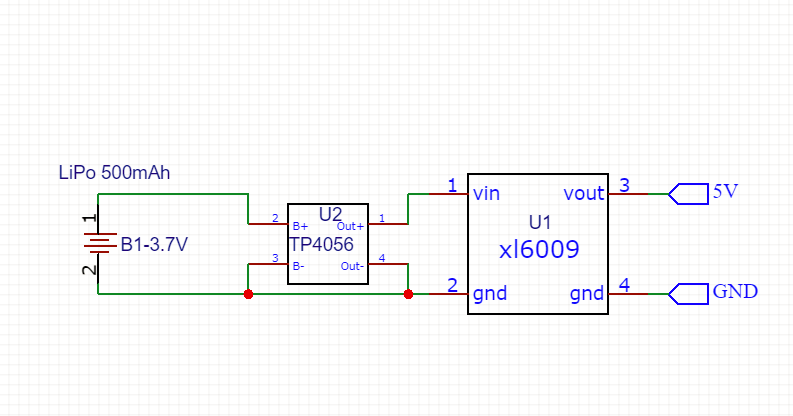
For Powering the cube a 3.7 V Lithium Poymer Battery of 500mAh is used along with a charging circuit TPA4056. Since 5V is required for the Sony Spresense Extension board and other modules, a boost converter called XL6009 is used.
The boost converter has adjustable output voltage range from 5 V to 35 V. So using a screwdriver the potentiometer is adjusted to provide 5V.
Selecting a suitable housing
Since the device would be cube shaped a 3D printer can be used to build the cube. I used a cardboard to make the cube since It was very flexible for me to make modifications to it and shows the simplicity of building this device. Each side measuring 8.5cm.
Audio
Since the cube requires audio to be played, although Spresense has enough power to drive a speaker directly, I have used a small audio amplifier PAM8403 to further amplify the sound.
Peripherals
MPU6050 is a accelerometer gyro combination sensor. For sensing the orientation of the cube we are using the accelerometer data only. The module is connected to the Spresense board on the I2C lines. Bluetooth is used to communicate with any other external device like a phone to take new inputs for triggering new actions. Bluetooth Module AT 09 is used for this purpose and connected to the Spresense board on the UART lines.
Putting it all together
So all the electronics are put into the cube shaped housing using glue. Also on each side holes are made to identify the a particular side. It is distinguished based on the number of holes on each side. All of the components and modules perfectly fits in a box of dimensions 8.5cm on each side.
After placing all the components and modules it is powered ON and housing is closed. The hardware part of our cube is completed.
The code for the cube is written using the Arduino IDE platform. The getting started guide released by Sony for Spresense is helpful to understand how to code using the Arduino IDE.
The link https://developer.sony.com/develop/spresense/developer-tools/get-started-using-arduino-ide/set-up-the-arduino-ide has step by step guidelines on how to use Arduino IDE for Sony Spresense Board.
Audio was loaded on the SD card in MP3 format and the Audio MP3 Decoder, Audio MP3 Decoder library was being installed on the SD card using the Arduino IDE itself.
The code uses various libraries like wire.h for I2C communication with the MPU6050 module, software serial library for Bluetooth communication and audio libraries for playing audio from Spresense.
The below video shows the working of the cube:
The above video illustrates how the intelligent wireless sense cube can be used to set simple timers. As soon as the orientation of the cube is changed a action is triggered which is starting the timer. As soon as the time elapses, a time up indication is made by playing a 'time up' sound using the Spresense board onboard audio jack connected to a speaker and blinking of the LED's.
The actions are hard coded for the demo but can be created using a mobile app for customized actions such as setting the timer time.
The cube communicates with the wireless light through bluetooth to switch it ON or OFF. For this purpose bluetooth was connected to a arduino and a relay to switch the light ON and OFF.
The video illustrates how a action like switching a light ON or OFF can be done just by changing orientation of the cube on a desk.


Comments
Please log in or sign up to comment.