


We think that there is a lack of simple solutions available and we are repeatedly experiencing the following problems:
- PLCs are hardly to connect to the internet
- No internet infrastructure on site available
- Programming required
- Expensive components
And once you have connected a PLC to the Internet, what do you do then? How do you get the data? Where do they end up and how do I make them available to my customers?
We provide a simple and inexpensive solution for this!The Datacake Industrial IoT Gateway is turnkey hardware for the digitization of industrial sensors and signals. Thanks to cellular communication based on the awesome Particle.io Infrastructure and a customized IoT platform, the measurement data of the connected sensors are available digitally on the platform after only a few minutes.
Technical Background
In the current version, we use the brand new B523 module from Particle.io. The reason for this is that we are mainly on the European market and we have very different coverage with mobile telephony in these regions. There are many different providers and everyone uses their own technology.
Particle's B523 solves this problem because it has a modem from Quectel, which has three different network technologies:
- LTE CAT 1
- 3G / UMTS
- 2G
At the same time, it comes with a SIM card from Vodafone. Previous modules like E Series and Electron had cards from Telefonica and these were unfortunately not very reliable in the EU.
And this is how it worksStep 1 - Connect Sensors
As a first step we will now connect sensors to the Gateway. The following inputs and outputs are available for this purpose.
- 6x 4-20mA (15 Bit)
- 8x Digital Input with 2 kHz Edge Counters
- 4x Digital Outputs
- 3x PT100
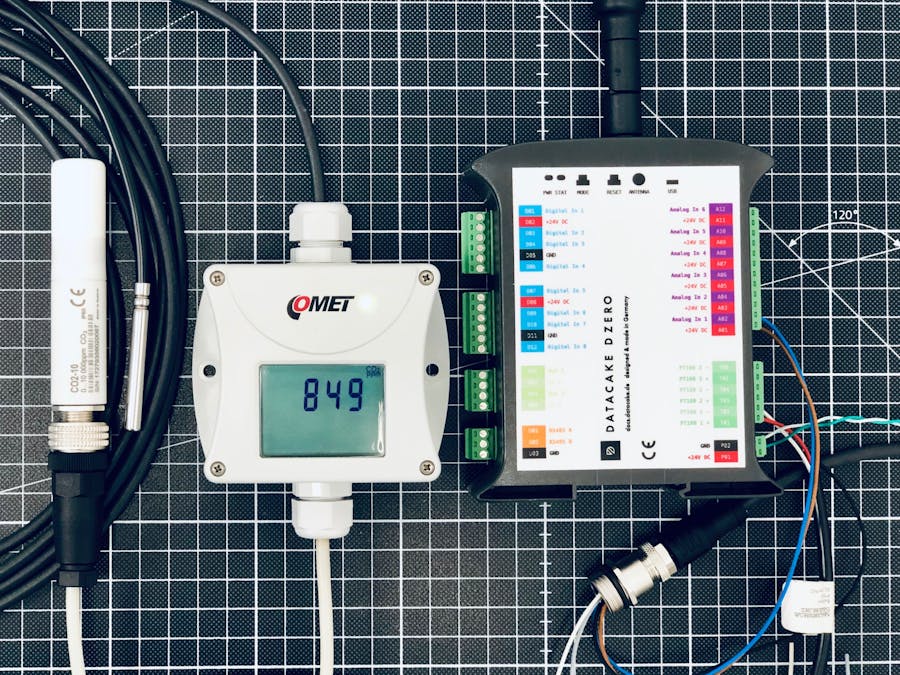
We decide to use a 4-20mA transmitter for CO2 and connect it to the terminal block of D Zero.
Integrated Sensor Power Supply
A great advantage of the Industrial IoT Gateway is that the supply voltage for the sensor is provided directly by the module. This reduces the cabling effort. We have realized this at the request of a customer. Thus 4-20mA sensors can be connected to the Gateway without the need for additional terminal blocks.
Step 2 - Register the Device on Datacake Platform
In order to use the module, registration on the Datacake platform is required. After successful registration, a workspace is created on the platform to which devices such as the gateway can be added.
On the back of the module, there is a sticker on which the serial number of the module has been printed. By entering this number the module is added to the portal.
After the module has been added, the view of the portal immediately changes to the dashboard of the IoT Gateway. This is a standard dashboard that displays all inputs and outputs.
This dashboard can be customized, but for the first start, it is sufficient that we use this dashboard.
Step 3 - Power it up
For the start-up, only the external antenna must be connected and a +24V DC power supply must be provided. Once this is done, the gateway automatically connects to the associated Datacake platform via the mobile network.
Some of you will recognize this lighting pattern - yes, the Datacake Industrial IoT Gateway is based on the Particle.io modules.
Initial Configuration
Once the connection is established, the gateway exchanges the initial configuration with the cloud. This configuration determines:
- How often should an input be queried?
- Does a change have to be made for transmission to take place?
- How large must this change be?
- Should the transmission take place immediately if the change is too large?
No programming required
The configuration of the Gateway can only be set via the platform and does not require any further programming of the module via external programming interfaces and can also be adapted at any time.
The first values
Immediately after the connection is established and an initial configuration is exchanged, the gateway starts transmitting the measured values.
This is the default setting:
- Transmission of the measured values every minute
- Immediate transmission in case of a change of +/- 0.5mA
All these values can later be individually adapted to the respective application situation.
You should now see the following:
Step 4 - Create Sensor Mapping
The currently connected CO2 sensor transmits its measured value as a 4-20mA signal. This signal must be converted into a corresponding measured value range for displaying the correct CO2 value as PPM.
The Datacake platform offers mapping fields for this purpose, which can be used to convert a range of measured values into any other range.
For this purpose, we navigate via the portal to the configuration of the device. There the respective inputs are listed in a table as a database field. The mapping fields can be created via a context menu.
After creating the Mapping field, the list of database fields now shows an additional field.
Step 5 - Changing the Dashboard
Now we have to assign this mapping field to the dashboards widget. Basically, the dashboards can be customized using a drag and drop editor and can be designed as desired.
For our purpose, we take an already active widget and reassign the value. After that is done, this widget now shows the correct value of the sensor as PPM.
The steps shown above illustrate how easy it is to digitize existing industrial sensors using the Datacake IoT Gateway.
It doesn't matter whether it is a 4-20mA sensor, PT100 temperature probe, or digital input and output. The procedure is always the same.
Create rules for alerting
The Datacake platform offers many additional features in conjunction with the Industrial IoT Gateway, including IFTTT style alerting via a simple rule engine.
This allows you to set limits for inputs (and mapping fields, or fields in general) and determine actions such as sending notifications via SMS or email that are triggered when limits are exceeded.
Local Rules for Automation
A special feature of the Industrial IoT Gateway is that we can create local rules on the device. These can be used, for example, to switch the outputs of the module on or off under certain measured value conditions of the inputs.
These rules run locally on the gateway and are therefore completely independent of the cloud. They can thus be used for alarm signals, etc.
Database viewer
If the IoT Gateway is in operation for a longer period of time, it collects a lot of data. The Datacake platform offers an integrated viewer so that this data can be visualized and used accordingly.
With the help of this tool, individual time ranges and measured value fields (inputs) can be selected and graphically visualized or exported.
- Export as Excel, CSV or JSON file
- Raw data or quantization options
Here are some screenshots:
Cloud-hosted Node-RED (aka Cake Red)
The Datacake platform has a cloud-hosted and managed Node-RED variant that you as a user can integrate into your workspace with a click of the mouse. A separate server will be created for you, on which Node-RED will be installed and a firewall will be installed.
With the help of Datacake Nodes and full extensibility of Node-RED, you can use the Industrial IoT Gateway to use it in your Node-RED flows.
More information here:
https://docs.datacake.de/cake-red/get-started
Availability and further informationThe Datacake Industrial IoT Gateway is available immediately from Datacake for approximately 300€.
Further information about the Gateway and the Datacake platform (which can also be used for LoRaWAN devices or via API) can be found under the following links:


Comments
Please log in or sign up to comment.