


Hardware components | ||||||
 |
| × | 1 | |||
Software apps and online services | ||||||
 |
| |||||
| ||||||
Research & Experimentation with the LoraWAN Dev Kit
This is the 2nd project in the "IoT Into the Wild Contest for Sustainable Planet 2022" which utilizes the LoRaWAN Dev kit.
Here are my notes that I took while following the steps in the getting started guide card included in the kit. The main project Edible Algae Growing Cycle Monitor is my entry into the challenge.
I first intended to include it in that project, but found it to be too long and this way if members are interested they can browse it and it might help someone that is having problems with the Tutorial.
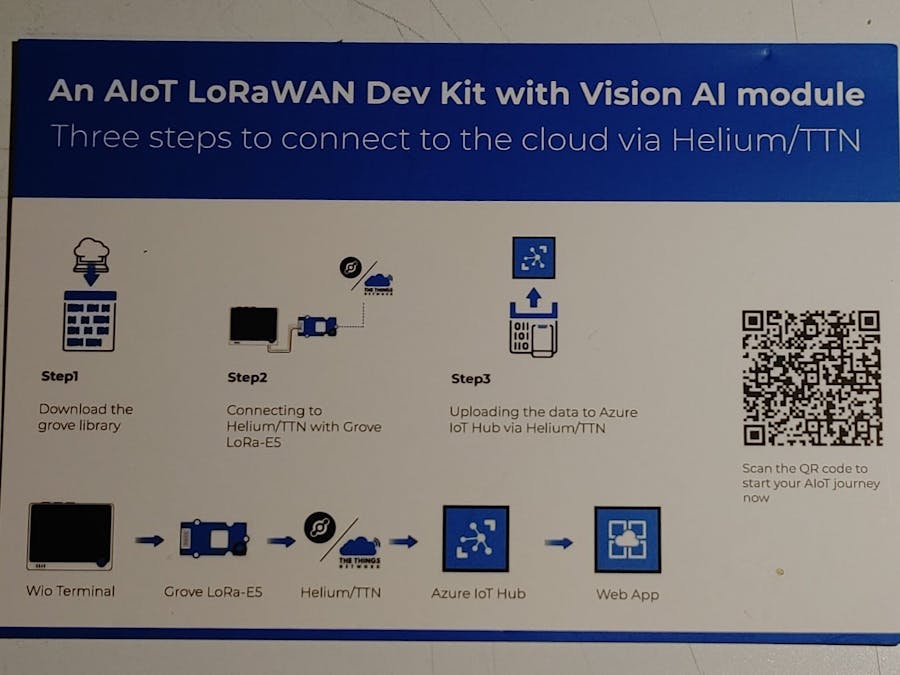
The card indicates 3 steps to do to connect to the cloud via Helium/TTN
1) Download the grove library
2) Connecting to Helium/TTN with the Grove LoRa-E5
3) Uploading the data to Azure IoT Hub via the Helium/TTN
In this blog I was able to get thru 2 of the 3 steps. It took a while but I was able to connect the LrRaWAN through Helium. I was not able to with another project with The Things Network. Due to Time constraints I was unable to complete the 3rd step “Uploading the data to Azure IoT Hub”
The card also indicates the flow of data from the Wio terminal to a Web App running on Azure
1) Wio Terminal
2) Grove LoRa-E5
3) Helium/TTN
4) Azure IoT Hub
I’ve had experience with Azure IoT Hub and Azure WebApps. I have some experience with Lora and was never able to connect to TTN (The Things Network). I was not in range. So it will be interesting to see if I can connect to Helium? If I can’t I’ve read that WIFI is available on the Wio terminal.
There is a QR code that when scanned, will lead you to the following page on the Seed website.
https://wiki.seeedstudio.com/Getting-Started-with-Seeed-Studio-LoRaWAN-Dev-Kit/
1 Getting Started with Seeed Studio LoRaWAN Dev Kit
The Helium network is briefly described in 2 paragraphs. Then an overview section is displayed with what they call a navigation bar with sections.
Navigation bar
The modules are meant to instruct you on each component of the kit. I will follow each module and make notes on my journey
There is a problem with the Second module.
When you click on the “jump to chapter it is a blank page with
This section will cover the preparation before the tutorial starts. This includes preparing the environment for use with Arduino and Wio Terminal.
Since in this tutorial we are going to connect to a nearby LoRa gateway with the help of the Grove LoRa E5. We need to configure the Grove port on the right side of the Wio Terminal as a soft serial port to receive AT commands.
Connect the USB cable to the Wio Terminal
Connect one side of the Groove cable to the Grove Lora E5 and the other end to the Right Groove Connector on the Wio.
Now plug the USB cable into your PC.
Step 1- Install Arduino Software. I already have the ide installed. But if you need to download it you can find it here https://www.arduino.cc/en/Main/Software. I’m using the latest version of the IDE.( 2.0.0-rc9.2)
Step 2 – Launch the Arduino IDE
Step 3 – Add the WIo Terminal to the Arduino IDE. Open your Arduino IDE, click on File > Preferences, and copy below url to Additional Boards Manager URLs:
https://files.seeedstudio.com/arduino/package_seeeduino_boards_index.json
Click on Tools > Board > Board Manager and Search Wio Terminal in the Boards Manager.
Step 4 - Select your board and port. You'll need to select the entry in the Tools > Board menu that corresponds to your Arduino. Selecting the Wio Terminal. The doc neglects to tell you to connect the Wio Terminal to the PC with the USB cable If you don’t do this the COM port does not show up.
In this section the LoRa E5 is described
Some useful links you can reference
The specification of the Grove LoRa E5 AT command can be found here.
More information on the use of Grove LoRa E5 can be found in this wiki.
All libraries and code for this course can be found on the following github repo
https://github.com/limengdu/Seeed-Studio-LoRaWAN-Dev-Kit
You can clone the repo to your own computer for reference and learning.
I cloned the repo to my PC for later use.
Helium is a LoRaWAN network similar to the "The Things Network". I was unable to connect to a TTN node in my location before. I’m wondering if I can with Helium? Yes it turns out I can connect.
Interesting blog Helium LoRaWAN: Public Infrastructure with Private Network Servers, that describes Helium servers.
This section describes how to use the Wio Terminal Light Sensor to acquire data and connect to the LoRa network via the Grove LoRa E5 in preparation for connecting to the Helium/TTN.
A brief description of the mechanics of the light sensor.
Error on the page
“For more information on the use of soil moisture sensors its reference here.”
The link is to the Wio Light Sensor, not the Soil Moisture Sensor
Of course you will need the Wio Terminal and The Groove LoRa E5. You will be using the Wio built in light sensor to gather data to send to the Groove LoRa E5
Get the value of the built-in light sensor of Wio Terminal
This code demonstrates how to use the built-in light sensor as a component in Wio Terminal. The light sensor uses Analog interface and you can simply read the surrounding light sensor values via reading its pin.
You have 2 options in this section to get the sample code
1. Click on the button “Download The Library”
a. This is the Arduino code file for the light sensor example not really the library.
b. Grab the “Get-lightsensor-value.ino”
2. In the code window, click on the “Copy to clipboard” icon in the upper right side.
Now open the Arduino IDE and PASTE the code into a code window
Now if you’re a Arduino IDE user, you know what to do, otherwise refer to Arduino IDE documentation on Verify and Uploading the firmware to your connected device.
OK, now we combine the code from the previous example Get-lightsensor-value.ino and add some Grove LoRa E5 code to connect to the LoRa Network.
The light sensor value obtained, is an integer of less than eight bits. We can determine the content size and format of the data to be sent via the AT command.
We might as well set up a large enough array,
- · Then store the strings we need to send into the array
- · Use the string splicing method to splice the light values together with the send command AT+CMSGHEX,
- · And finally use the at_send_check_response() function to send the array out.
- · Pseudo-code for this is:
void loop(void)
{
......
int light = analogRead(WIO_LIGHT);
char cmd[128];
sprintf(cmd, "AT+CMSGHEX=\"%04X\"\r\n", light);
ret = at_send_check_response("Done", 10000, cmd);
delay(5000);
......
}
- · We need to join the LoRa network using the AT command and confirm that the data is complete by sending the returned confirmation frame.
- · Finally, the signal strength information is output.
- · The firmware is called Lightsensor-send-data.ino and can be found in the example sketches on on github at Seeed-Studio-LoRaWAN-Dev-Kit/sensor/Lightsensor-send-data
- The code is attached later on in this project as Lightsensor-send-data.ino
· Until the next lesson do not try to upload this sketch to the Wio. It will not connect. you will need to finish the Next section “Connecting to Helium” first
Connecting to HeliumThis section describes how to configure Helium so that sensor data can be successfully uploaded to and displayed in Helium.
Connecting to Helium
First I need to check if I have LoRaWAN coverage in my area. It is suggested to go to this link. Helium LoRaWAN®.
But I found this link to go to Helium Explore, which contains a hotspot map and It looks like I have coverage.
IMPORTANT Before you complete the rest of this tutorial you need to create a Helium account.
If you are familiar with Helium and already have an Account you can continue with the tutorial at
Adding Grove - Wio-E5 devices to the Helium console
Otherwise you can learn how to create an account and use the Helium console by using the “Helium Introduction” tutorial. My notes on this are in the next section
Helium IntroductionLinkUse the following sections to create your Helium account and to get familiar with the Helium console. The Helium console is used to accelerate moving data from IoT devices to the Internet over Helium Network. With Console, developers can provision and manage devices, monitor data activity, and manage connectivity cos
Register for a Helium accountTo register an account, go to the Helium website, You will asked for an email. They will email you with a link to register
NO PASSWORD was ever given? ODD?
ONE THING TO BE AWARE OFF with data When you become a new member of Helium and you have device data to send to Helium, you will get 250 DATA CREDITS. And 1 DC = 24 Byte Packet = $0.00001 USD. SO be real careful to not go over on your data packets You can choose to get more DC from Helium.
Helium Console - FlowsFlows are: a visual-centric view of the key elements in Console. It allows users to see the relationship between devices, functions, and integrations.
Helium Console - Devices- Helium Console allows developers to add devices and grab the device identifiers to load onto their device firmware that authenticates and identifies the device for the Helium Network.
- DevEUI, AppEUI, and AppKey are auto generated by the Helium Console when you create a new device. However, you can input your own DevEUI, AppEUI, and AppKey if your device is already provisioned with these credentials.
o Device EUI - 64-bit end-device identifier, sometimes called Manufacturer EUI
o App EUI - 64-bit application identifier
o App Key - 128-bit AES key, used to secure communication between device and network
This initial join process could take up to 20 mins
Helium Console - FunctionsWith the Decoder Function, users can transform and/or parse a raw payload before it is posted to an endpoint.
Helium Console - IntegrationsIntegrations enable devices to connect to pre-configured, cloud-based applications or send data directly over HTTP or MQTT.
Integrations are added all the time.
For a video walkthrough of how to use Integrations, check out our Tips and Tricks video here.
How to add Azure IoT Hub Integration in this tutorial can be found here.
Tech Supportsubmit the issue into our forum. I didn't get my problem answered, but Seed -IoT-Into-The-Wild have a channel on Discord. The forum was able to help me.
Now you ready to continue with the “Connecting to Helium” Tutorial
Adding Grove - Wio-E5 devices to the Helium console- · Login to helium console
- · Go to Devices
- · Add new device
- · Enter in a device name
- · The 3 keys mentioned above are created.
- · Now in Arduino IDE, load the example from the sensors folder lightsensor-send-data.ini
- · You will modify this sketch to connect to the Helium network.
- · Select the LoRaWAN® band you wish to use.. The available frequency bands are in the comments of the code below. In the tutorials we use, the default is the EU868 band.
- o The US915 band is commonly used in North America
- · Place the the Helium generated DevEUI, AppEUI, and AppKey in the sketch for deveui[] , appeui, appkey[] array initialization.
- · Upload the code for Wio Terminal and open the serial port monitor of Arduino IDE, set the baud rate to 9600 and observe the setting.
- · RESULTS I had a problem !! I'll try and describe it.
o Verify failed with disk91_LoRaE5.h not found?
§ OH YES… I needed to clone the zip file from https://github.com/disk91/Disk91_LoRaE5
§ Then I went to the Arduino IDE. And selected the zip file
o NOW I’m getting an error.
- § exit status 1
- § Compilation error: invalid conversion from 'char*' to 'uint8_t* {aka unsigned char*}' [-fpermissive]
- § It’s occurring
· if ( ! lorae5.setup(
· Frequency,
· deveui,
· appeui,
· appkey
· // (uint8_t)deveui,
· // (uint8_t)appeui,
· // (uint8_t)appkey
·
o Is It Because the 3 args in lorae5.setup() are uint8_t?
o char deveui[] = "";
o char appeui[] = "";
o char appkey[] = "";
This is NOW working for me. If anyone else in the IoT into the Wild contest is having problems with the Seed LoRa E5 connecting this is probably why!! Some missing link to the disk91_LoRaE5 library in the tutorial I am following!
SOLUTION GIVEN ON DISCORD. @ https://discord.com/channels/862602258452578314/951405763824349195/1013627784272294070
Hi, we have specified the program libraries to be used in the section for each sensor. We have built on top of the library written by Disk91 for LoRa E5 and further revised it to suit the tutorial, so if you are using the Disk91 library directly, you may get errors. Therefore, we recommend that you use the Lora e5 library recommended by the tutorial.
You can get it on GitHub @ https://github.com/limengdu/Disk91_LoRaE5
This is now working. I cloned the .ZIP and installed the Library and it is now working.
I was using the wrong library!!!!!
But I did not see the link mentioned in the tutorial??? At Adding Grove - Wio-E5 devices to the Helium console
https://wiki.seeedstudio.com/Connecting-to-Helium/#adding-grove-wio-e5-devices-to-the-helium-console
There is no link as you described. NO step5 download link? That is why I installed the wrong library. You should report this to the tutorial author, because I’m sure other users of the tutorial are having problems. Now that I have the correct library I can see where those 3 variables mention in my post are now of type Char not uint8_t, as in the github.com/disk91/Disk91_LoRaE5 repo!
Going on to the next section. After 3 days of trying to figure it out!!!.
Write decoders function for different sensors.· To send the sensor values to Helium via Grove - Wio-E5, it is necessary to use AT commands to do so.
· The sent data is received by Helium and needs to be decoded before it becomes real data that we can read. This is the reason why we need a decoder. the data format sent is not uniform, with sensors having integer, float, positive and negative data, etc., the decoder code required for each sensor is different.
· This section of the tutorial gives you examples of decoders for all the sensors available in the Kit.
Option 1. Wio Terminal Light Sensor data decoder· This section shows you how to create a decoder on Helium for the Wio On board Light Sensor.
· Go to the Helium FUNCTIONS menu option
· Add A new function called Light_data
· In the previous section Wio Terminal Light Sensor, we used an integer variable light to store the light value read by the light sensor and sent that value out using the send_sync() function. So, the goal of the decoder we wrote in Helium is to be able to parse this integer data.
· Type this code in the script area
· We can input the data of 8-bit light sensor in SCRIPT VALIDATOR on the right side to check whether the decoder parses correctly.
· This statement is not happening. The 3 fields are not added based on the code and the “Payload Output” is grayed out??? What is the purple play button for ? This is not explained correctly in this section of the tutotial!!
· The way I figured this out was to enter in values for “Payload Input” and “Port”. And then press the Purple button and the results should show up in “Payload Output”
· Create A flow. The tutorial states the following:
· Go back to Flows and connect the device to the Light_data decoder.
· Not sure if this is working? Because the device shows no flows active?
· And there is a broken arrow on the UpLink row indicating “No Integration Attached”
· DO I Need integrations? Apparently YES from w\hat I found out by experimenting with integrations
· There was no explanation in the tutorial to compete the integrations. But the Next steps were For Azure IoT central and Google sheets.
· But in https://wiki.seeedstudio.com/Helium-Introduction/#helium-console-integrationsI was able to figure out how to add an integration
· I added a MyCayenne integration and now the flow shows up in the device flows section
· And the event log shows that the UpLink now has integrations by NOT showing the broken arrows. And the
· This section has links to all the sensors in the kit that you can upload to the Wio. Don’t forget to change the Frequency
Real-time data and debug.· Now when you run the firmware you should see a RED point on the real time packets chart for the device.
· Not seeing data?
Source Code Analysis· This section of the tutorial describes the code of the SHT40 (temp, humidity) sensor as an example to explain the logic of the code implementation
· The logic is similar to the Light Sensor LoRa E5 implementation. The SHT40 contains 2 data values that decoded and sent. The LoRa connection is basically the same.
- 1. At the beginning of the program
- a. Need to include libraries
- i. A few new ones
- 1. SoftwareSerial
- 2. SensirionI2CSht4x
- b. Create a SensirionI2CSht4x object
- c. create the lorae5 object and send it the UART (Serial) where the AT command and debut traces are printed
- d. Set the Helium connect info.
- i. define the frequency to be DSKLORAE5_ZONE_US915
- ii. The triad info (deveui, appeui, appkey) from the Helium device console page.
- e. Then a decode function is defined.
- i. This function converts the sensor values into data frames that can be parsed by the helium decoder.
- ii. This is also in compliance with the LoRaWAN protocol.
- iii. The function stores the decoded values in an array that is a static array of 4 bytes created by the caller.
- iv. The function also takes in temp and humidity data variables that are also created by the caller.
- f. The setup() function is next.
- i. This function contains initialization code for Serial, Wire, SHT40
- ii. Gets sht40 serial number
- iii. And lastly
- 1. Sets up the lora5 on port 2 with the begin. In a while loop until sucessful
- a. SKLORAE5_SWSERIAL_WIO_P2 represents the Grove interface on the right side of the Wio Terminal,
- b. while DSKLORAE5_SWSERIAL_WIO_P1 represents the Grove interface on the left side.
- c. For other projects without external sensors, you can also use DSKLORAE5_SEARCH_WIO , which will automatically search for the Grove interface your Wio-E5 is connected to.
- 2. Then the setup() function sets the Frequency and the 3 LoRaWAN credentials deveui, appeui, appkey in a while loop until successful.
- g. The loop() functionis next
- i. Gets the temp and humidity values
- 1. Prints the values to the serial terminal
- ii. Calls the decoder function mention above with the 3 values , temp, humi, data.
- iii. Calls send_sync() function is to send the sensor values over the LoRaWAN®
- 1. The first parameter indicates the channel number to send the data,
- 2. the second parameter indicates the content of the data sent,
- 3. the third parameter indicates the length of the data sent.
- iv. In general, we only need to focus on the content of the first three parameters.
- h. The first parameter indicates the channel number to send the data, the second parameter indicates the content of the data sent, and the third parameter indicates the length of the data sent. In general, we only need to focus on the content of the first three parameters.
· The above sections is a step-by-step guide on how to use the device to connect to Helium and receive data.
· However, from a practical point of view, the data currently sent to Helium is not human readable.
· If you have a requirement for data visualization, you can then refer to the following steps to complete the tutorial on integrating Helium into Microsoft Azure IoT hubs, which will take you through the process of displaying the data in a graphical way.
I need to follow the next section in order to send my project data to Azure Iot Hub.


Comments
Please log in or sign up to comment.