


Hardware components | ||||||
 |
| × | 1 | |||
 |
| × | 1 | |||
Software apps and online services | ||||||
 |
| |||||
IoT is very simple if you know how to use services. there are a lot of different services and technologies to use, if you thinking about all of them, you'll be confused. but you can find good service like uBeac; a very very simple and powerful IoT platform. in this tutorial i'm gonna tell you something useful with this one. so lets get started.
Raspberry pi as a live sensor gatewaySensors are very important in every different simple processing. when we are talking about ability for a sensor to talk to us, an infrastructure of IoT needed. such as sending protocol, a network of things and also a platform. in which you can manage every sensor. in this project I use uBeac IoT platform to monitor and log all my DHT sensor. sending temperature and humidity parameter of a place is nothing special, but understanding the scenario is something very important. so lets get started, follow my lead and if you have any question, just ask me in comments.
Python Library and recommendationIn this project we need DHT python library. if you have it in your os leave this section. but if you don't have it, open terminal and write the command below to install it.
sudo pip3 install Adafruit_DHTAll DHT sensors has 4 pins, but we use 3 of them. pin No1 goes for VCC to the raspberry pi. pin No2 goes for data and connect to GPIO 4 of raspberry pi. pin 3 is not connected. pin 4 is goes for GND to the raspberry pi. it is very simple, just be careful to connect them right.
What is JSON?
JSON or Java Script Object Notation is a way structuring text to be exchanged as data. So rather just sending a temperature value to a device you could send an id and a time stamp all in the same message as object, this is useful for home automation systems when there are many temperature sensors.
For Example in this project I use the message :
{
"id": uid,
"sensors":[{
'id': 'Temperature',
'data': temperature
},
{
'id': 'humidity',
'data': humidity
}]
}
with this JSON string we can send our data to the server in a Safe and Fast way. but server can understand this type of messages. as you may know, here I use uBeac, which can handle this kind of messages. uBeac is very powerful, in Json message format.
Setting up uBeac, IoT platformfirst of all you should have an account. if you have uBeac account, just login. but if you dont have, just hurry and sign up ASAP. after logged in uBeac, click on Gateway menu. then click on + sign in up right corner to create you new Gateway.
After that you will find settings like below, there are 14 different kind of gateways in v0.0.245beta uBeac platform till now. the site says these gateways are going to be develop more apps like this. now you should create a new gateway, just click on this link in previous tutorial, I explained how to do this. after creating your gateway, copy uBeac URL and put it on this Python script. take a look at this picture below, you should see something like this.
if you can see Live Data like this picture, it means that your gateway and codes on Raspberry Pi, are working correctly. now you can go for next step.
Create New Device in uBeac IoT Platformjust click on Devices from left menu, and click on + right corner above. as you can see below, UID is needed. in this codes I used "rpi_arash" as my device UID. you can change it to what ever you want. name and description is optional, but important. at the last section, as Appearance, you may use some special icons and colors. it is very useful when you have a lot of connected devices.
After creating device you should see something like this picture. every 5 seconds data will arrive here. as I used a single DHT sensor, so I have tow data, temperature and humidity. so the sensors number is 2 and requests will raise every 5 seconds. it depends on your scenario, to set request times, you can change it.
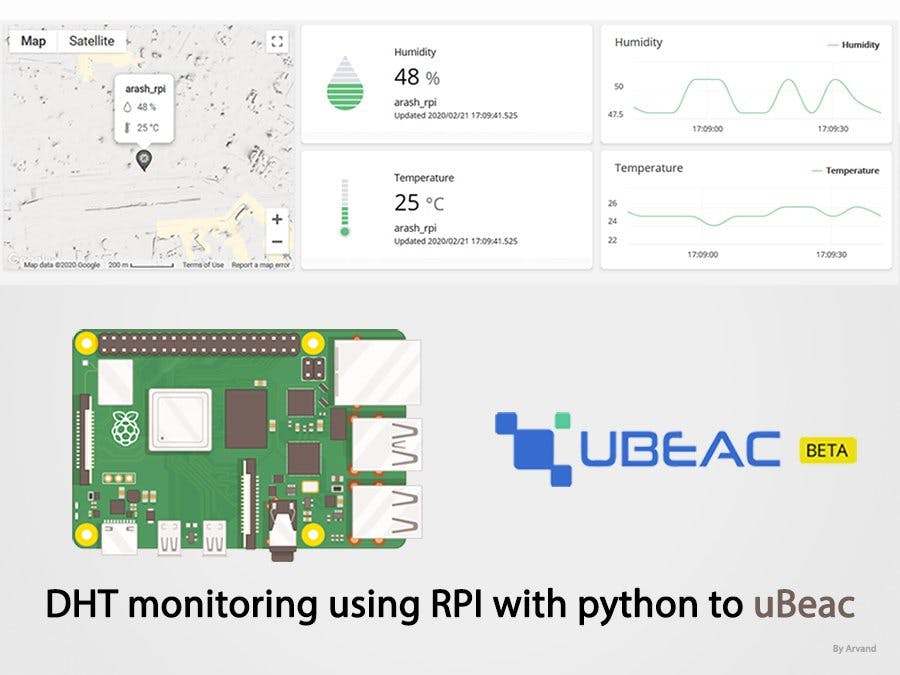
Dashboard is the UI of every IoT project. and it is very very very important to have a perfect one. which can show every data clearly and friendly. in my opinion uBeac has one of the best powerful Dashboards. it is very easy to use, and working with Drag and Drop. there is a simple dashboard you can see below.
Here is another dashboard I made, in this one I set up my device location. you can see below
If you have any question just ask me in the comments below. answer to your question is like a meal to me, so go on and ask any kind of questions you have.


Comments
Please log in or sign up to comment.