This was just a little fun side project I thought of which is rather simple and works pretty well to my knowledge. it makes use of some Adafruit libraries along with beautiful soup and urllib to scrap the website.
3D PrintingI printed all of the parts on my Ender 5 so you may need to adjust your settings to best fit your printer. In order to get multiple colors your going to want to follow Devins tutorial over at Make Anything. He does a great job of explaining it and I would recommend checking out the video in order to get multi-colored prints.
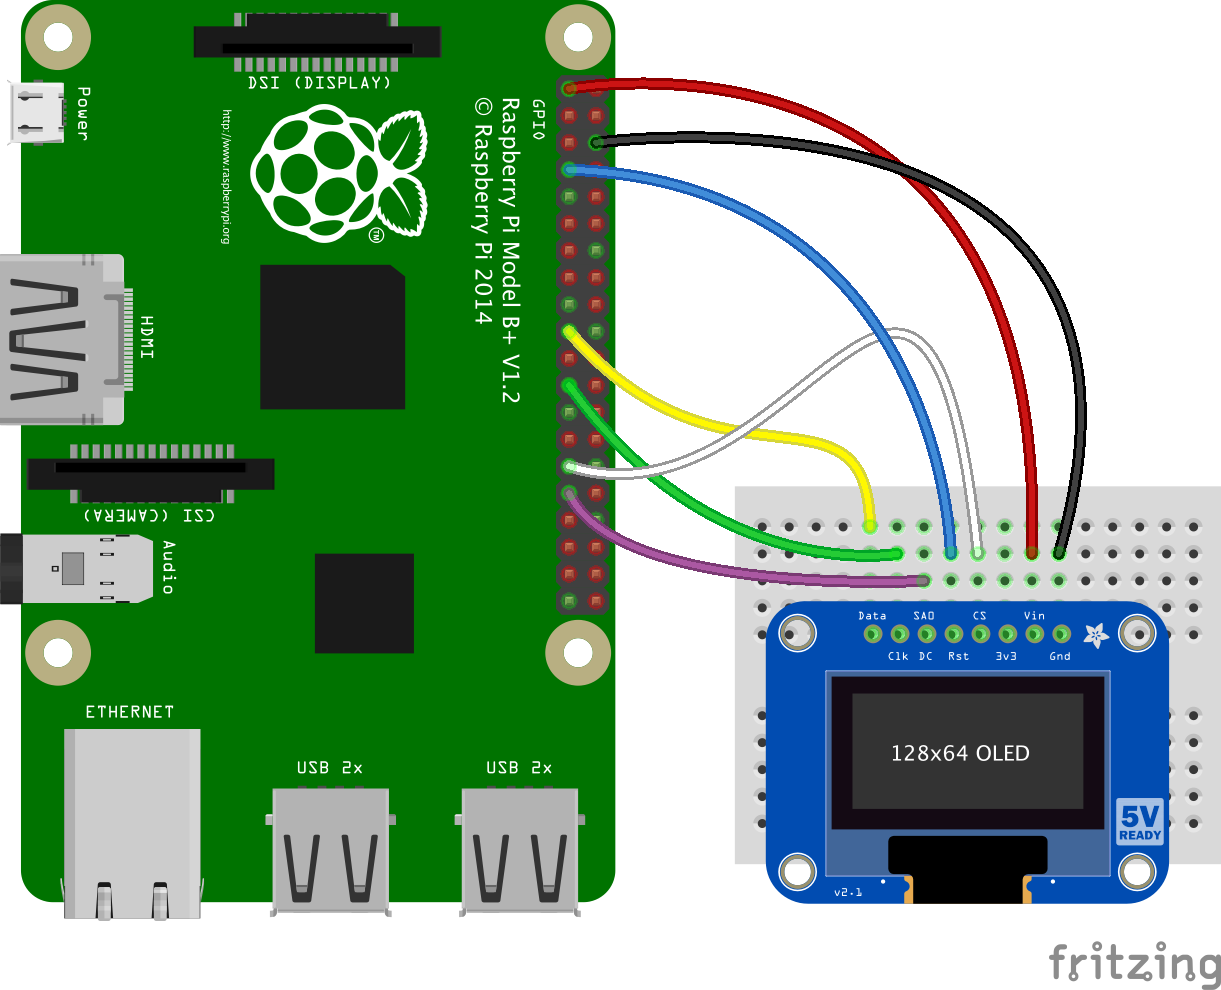
WiringBelieve it or not, the wiring is very simple. you can find a wiring diagram below but here is what you need to connect:
- Pi 3.3V to OLED VIN
- Pi GND to OLED GND
- Pi MOSI to OLED DATA
- Pi SCLK to OLED CLK
- Pi GPIO4 to OLED RST
- Pi GPIO5 to OLED CS
- Pi GPIO6 to OLED DC
To start, your going to need Raspbian on your raspberry pi. Everyone has there own methods on how to install it but if you're a complete noob this is a great tutorial for beginners.
SetupNow we need to install the required libraries. First, we're going to start with Adafruits CircuitPython libraries. Start by executing the following commands in the terminal.
Run the standard updates:
sudo apt-get update
sudo apt-get upgrade
and
sudo pip3 install --upgrade setuptools
If above doesn't work try
sudo apt-get install python3-pip
Next, enable SPI, if you don't know how to here is a 30-second tutorial.
Now we install the libraries:
pip3 install RPI.GPIO
pip3 install adafruit-blinka
Once that's done, from your command line run the following command for the SSD1306 library:
pip3 install adafruit-circuitpython-ssd1306
If your default Python is version 3 you may need to run 'pip' instead. Just make sure you aren't trying to use CircuitPython on Python 2.x, it isn't supported.
Now the Pillow library for displaying images on the oled:
sudo apt-get install python3-pil
If you want to speed up the display a little you can do that by editing the config file.
sudo nano /boot/config.txt
and then add this to the end of the file
dtparam=i2c_baudrate=1000000
then reboot the pi.
Now its time for the code, create a file in your pi directory called karma.py
sudo nano karma.py
Copy and paste the code below then save the file.
Execute the file like so:
python3 karma.py
To run the file we've created when the pi is powered on run will need to make use of Crontab.
Start by doing:
crontab -e
Type 1, then enter and add the following line to the bottom of the file
@reboot python3 /home/pi/karma.py &
Now I am aware that my code or methods of doing this may not be the most effective way to do so if you have any suggestions on my code or anything please don't hesitate to tell me. Thank you!


Comments