The BME280 is an inexpensive, 3.3v sensor board from Bosch GMBH of Germany, which provides basic readings of temperature, humidity and barometric pressure, and has a good performance ratio as long as the humidity isn't very close to 100%. Some BME280 boards have power regulation, hence also to run on 5v systems.
N.b: This tutorial counts on you being familiar with how to connect your Raspberry Pi to your computer via a network, and works both on a PC, Mac or a linux box.
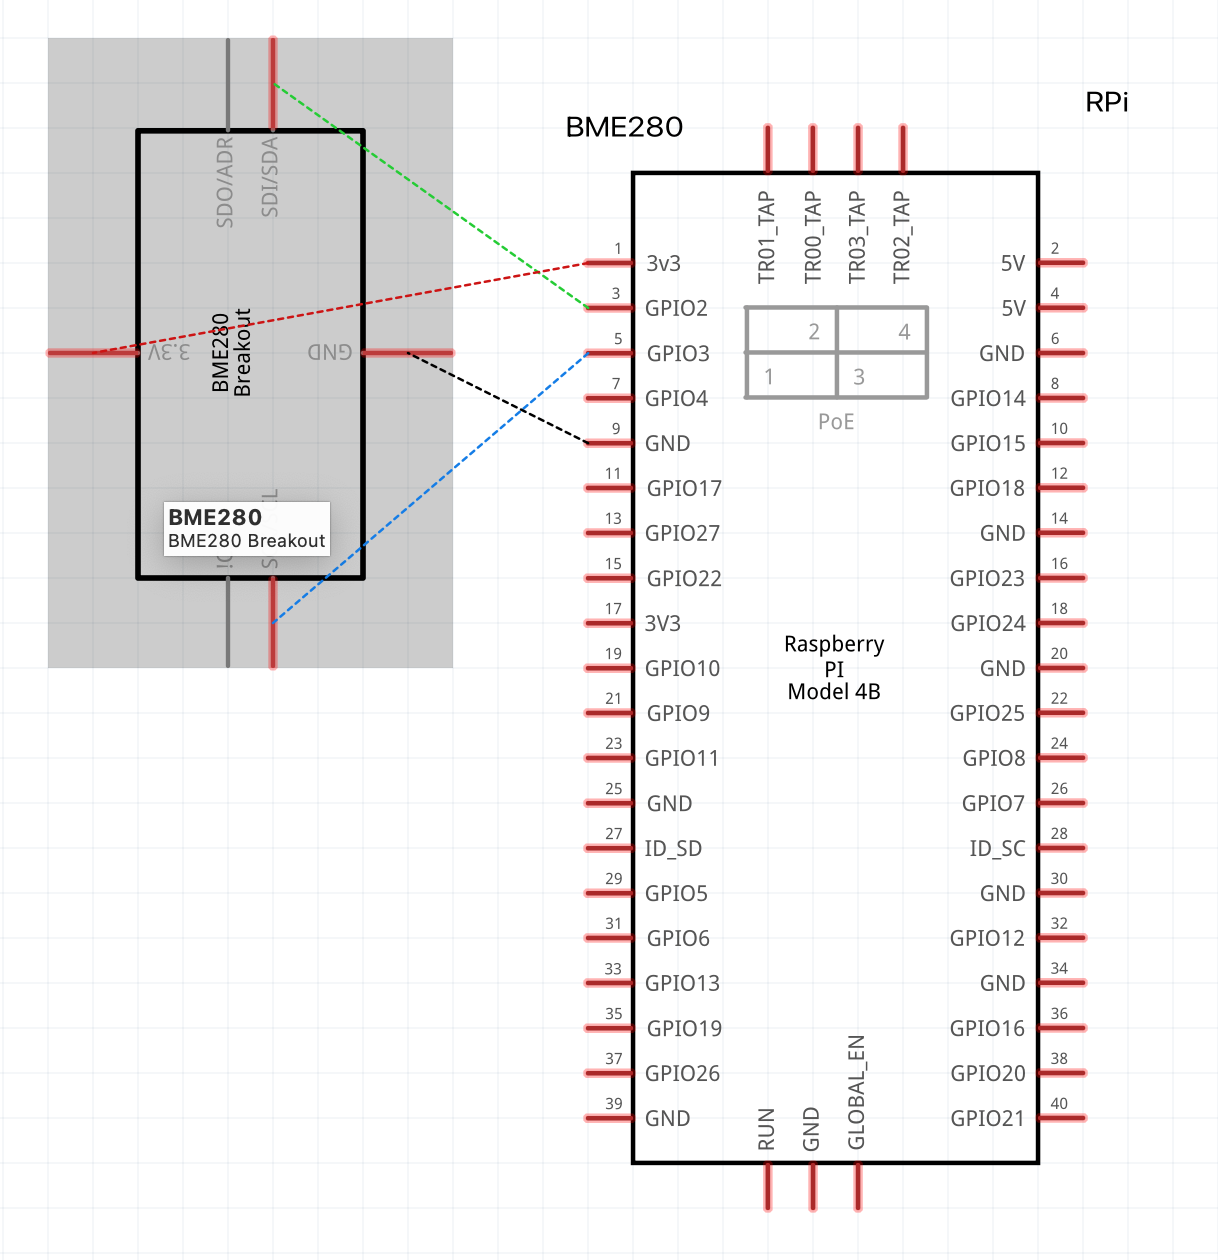
Connecting the partsTo complete the circuit, you'll need the classic four wires; for 3.3v, data pin (SDA), clock pin (SCK) and a ground connector (GND), practically soldering the sensor with female wire headers to attach on the Raspberry, pins #1 (3.3v), #3 (SDA), #5 (SCL) and #9 (ground).
Since the SDA and SCK connectors are part of I2C (Inter-Integrated Circuit Protocol) this port needs to be activated on your Raspberry Pi, using the command:
sudo raspi-config nonint do_i2c 0alternatively via the traditional configuration script on the Pi
run sudo raspi-configIn order to talk fluently with the sensor hardware, you'll also want to install a python script for the BME280 on your Raspberry Pi, e.g. using pip:
sudo pip install pimoroni-bme280 smbusAlternatively, you can clone and install it from its github repo:
git clone https://github.com/pimoroni/bme280-python
cd bme280-python
sudo ./install.sh
Now we have the hardware in place, have activate the I2C interface and have the python library to do the talking, we'll turn to the SA Studio.
Setup SA StudioSA Studio is a service running on the cloud, a complete IDE with a browser-based user interface and a federation of nodes which run a core software called SA Engine. A user accesses SA Studio and all the connected streamindevices – all running their own SA Engine - updating is carried out in real-time without installing new firmware or restarting edge devices.
Go to https://studio.streamanalyze.com and sign up for a free account (no credit card required), and get started in the "Devices" section.
Click "Get Started", and choose Raspberry Pi as your target platform, to learn how it's done. Open your favorite terminal app and connect to the Raspberry. Follow the instructions to copy & paste the command enclosed to download the binary to your favorite folder. Unpack [using tar -xvf FILE] the compressed file and issue the start command:
sa.engine/bin/sa.engineNow a SA Engine is running on your Raspberry Pi, and you'll see the prompt switch, and you can write OSQL commands.
[sa.engine] >Now we'll connect the Raspberry to the SA Studio federation – easy as pie(!). Under "Devices", select "Connect edge", give your device an appropriate name like I came up with "Edgemcpie", and copy the connect blob in the instructions for starting with "connect_using_config_blob()" and paste it into the terminal window for your Raspberry. Click on the "OSQL" tab, press "New OSQL Editor", and select your newly connected edge device from the list of devices, like in the screen dump below:
You can also ask its name in the OSQL editor, for good measure, so that you're talking to the right node!
this_peerid()In SA Studio, developers use a declarative query language called OSQL (Object Stream Query Language), designed to be high-level and easy to use to create computations, filters and transformations over data. Ready-made functions can be stored in models; there are public ones and local ones you can modify, making your own custom models for your development needs as well.
Importing the public model for the BME280 is done in the OSQL editor:
models:import("public","bme280","1.0");You can check which sensor parameters are accessible using this model, with the OSQL command
signals();In this case you should get a list back for "temperature", "humidity" and "pressure", meaning that you can issue commands with these parameters.
If you're more curious of the nitty-gritty details, you have two files to examine in your $SA_HOME catalog, Together, the python script and the OSQL file, make up a model for visualising the data:
- models/bme280@1.0/bme280_interface.py
- models/bme280@1.0/master.osql
We're almost done now! The only thing left is to start this party is, using the OSQL editor, to check the loaded model by running the command
loaded_models()This should give you "bme280@1.0" as a reply. Note; if you only get a "done" response (i.e an empty list) instead of the model name, you can reload the model using:
load_model('bme280@1.0')To start streaming data with time stamps, issue the OSQL command, e.g. for pressure readings
ts_signal_stream("pressure");to start streaming. This will produce a real-time graph of temperature data from the BME280 sensor.
If you want data without the timestamps, use instead
signal_stream("pressure");We've connected the BME280 to a Raspberry Pi, and using pimoroni's bme280-python library we stream data to SA Studio to view the graph in realtime. In SA Studio you can also do lots of other things with streaming data, look in the "Docs" section of SA Studio for more examples and inspiration for your IoT and Edge AI projects!


_3u05Tpwasz.png?auto=compress%2Cformat&w=40&h=40&fit=fillmax&bg=fff&dpr=2)

Comments
Please log in or sign up to comment.