


Hardware components | ||||||
 |
| × | 1 | |||
 |
| × | 1 | |||
 |
| × | 1 | |||
| × | 1 | ||||
Software apps and online services | ||||||
 |
| |||||
| ||||||
Hand tools and fabrication machines | ||||||
 |
| |||||
 |
| |||||
 |
| |||||
 |
| |||||
 |
| |||||
In the circle of Maker, It is probably no one who doesn't know ESP8266, the development kit series based on the Wi-Fi chip development. It occupies half of the sky in the last few years, even makes great pressure on other communication chip manufacturers. Why will ESP8266 suddenly so popular we can not figure out?
The main reason for its popularity is its cost and wide community support. But if like to make a battery power IoT device you will face some serious issues. The main problem is ESP8266 is a power-hungry device. It can drain a 1000mAh battery in 2/3 days. Another big problem is its operating voltage range. It runs on 3-3.6 V which is not directly compatible with any commonly available battery technology. If you use 2 AA battery in series you can only utilize a few percentages of its energy. If you want to use a Li-ion battery you should use a buck converter. Besides, if you plan to power it from the battery using a buck or boost converter you must implement some sort of sleep mechanism for keeping it alive for a couple of weeks without replacing the battery.
If you are a new and inexperienced maker you have to spend a few sleepless nights to make a power-efficient battery power IoT device solving the above problems.
Ultra-low power Cricket Module, the SolutionIn this tutorial, I want to introduce you with a ultra-low power ESP8266 based WiFi module you can use for your IoT project. The module is a bit expensive but very easy to use.
Cricket is an ultra-low battery-powered IoT Wi-Fi module. It doesn't require IoT hubs, any coding or programming to connect your devices to the internet. It comes with a pre-installed software and integrated FREE Cloud service (Developer Portal & MQTT service). You can configure Cricket's connectivity out of the box either from a smartphone or a laptop from any web browser. This means you do it entirely over the air. Manage device(s) remotely and integrate them to other systems using either MQTT protocol or HTTP POST Requests (Webhooks, IFTTT, …).
Cricket can be powered directly from an AAA battery without any boost converter. Another great feature is it has a 3.3V output you can use to power up your sensor using the same AAA battery.
It comes with a set of great features which you can utilize in your device:
- Ultra-low power, true 0A current when not in operation
- Operates directly on batteries below 3V (AA, AAA, AAAA,...)
- Built-in configurable Real-Time Clock (RTC) for regular wake ups with specified time intervals
- Built-in configurable temperature sensor
- Configurable battery monitor
- Configurable Analog or Digital input for sensors
- Remote configuration (from the Developer Portal)
- Configurable MQTT (use either FREE Things On Edge or any 3rdparty MQTT broker)
- Configurable HTTP POST Requests
To know more about the Cricket Module visit https://www.thingsonedge.com/
IoT Plant Care Device, a Use CaseRecently I made a plant care device using the Cricket module. In the next few steps, I will show you how can make your own plant care device without any programming knowledge. I used 2 AAA cells for powering my device. The device measures the moisture level every 8 hours and shows the result in the Android apps.
Hardware PartsBefore working with a project you first need to collect the hardware. The Cricket WiFi module and Capacitive moisture sensor are the main parts of the project. For protecting the hardware parts and giving the device a professional look I designed a 3D printed case.
The Cricket and the Moisture sensor.
The 3D files were designed in Tinkercad and STL files are attached in the file section. For the battery case, I use a design downloaded from Thingiverse. You can also use a dual AAA battery case available in parts shop.
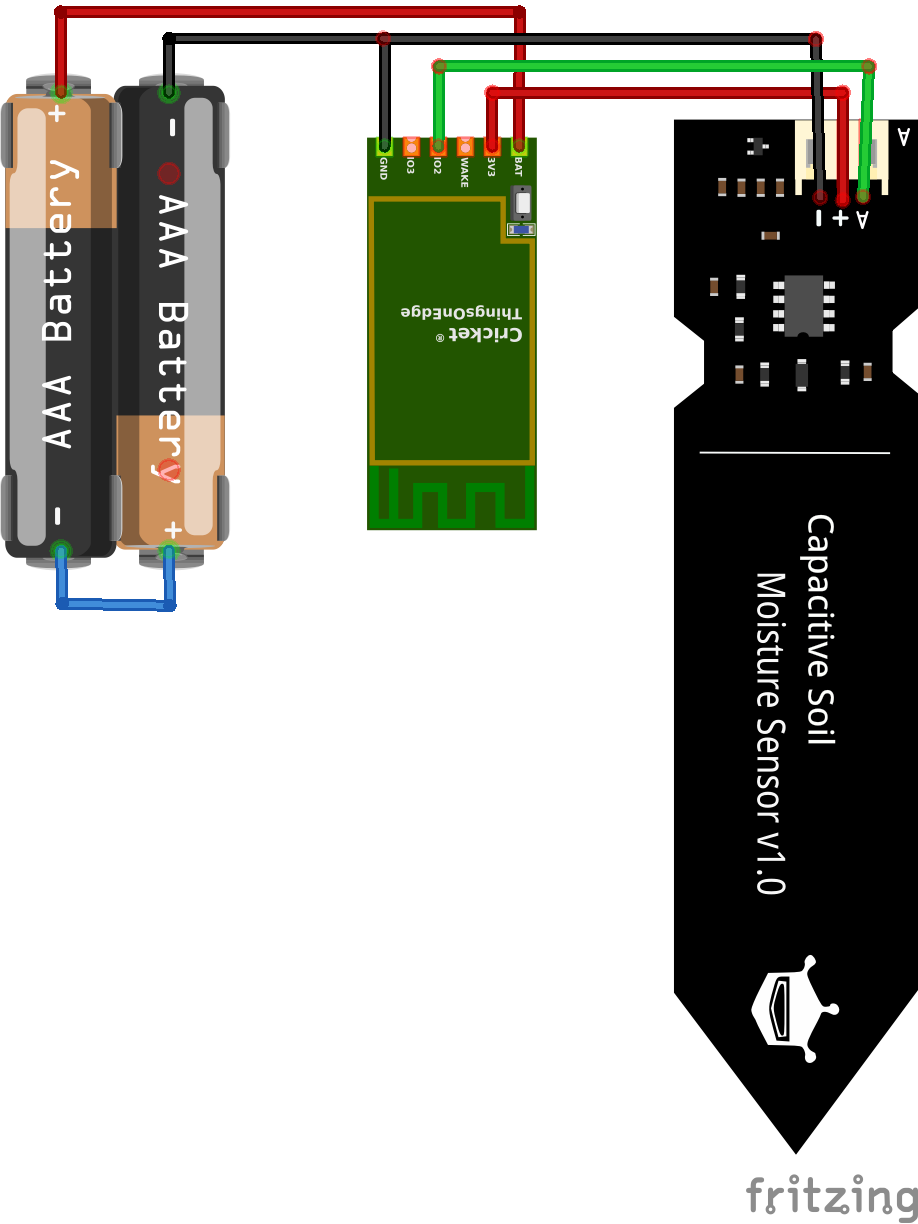
The connection is super simple. Connect the positive output of the battery case to BAT pad of the Cricket and negative terminal of the battery case to the GND pad of the cricket. Cricket module produces 3.3V output from the battery and we will use this 3.3V output to provide power to the sensor. The sensor's analog out is connected to the IO2 of the cricket. See the following image for a better understanding.
You need to do some solder work for connecting the Cricket, Sensor, and the Battery all together. According to the schematic connect the sensor to the cricket using two extra wires each 5cm long.
Then connect the battery to the cricket and the sensor using extra wires like before. When connecting the battery double-check the polarity. I solder wires to the sensor from the bottom side because I don't want to use the jumper provided to the sensor to save the space inside the box.
After completing the solder work, place the batteries on the holder and get ready for configuration.
Configuring (No Coding!!!)The funniest thing about Cricket is you don't need to write a single line of code for making a complete IoT project/product. You will only configure the device entirely OTA (Over The Air) on Things On Edge - Developer Portal (https://dev.thingsonedge.com). The configuration is retrieved by Cricket via the internet when connected to your Wi-Fi.
Now let's configure it first.
For the moisture sensor it is recommended to set the following configuration:
Set IO2 as an analog input
- Set IO2 as an analog input
- Report moisture level every 8 hours - it will make your device running on 2xAAA alkaline batteries for more than 3 years.
- The configuration window should look like following
For details of the configuration follow the blog post written by Sylwester Bala from here (https://www.thingsonedge.com/post/manage-your-blog-from-your-live-site).
Placing inside the BoxAfter soldering and configuring the Cricket and the WiFi you are ready to put all the stuff inside the box. First, place the cricket in the box and fixed in the right position using double-sided tape. Then place the battery case above the Cricket. The battery case automatically places in the right position after connecting the top part of the box.
Finally, place the sensor keeping the bottom side up, and add some hot glue before placing the top part of the box. The press the top part by a gentle press and keep in place without moving the press till the glue becomes hard.
Congratulation! Your device is ready to serve for the next couple of years without replacing the battery. Use the alkaline battery for long term performance. You can add some hot glue at the junction of the sensor and the box to make it waterproof and the environment safe.


Comments
Please log in or sign up to comment.