

Hardware components | ||||||
 |
| × | 1 | |||
 |
| × | 1 | |||
 |
| × | 1 | |||
| × | 1 | ||||
 |
| × | 1 | |||
 |
| × | 1 | |||
 |
| × | 1 | |||
Software apps and online services | ||||||
 |
| |||||
Hand tools and fabrication machines | ||||||
 |
| |||||
 |
| |||||
Bats use their forelimbs as flapping wings. They are the only mammals capable of true flight. Bats have been one of the symbols of Halloween. It is believed that witches worshipped horned figures with wings, possibly bats. Although bats have a creepy reputation, they have been widely used as Halloween decorations. In this tutorial, a flapping-wing robotic bat has been made that can be used as part of a Halloween decoration. The general view of the robotic bat is shown in Fig. A.
The current bat is made of some Lego-compatible parts, an Arduino board, a motor driver, an off-the-shelf DC gear motor, two red LEDs, a PIR motion detector sensor, and 3D printed parts. The red LEDs resemble scary eyes for the bat. Sensitivity to motion is another feature that has been added to the bat. When an object or a person passes nearby, the bat starts flapping its wings.
In this tutorial, we will make the body structure and the wing mechanisms of the bat using Lego-compatible parts. However, the wings are designed and 3D printed. Then, a DC gear motor drives the crank mechanism of the bat to flap its wings (Figs. B and C). Since an Arduino Nano onboard is used, we can attach a diverse set of sensors and modules to the project. This enables us to get the most creative and let our imagination go limitless.
As a creative decoration for the Halloween season, we can make our robotic bat scare people off by flapping its wings whenever a person passes by using a PIR motion detection module (Fig. C). The PIR motion detectors are similar to the ones used in automatic hallway lamps. Thanks to the open-source nature of the Arduino board that allows such developments.
For more sophisticated applications, an Arduino NANO board is added to the bat to significantly increase the expandability and programming elements of the project (Fig. D). As you know, various add-on shields can be added to any Arduino board to expand the project’s capabilities.
For instance, the Arduino board allows us to add two super flux red LEDs to the bat so that they can be turned on whenever the bat detects any motion nearby (Fig. E). These features enable us to make our projects fun and interactive.
- 1x Arduino Nano
- 1x PIR sensor
- 1x Mini Switch
- Jumper wires
- 1x Breadboard, Mini Size
- 2x RED LEDs
- 1x Power Jack, Barrel Type
- Frame, 5x7 module
- TT Gear Motor
- 3D Printed Gear Motor Housing
- 3D Printed Lego-compatible Coupling
- Gear, 40-tooth
- M3 x 25 Machine Screw
- M3 x 10 Machine Screw
- Axle, 12-module
- Axle, 6-module
- Axle, 3-module
- Beam, 3-module
- Beam, 5-module
- Beam, 7-module
- Angular beam, 3x5 module
- Beam with crosshole, 2-module
- Gear, 24-tooth
- Gear, 8-tooth
- Axle connector with axle hole
- Connector peg, 2-module
- Connector peg with the axle, 2-module
- Bushing, module
- Axle, 2-module
- Connector peg with friction, 2-module
- Bushing, 1-module
Let’s start off by assembling the body structure and wing mechanisms of the bat. The body structure holds everything together including the gears, wings, and electronics. Prepare the Lego-compatible pieces according to Fig. G, and follow the step-by-step video tutorial below.
3D printed partsIn order to hold the DC gear motor in place and make a proper connection to the Lego-compatible pieces, we have used custom-designed, Lego-compatible, 3D printed motor housings, and shaft couplings (Fig. H). The wings are specially designed and 3D printed to give a proper outlook to the bat (Fig. I). Download and print out the motor housings, couplings, wings-1, and wing-2. Then prepare the required Lego-compatible parts from Fig. G, and follow the step-by-step mechanical assembly tutorial.
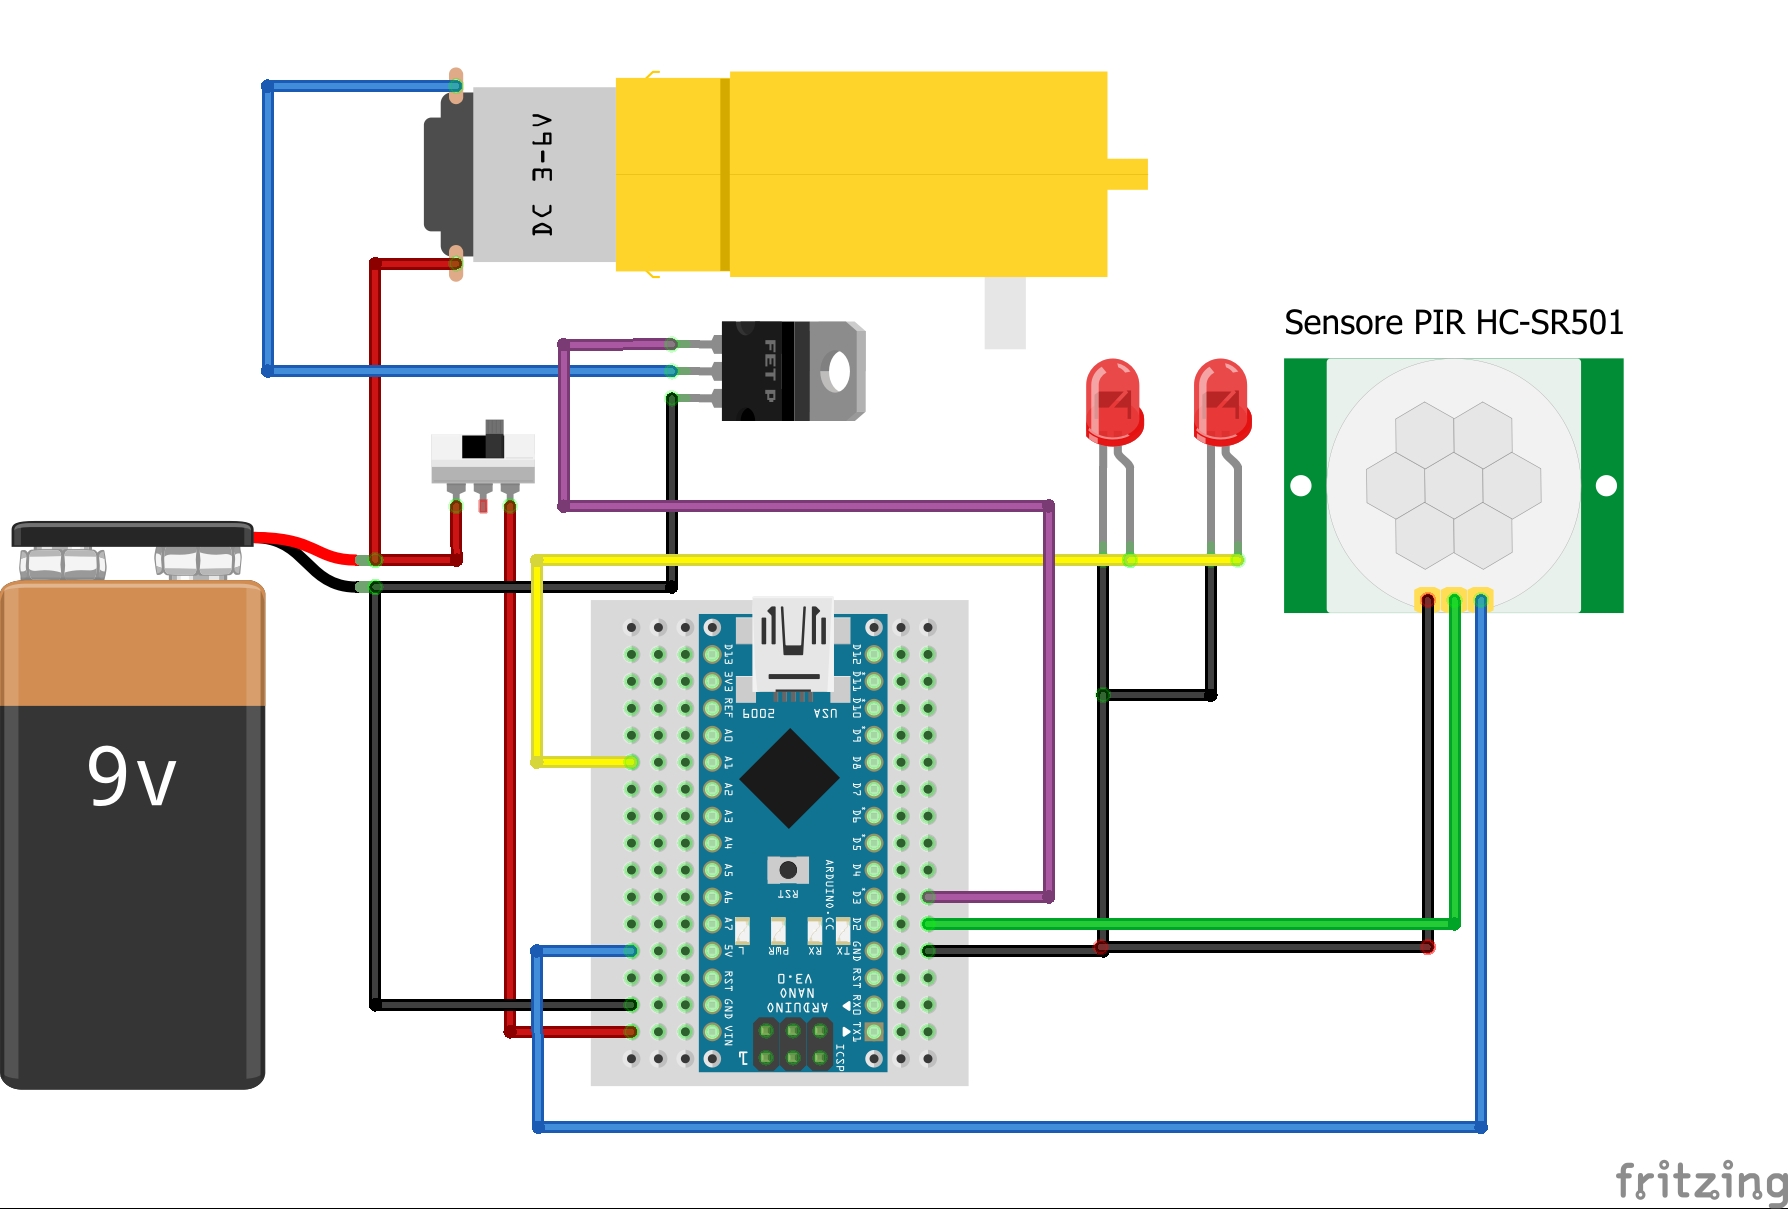
Prepare your screwdriver and soldering iron and carefully follow the video instructions below. Make sure you properly implement the schematic circuit diagram shown in Fig. J, so you don't end up toasting your Arduino board and motor driver.
You can pick up Lego-compatible pieces and let your imagination go limitless. Of course, coding is also the part that you can have lots of fun and be the most creative. You can go to Arduino IDE and write your own code to tell Dracula what to do. But for now, let's start with this code.
/*
Robotic bat
The idea:
In this project, we will show you how to make a  Robotic bat out of Lego Technic pieces,
Arduino boards, off-the-shelf DC motors, and PIR motion sensor.
The current project uses an Arduino Nano boards as the main controller of the
robot.
The circuit:
- In this circuit, an Arduino Nano is used. Any other types of Arduino
can be used of course but do not forget to change the pin configurations
if you want to change the circuit on your preference.
Visit the Tart Robotics blog for more information:
https://www.tartrobotics.com/blog
*/
#define PIR 2        // PIR motion sensor
#define EYES A1   // LEDs
#define WINGS 3 // DC motor
void setup() {
pinMode(PIR, INPUT);
}
void loop() {
if (digitalRead(PIR)) {
analogWrite(EYES, 255);
analogWrite(WINGS, 180);
} else {
digitalWrite(EYES, 0);
digitalWrite(WINGS, LOW);
}
}
void blink() {
digitalWrite(EYES, HIGH);
delay(100);
digitalWrite(EYES, LOW);
delay(100);
}
You are all set. Your robot is ready to go.


_3u05Tpwasz.png?auto=compress%2Cformat&w=40&h=40&fit=fillmax&bg=fff&dpr=2)
Comments
Please log in or sign up to comment.