Hardware components | ||||||
_zhWsCcSEcl.jpg?auto=compress%2Cformat&w=48&h=48&fit=fill&bg=ffffff) |
| × | 3 | |||
 |
| × | 3 | |||
| × | 3 | ||||
 |
| × | 1 | |||
| × | 1 | ||||
| × | 1 | ||||
| × | 1 | ||||
| × | 1 | ||||
| × | 1 | ||||
| × | 1 | ||||
| × | 1 | ||||
Software apps and online services | ||||||
 |
| |||||
 |
| |||||
Hand tools and fabrication machines | ||||||
 |
| |||||
| ||||||
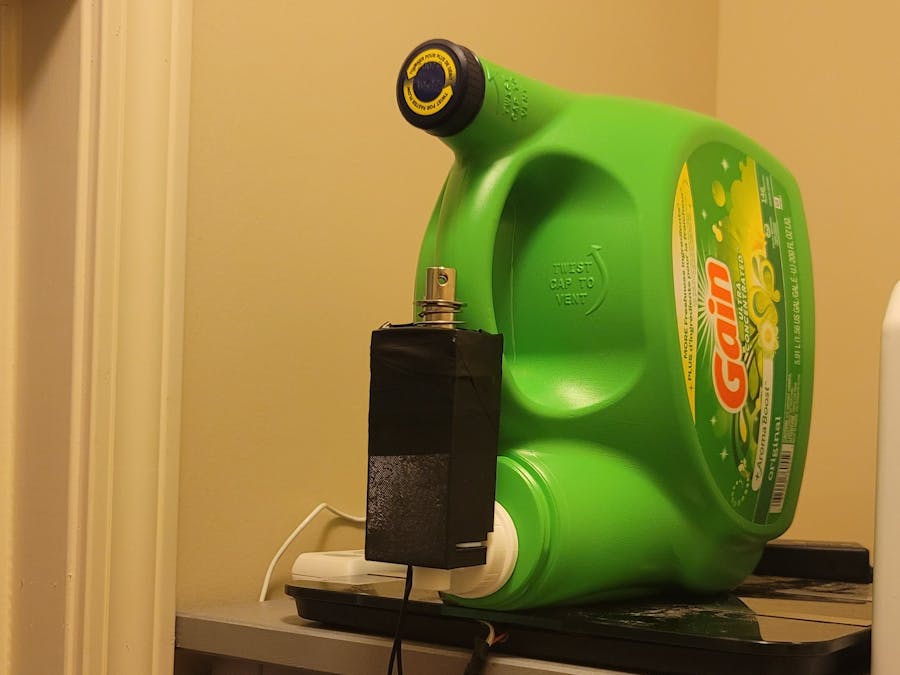
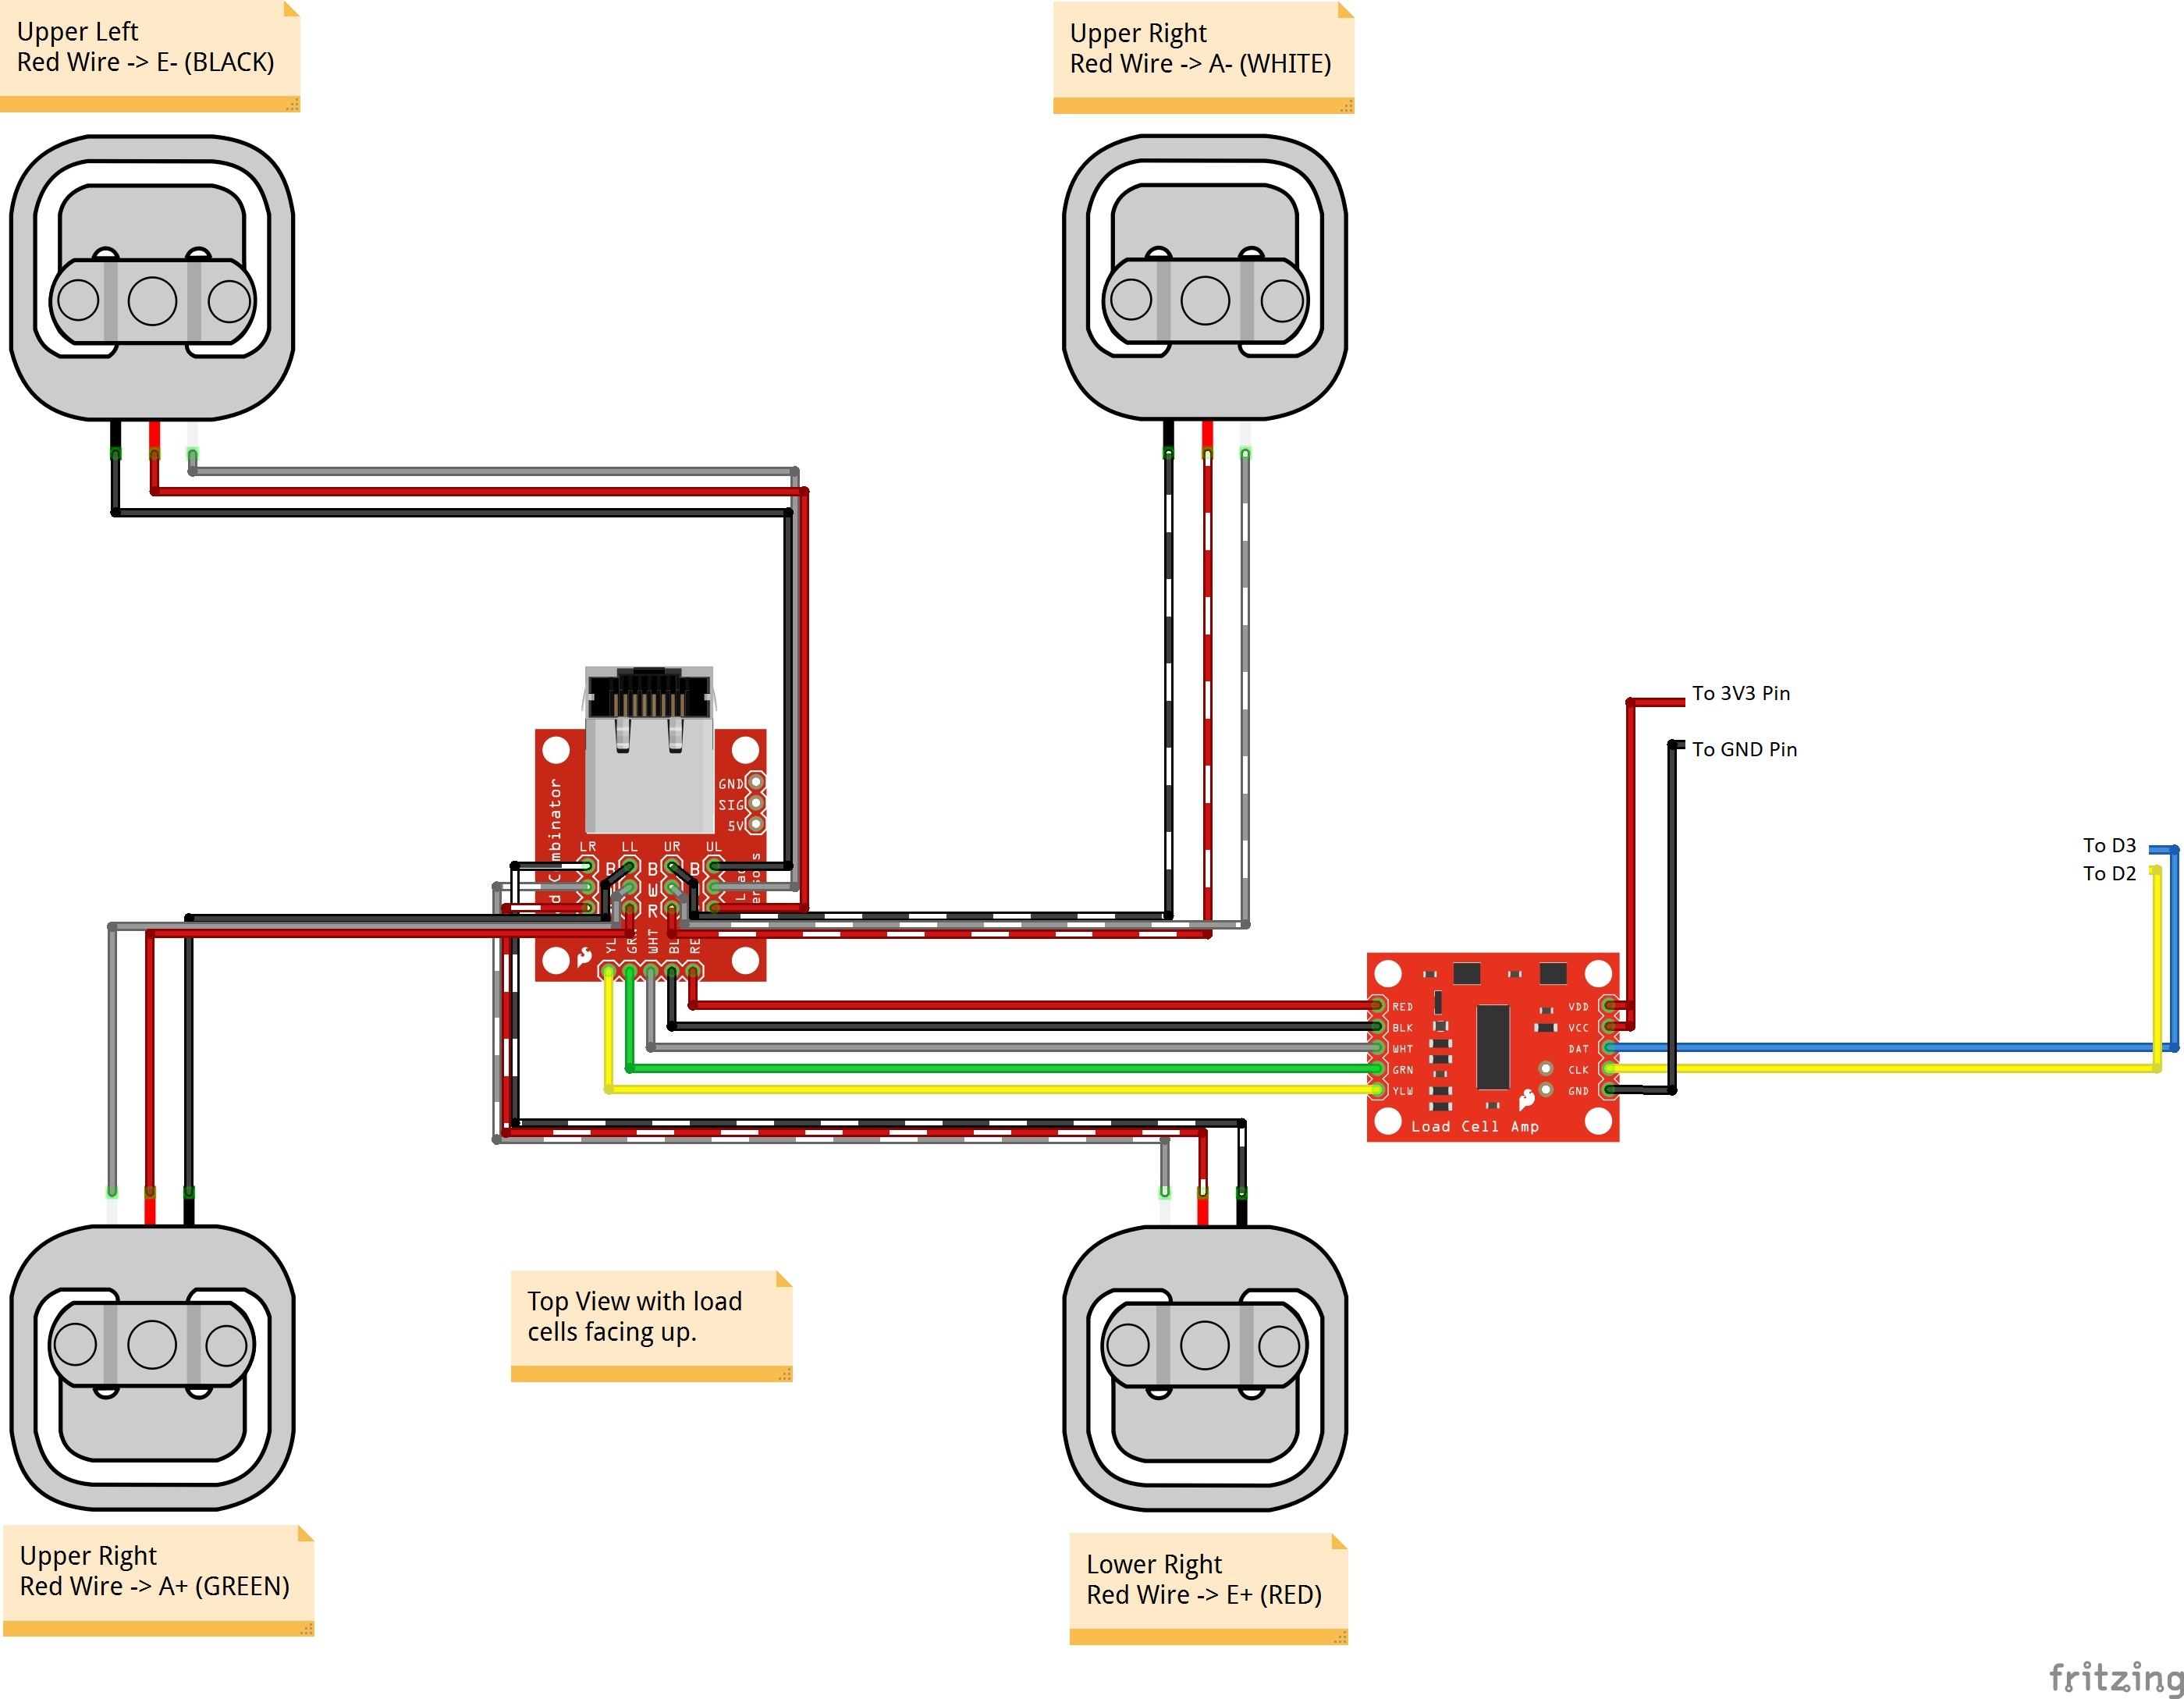
Putting detergent in laundry is always a hassle especially when trying to get the measurements just right. Therefore, my team and I made the Smart Laundry Detergent Dispenser which safely dispenses detergent into the washing machine taking the guess work out of the chore. The dispenser includes a magnetic door switch to prevent dispensing of detergent when the door is closed. Additionally a scale is included that measures the remaining detergent; if the detergent level reaches 25% a new bottle can be ordered through an Amazon Alexa script. The system is activated in one of two ways, either by asking Google Assistant/Alexa to dispense detergent or by using the buttons on the control panel. Both the smart assistant and buttons allow for a load size ranging from small to large.
Live data can be found here.
System Control Code
C/C++// This #include statement was automatically added by the Particle IDE.
#include <HX711ADC.h>
// This #include statement was automatically added by the Particle IDE.
#include <HX711ADC.h>
#include "HX711ADC.h"
#define calibration_factor 10000
//#define DOUT 3
//#define CLK 2
SYSTEM_THREAD(ENABLED);
float weight1;
float weight2;
float weight3;
float weightAvg;
bool shouldGetWeight = false;
double percent;
int smallSwitchState = 0;
int mediumSwitchState = 0;
int largeSwitchState = 0;
int LASTsmallSwitchState = 0;
int LASTmediumSwitchState = 0;
int LASTlargeSwitchState = 0;
int switchstate = 0;
int lastswitchstate = 0;
bool doorOpen = false;
bool haveOrdered = false;
int groundpin = D0;
int smallSwitch = D1;
int mediumSwitch = D2;
int largeSwitch = D3;
int solenoid = D4;
int switchpin = D5;
int groundpinDoor = D6;
int DOUT = D9;
int CLK = D8;
const pin_t led = D7;
//SCALE CODE
int weightFunc(const char *topic, const char *data) {
shouldGetWeight = true;
return 0;
}
//SOLENOID CONTROL
int ledToggleSmall(String command) {
digitalWrite(solenoid, HIGH);
delay(3000);
digitalWrite(solenoid, LOW);
delay(1000);
Particle.publish("get-weight", PRIVATE);
return 0;
}
int ledToggleMedium(String command) {
digitalWrite(solenoid, HIGH);
delay(5000);
digitalWrite(solenoid, LOW);
delay(1000);
Particle.publish("get-weight", PRIVATE);
return 0;
}
int ledToggleLarge(String command) {
digitalWrite(solenoid, HIGH);
delay(7000);
digitalWrite(solenoid, LOW);
delay(1000);
Particle.publish("get-weight", PRIVATE);
return 0;
}
HX711ADC scale;
void setup() {
//DOOR SWITCH CODE
pinMode(switchpin, INPUT_PULLUP);
pinMode(groundpinDoor, OUTPUT);
digitalWrite(groundpinDoor, LOW);
//SOLENOID CONTROL CODE
pinMode(smallSwitch, INPUT_PULLUP);
pinMode(mediumSwitch, INPUT_PULLUP);
pinMode(largeSwitch, INPUT_PULLUP);
pinMode(groundpin, OUTPUT);
pinMode(solenoid, OUTPUT);
Particle.function("ledSmall", ledToggleSmall);
Particle.function("ledMedium", ledToggleMedium);
Particle.function("ledLarge", ledToggleLarge);
//SCALE CODE
Serial.begin(9600);
Serial.println("HX711 scale demo");
scale.begin(DOUT, CLK);
scale.set_scale(calibration_factor);
scale.tare();
Particle.subscribe("get-weight", weightFunc, MY_DEVICES);
//ORDER CHECK
}
void loop() {
//DOOR SWITCH CODE
lastswitchstate = switchstate; //copy the previous switch state to the last switch state
switchstate = digitalRead(D5); //read a new switch state.
//SOLENOID CONTROL
LASTsmallSwitchState = smallSwitchState;
LASTmediumSwitchState = mediumSwitchState;
LASTlargeSwitchState = largeSwitchState;
smallSwitchState = digitalRead(D1);
mediumSwitchState = digitalRead(D2);
largeSwitchState = digitalRead(D3);
if (switchstate == 1) {
if (smallSwitchState == 0 && LASTsmallSwitchState == 1){
ledToggleSmall("ledSmall");
delay(1000);
}
else if (mediumSwitchState == 0 && LASTmediumSwitchState == 1){
ledToggleMedium("ledMedium");
delay(1000);
}
else if (largeSwitchState == 0 && LASTlargeSwitchState == 1){
ledToggleLarge("ledLarge");
delay(1000);
}
switchstate = 0;
}
//SCALE CODE
if (shouldGetWeight == true) {
weight1 = scale.get_units();
delay(1000);
weight2 = scale.get_units();
delay(1000);
weight3 = scale.get_units();
weightAvg = (weight1 + weight2 + weight3) / 3;
percent = (weightAvg / 9) * 100;
Particle.publish("weight-avg", String(weightAvg));
Particle.publish("percent-remaining", String(percent));
delay(2000);
shouldGetWeight = false;
}
//CHECK TO ORDER
if (percent <= 25.0 && haveOrdered == false){
Particle.publish("order-detergent", PRIVATE);
haveOrdered = true;
}
else if (percent >= 85.0){
haveOrdered = false;
}
}
Scale Calibration
C/C++// This #include statement was automatically added by the Particle IDE.
#include <HX711ADC.h>
/*
Example using the SparkFun HX711 breakout board with a scale
By: Nathan Seidle
SparkFun Electronics
Date: November 19th, 2014
License: This code is public domain but you buy me a beer if you use this and we meet someday (Beerware license).
This is the calibration sketch. Use it to determine the calibration_factor that the main example uses. It also
outputs the zero_factor useful for projects that have a permanent mass on the scale in between power cycles.
Setup your scale and start the sketch WITHOUT a weight on the scale
Once readings are displayed place the weight on the scale
Press +/- or a/z to adjust the calibration_factor until the output readings match the known weight
Use this calibration_factor on the example sketch
This example assumes pounds (lbs). If you prefer kilograms, change the Serial.print(" lbs"); line to kg. The
calibration factor will be significantly different but it will be linearly related to lbs (1 lbs = 0.453592 kg).
Your calibration factor may be very positive or very negative. It all depends on the setup of your scale system
and the direction the sensors deflect from zero state
This example code uses bogde's excellent library: https://github.com/bogde/HX711
bogde's library is released under a GNU GENERAL PUBLIC LICENSE
Arduino pin 2 -> HX711 CLK
3 -> DOUT
5V -> VCC
GND -> GND
Most any pin on the Arduino Uno will be compatible with DOUT/CLK.
The HX711 board can be powered from 2.7V to 5V so the Arduino 5V power should be fine.
*/
#include "HX711ADC.h"
#define DOUT 3
#define CLK 2
HX711ADC scale;
float calibration_factor = 10000; //-7050 worked for my 440lb max scale setup
void setup() {
Serial.begin(9600);
Serial.println("HX711 calibration sketch");
Serial.println("Remove all weight from scale");
Serial.println("After readings begin, place known weight on scale");
Serial.println("Press + or a to increase calibration factor");
Serial.println("Press - or z to decrease calibration factor");
scale.begin(DOUT, CLK);
scale.set_scale();
scale.tare(); //Reset the scale to 0
long zero_factor = scale.read_average(); //Get a baseline reading
Serial.print("Zero factor: "); //This can be used to remove the need to tare the scale. Useful in permanent scale projects.
Serial.println(zero_factor);
}
void loop() {
scale.set_scale(calibration_factor); //Adjust to this calibration factor
Serial.print("Reading: ");
Serial.print(scale.get_units(), 1);
Serial.print(" lbs"); //Change this to kg and re-adjust the calibration factor if you follow SI units like a sane person
Serial.print(" calibration_factor: ");
Serial.print(calibration_factor);
Serial.println();
if(Serial.available())
{
char temp = Serial.read();
if(temp == '+' || temp == 'a')
calibration_factor += 10;
else if(temp == '-' || temp == 'z')
calibration_factor -= 10;
}
}


_lnfApowAFv.png)


_3u05Tpwasz.png?auto=compress%2Cformat&w=40&h=40&fit=fillmax&bg=fff&dpr=2)


Comments
Please log in or sign up to comment.