

Hardware components | ||||||
 |
| × | 1 | |||
 |
| × | 1 | |||
 |
| × | 1 | |||
 |
| × | 1 | |||
Software apps and online services | ||||||
| ||||||
 |
| |||||
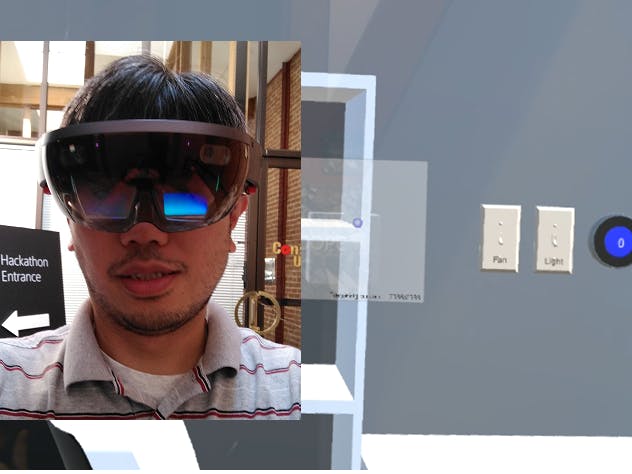
I was fortunate to attend the Hololens Hackathon and Internal Hackster Hack Day in San Francisco last June 17-19, 2016. It was so much fun! The Hololens Hackathon event was sponsored mainly by Microsoft gave a select number of lucky individuals the opportunity to work with the Microsoft Hololens device.
Over the course of two-and-half days, my team built a Building information modeling (BIM) design and construction validation tool in Hololens. The idea is to overlay a BIM model over Real World in Hololens and have IoT and BIM content integration.
Here's a demo.
Shout out to my team members, they are awesome!▪Scott Montgomerie - ScopeAR
▪Matt Mason – IMAGINiT Technologies
▪Cody Nowak – Martin Bros.
▪Ron Dagdag – ThyssenKrupp Elevators
▪Steve Holzer – AEC Hackathon
Workflow▪Author BIM model to .dae and .json from Autodesk Revit ConstructAR plugin
▪Push model to Unity
▪Push build to Hololens or Oculus Rift
Features▪Overlay as-built BIM model over RW (Real World)
▪Turn on/off content (X-ray mode)
▪IoT integration for temperature, light switch, and fan switch
▪Click on BIM content to view BIM info
▪Revit to Unity workflow with ConstructAR Revit plugin
▪Model placement with Vuforia marker tracking
Here's the link to our Presentation
My part was to build the IoT integration. I will describe here the IoT integration to Hololens or Oculus Rift. The Vuforia marker tracking and BIM content will not be discussed here.
IntroductionMy name is Ron Dagdag and I'm doing a series of VR projects. This is part 4 of 6 series project exploring Virtual Reality as a Maker. I'm not going to create games, I am going to explore different ways to create new experiences and interact in VR/AR.
Part 1: Amazon Echo VR Controller
https://www.hackster.io/RONDAGDAG/amazon-echo-vr-controller-724c89
Part 2: Gesture Controller using Particle Photon and Sparkfun RGB and Gesture Sensor APDS-9960
https://www.hackster.io/18937/augmented-reality-virtual-reality-dinosaur-experience-be9c8c
Part 3: Virtual Reality Fireworks using Color Sensor
https://www.hackster.io/RONDAGDAG/virtual-reality-fireworks-using-color-sensor-779ea7
Part 4: ConstructAR - The Holographic Tool Belt
https://www.hackster.io/team-constructar/constructar-the-holographic-tool-belt-b44698
Part 5: Control your "Earth Rover" in Virtual Reality
https://www.hackster.io/RONDAGDAG/control-your-earth-rover-in-virtual-reality-15a9fe
Part 6: Posture Recognition using Kinect, Azure IoT, ML and WebVR
https://www.hackster.io/RONDAGDAG/posture-recognition-using-kinect-azure-iot-ml-and-webvr-e9c4f7
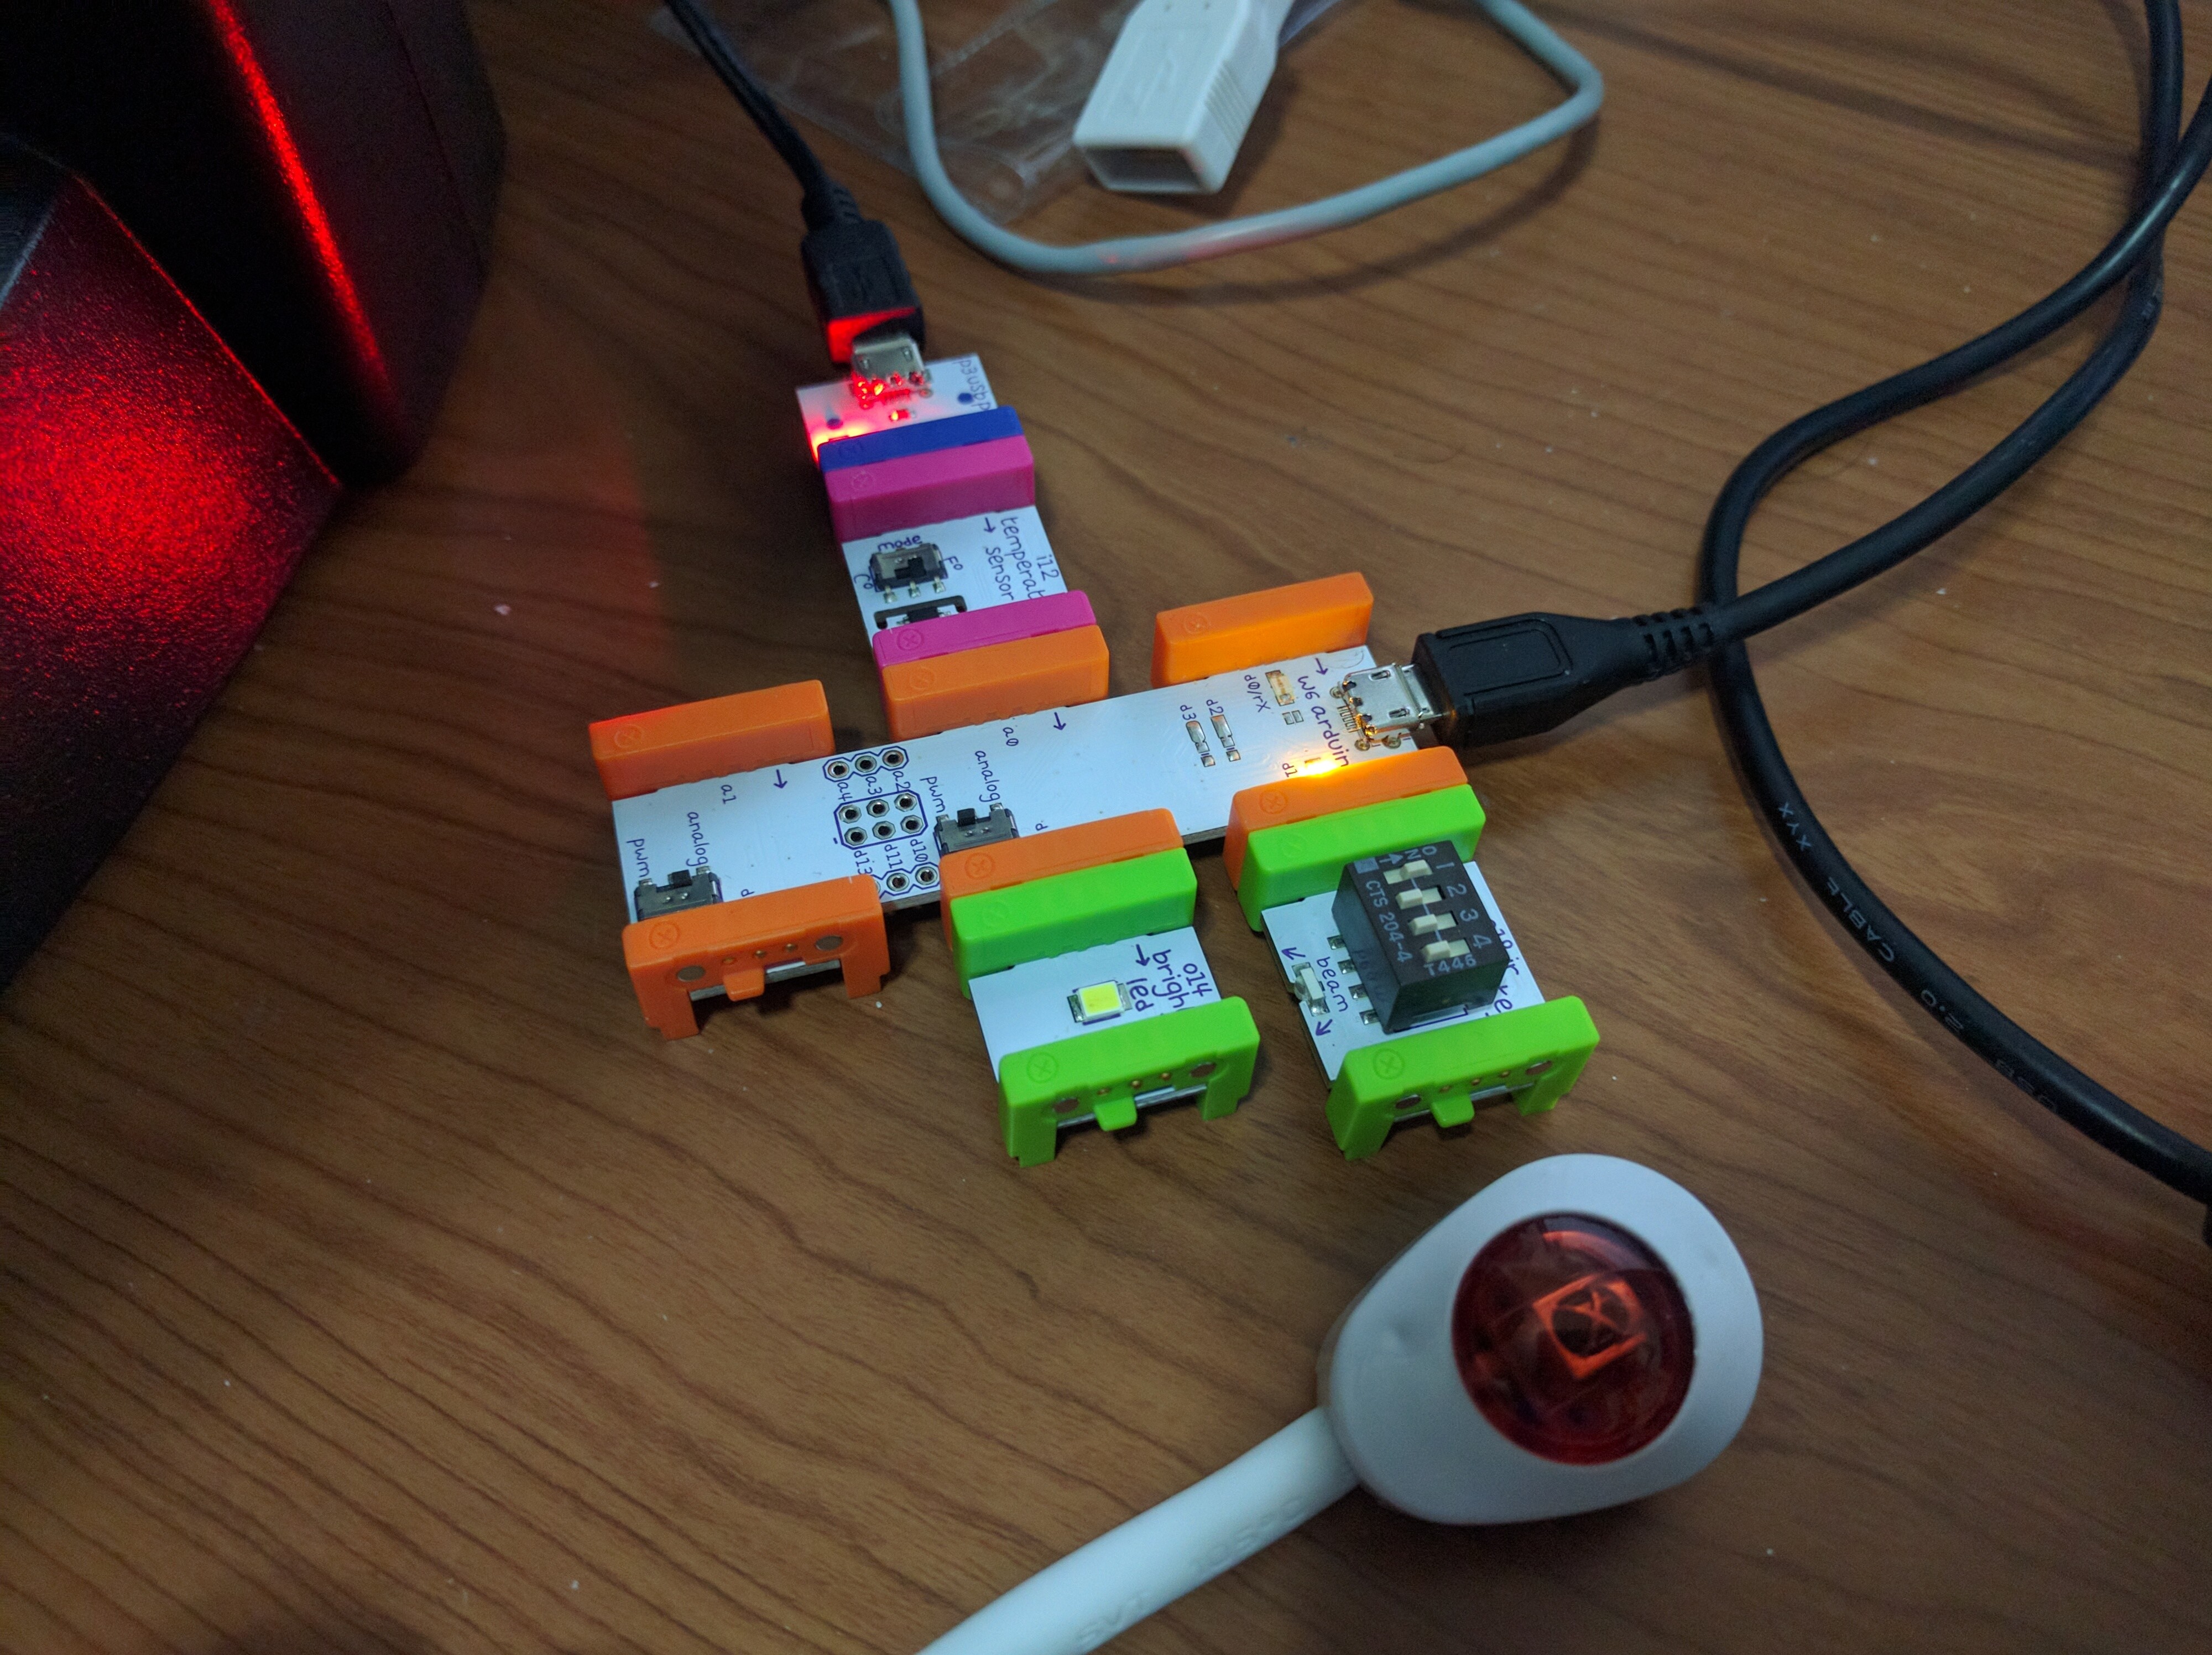
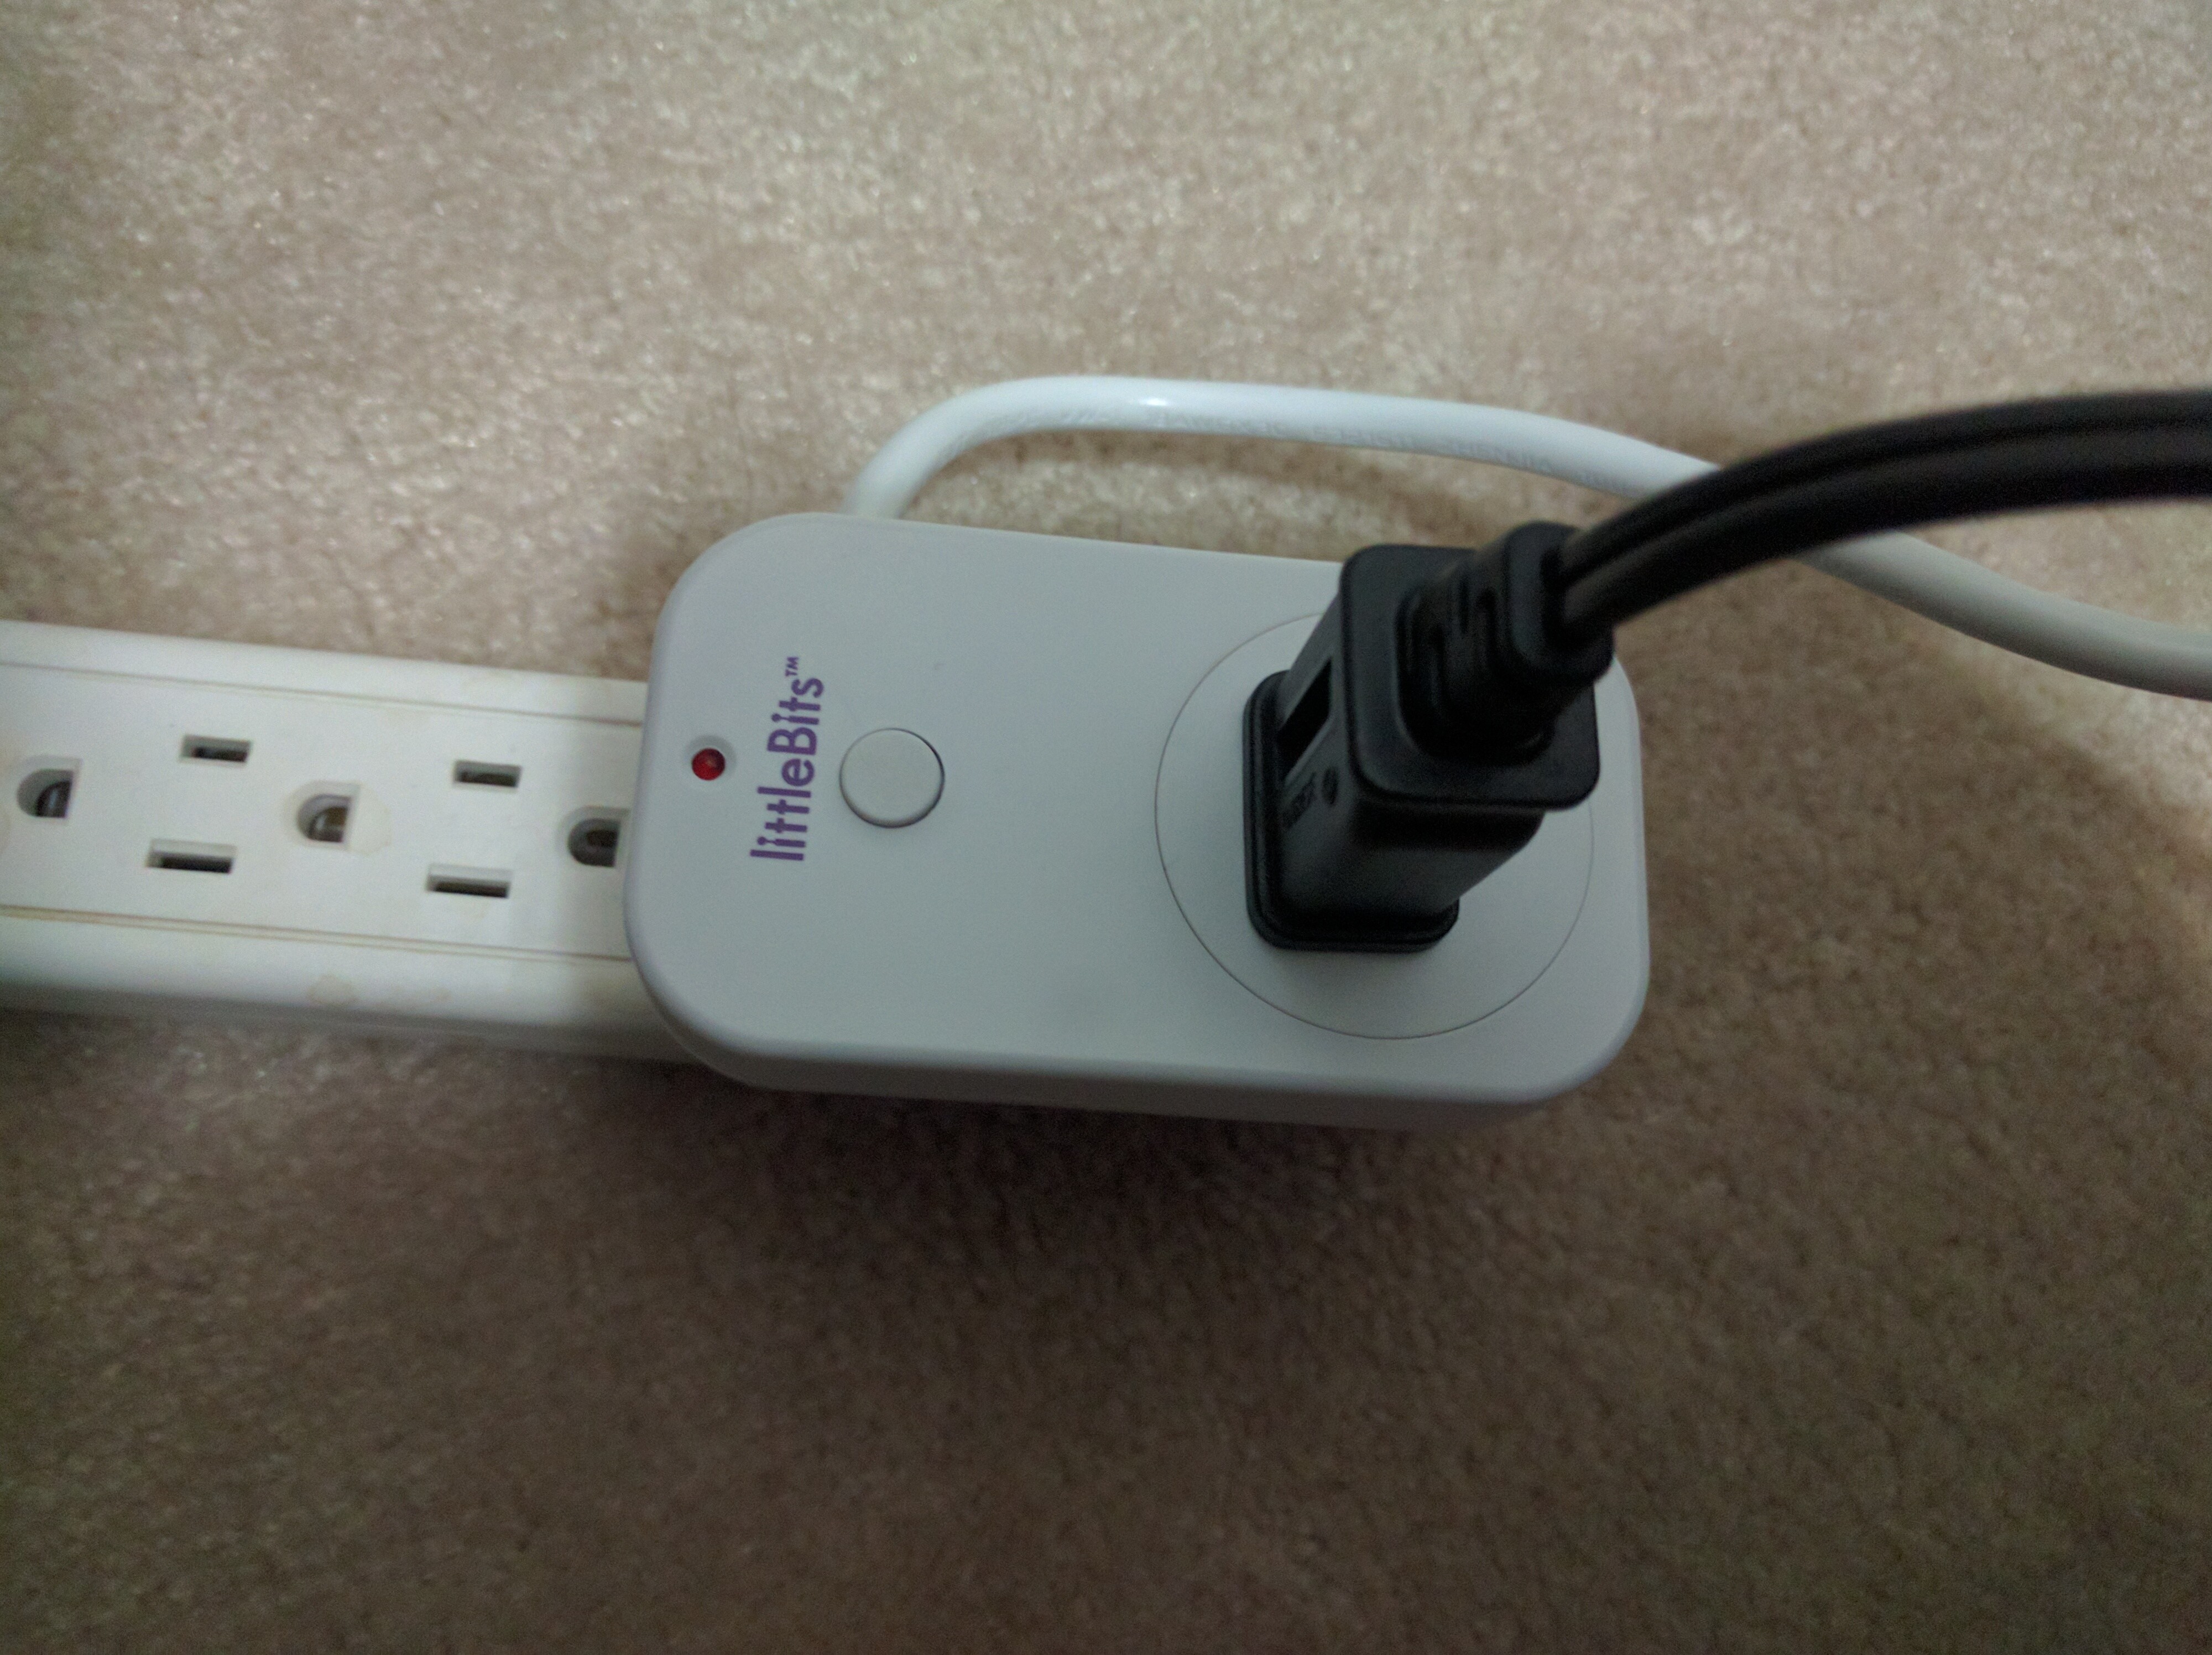
- IoT LittleBits Device
- Hololens App
Fan, LED Light, Temperature Sensor is connected to Littlebits Smart Home Kit and Littlebits Arduino.
The Arduino is connected to my laptop via USB, I used Johnny-Five to communicate to Arduino. The NodeJS app sends and receives UDP packets to a Hololens App via WiFi.
If you want to learn more how to setup Littlebits Arduino using Johnny-Five, checkout Anna Gerber great tutorial.
https://github.com/AnnaGerber/little-bits-js
I used Temperature Sensor, Arduino, AC & IR to control the fan, and LED bit.
Here's the code I used:
var HOST = '192.168.1.11';
var PORT = 12345;
var SRVPORT = 12346;
var SRVHOST = '192.168.1.8';
var dgram = require('dgram');
var five = require("johnny-five");
var board = new five.Board();
var dgram = require('dgram');
var server = dgram.createSocket('udp4');
var client = dgram.createSocket('udp4');
board.on("ready", function() {
var sensor = new five.Sensor({
pin: "A0",
freq: 250,
threshold: 0.5
});
// Scale the sensor's data from 0-1023 to 0-10 and log changes
sensor.scale(0, 100).on("change", function() {
	console.log(this.value);
	var message = this.value.toString();
	client.send(message, 0, message.length, PORT, HOST, function(err, bytes) {
	//if (err) throw err;
	//console.log('UDP message sent to ' + HOST +':'+ PORT);
	//client.close();
		});
	});
server.on('listening', function () {
var address = server.address();
console.log('UDP Server listening on ' + address.address + ":" + address.port);
});
var pin = new five.Pin(1);
var pin5 = new five.Pin(5);
var pin9 = new five.Pin(9);
server.on('message', function (message, remote) {
	console.log("-" + message + "-");
	if (message == "hello")
	{
		HOST = remote.address;
		PORT = remote.port;
	}
	else if (message == 'fan-on')
	{
		pin.high();
	} else if (message == 'fan-off')
	{
		pin.low();
	}
	else if (message == 'light-on')
	{
		pin5.high();
	} else if (message == 'light-off')
	{
		pin5.low();
	}
	else if (message == 'sound-on')
	{
		pin9.high();
	} else if (message == 'sound-off')
	{
		pin9.low();
	}
});
server.bind(SRVPORT, SRVHOST);
});
null
SRVHOST and SRVPORT is the current IP address of the machine connected to Littlebits Arduino.
The HOST and the PORT is the Hololens ip address and port. When the Hololens app sends 'hello' message, it updates the HOST and PORT ipaddress.
Sending the temperature is simple in Johnny-Five. I scale the sensor to 0-99 (the littlebits temperature only goes up to 99 degrees). When temperature changes to more/less than 0.5 threshold, this program would send that info to Hololens or oculus by using client.send.
var sensor = new five.Sensor({
pin: "A0",
freq: 250,
threshold: 0.5
});
// Scale the sensor's data from 0-1023 to 0-10 and log changes
sensor.scale(0, 100).on("change", function() {
	console.log(this.value);
	var message = this.value.toString();
	client.send(message, 0, message.length, PORT, HOST, function(err, bytes) {
	//if (err) throw err;
	//console.log('UDP message sent to ' + HOST +':'+ PORT);
	//client.close();
		});
	});
server.on('listening', function () {
var address = server.address();
console.log('UDP Server listening on ' + address.address + ":" + address.port);
});
null
When the node app receives a UDP message, it parses and triggers the appropriate pin.
var pin = new five.Pin(1);
var pin5 = new five.Pin(5);
var pin9 = new five.Pin(9);
server.on('message', function (message, remote) {
	console.log("-" + message + "-");
	if (message == "hello")
	{
		HOST = remote.address;
		PORT = remote.port;
	}
	else if (message == 'fan-on')
	{
		pin.high();
	} else if (message == 'fan-off')
	{
		pin.low();
	}
	else if (message == 'light-on')
	{
		pin5.high();
	}
null
I can test this by sending udp packets using command line.
>echo -n "fan-on" | nc -u -v -w 1 192.168.1.8 12346
>echo -n "fan-off" | nc -u -v -w 1 192.168.1.8 12346
Developing for Hololens is amazing. The documentation and the forums are great.
Here's my desktop in Hololens. You can see surrounding areas.
Oculus Rift is Virtual Reality, Hololens is Mixed Reality. Hololens would map the surrounding area and allow developers to use that information. Oculus Rift does not have this capability.
Either way, this project runs on both. The only difference is that Oculus Rift cannot overlay the BIM design to Real World.
First I followed the instructions from this Holographic Academy tutorial
https://developer.microsoft.com/en-us/windows/holographic/holograms_101e
Very useful.
Since I want to connect the Hololens to an IoT device, you can use Bluetooth, (I was able to connect a bluetooth mouse, IMHO, easiest way to navigate inside Hololens, less arm strain). I opted out to send and receive UDP/Datagram packets via WiFi. The range is better since the Hololens is untethered device compared to Oculus Rift.
In Unity, I created an empty Game Object that will facilitate the connected between the IoT device and Hololens/Oculus Rift. I rename it to UDPCommunications then I copied this script to my unity project and attach this script to UDPCommunications Game Object.
https://github.com/rondagdag/hololens-littlebits/blob/master/UnityScripts/UDPCommunication.cs
Since UWP does not run inside Unity, we have to test for UnityEditor
#if !UNITY_EDITOR
.... code here....
#endif
This is how you open a Datagram socket and receive messages. The external IP and port is the ip address of nodeJS app.
When the app starts, it would send a "hello" message to the NodeJS app just to capture IP address of Hololens.
public class UDPCommunication : Singleton
{
public string port = "12345";
public string externalIP = "192.168.17.110";
public string externalPort = "12346";
const string FAN_OFF_MESSAGE = "fan-off";
const string FAN_ON_MESSAGE = "fan-on";
const string LIGHT_ON_MESSAGE = "light-on";
const string LIGHT_OFF_MESSAGE = "light-off";
const string TEMPERATURE_MESSAGE = "temperature";
public readonly static Queue ExecuteOnMainThread = new Queue();
#if !UNITY_EDITOR
DatagramSocket socket;
#endif
// use this for initialization
#if !UNITY_EDITOR
async void Start()
{
Debug.Log("Waiting for a connection...");
socket = new DatagramSocket();
socket.MessageReceived += Socket_MessageReceived;
HostName IP = null;
try
{
var icp = NetworkInformation.GetInternetConnectionProfile();
IP = Windows.Networking.Connectivity.NetworkInformation.GetHostNames()
.SingleOrDefault(
  hn =>
      hn.IPInformation?.NetworkAdapter != null && hn.IPInformation.NetworkAdapter.NetworkAdapterId
      == icp.NetworkAdapter.NetworkAdapterId);
await socket.BindEndpointAsync(IP, port);
}
catch (Exception e)
{
Debug.Log(e.ToString());
Debug.Log(SocketError.GetStatus(e.HResult).ToString());
return;
}
var message = "hello from " + IP;
await SendMessage(message);
await SendMessage("hello");
Debug.Log("exit start");
}
This is how messages are sent.
private async System.Threading.Tasks.Task SendMessage(string message)
{
using (var stream = await socket.GetOutputStreamAsync(new Windows.Networking.HostName(externalIP), externalPort))
{
using (var writer = new Windows.Storage.Streams.DataWriter(stream))
{
  var data = Encoding.UTF8.GetBytes(message);
  writer.WriteBytes(data);
  await writer.StoreAsync();
  Debug.Log("Sent: " + message);
}
}
}
This is how message is received in the Hololens App. Assigns the temperature value to the Thermostat 3D object.
#if !UNITY_EDITOR
private async void Socket_MessageReceived(Windows.Networking.Sockets.DatagramSocket sender,
Windows.Networking.Sockets.DatagramSocketMessageReceivedEventArgs args)
{
Debug.Log("GOT MESSAGE: ");
//Read the message that was received from the UDP echo client.
Stream streamIn = args.GetDataStream().AsStreamForRead();
StreamReader reader = new StreamReader(streamIn);
string message = await reader.ReadLineAsync();
Debug.Log("MESSAGE: " + message);
if (ExecuteOnMainThread.Count == 0)
{
ExecuteOnMainThread.Enqueue(() =>
{
  Thermostat.Temperature = float.Parse(message);
});
}
}
#endif
null
Hololens run UWP apps and must be compiled as Windows 10. The Holographic tutorial walks thru compiling a Hololens app. When you build, Don't forget to select Universal 10, D3D Build Type. go to Player Settings -> Capabilities, click on InternetClient, InternetClientServer and PrivateNetworkClientServer. This will allow your app to receive and send network data.
I also tested this hack on Oculus Rift, the head tracking works inside Unity. BIM Model loads, but the IoT integration is not supported. If I compile as a UWP app, I loose VR capabilities when I run it inside Visual Studio. If I rewrite this as win32 instead of UWP, it will work.
Final ThoughtsI've learned a lot from this Hackathon. I made new friends and definitely excited to develop for the Hololens. Hololens is not just gaming, I can see how the AEC (Architecture, Engineering, Construction) industry would benefit from this technology.
I thank Dona Sakar, the Microsoft Hololens team, and other organizers that made this Hackathon possible. I look forward participating in future HoloHacks. Hint, Hint: Dallas
If this project made you interested in developing in Hololens, Mixed Reality apps, tinker with Littlebits Arduino, or just learned something from this article, please click respect and follow me. Feel free to contact me if you have questions. Thanks.


Comments