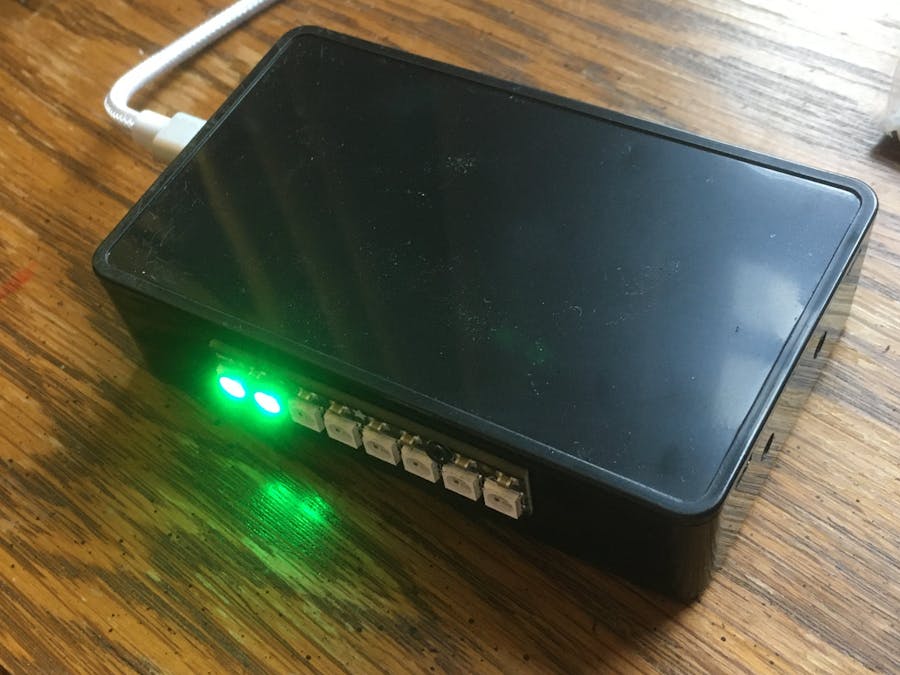
Having too many people in one room with poor ventilation can lead to unsafe conditions and an increased probability of sharing airborne viruses. Using ThingSpeak to track the air quality enables live alerts and the ability to visualize historic trends. With this monitor, you can immediately see the local air quality on the 8 pixel LED strip, you can look up what the air quality was yesterday on ThingSpeak, and you can even check the safety of the room when you are far away.
This project creates a working air-quality monitor that measures several environmental variables to compute an Air quality measurements and CO2 equivalent concentration estimate. The instructions are designed to require minimal assembly but result in a working high-quality device. The LED array provides a flexible communication output.
The BME680 air quality sensor reports a calculated air quality measurement and the accuracy of its measurement. The accuracy of the calibration is shown on the LED array as the number of pixels that are lit. The accuracy range is from 0 to 3, so two pixels are lit for each of the accuracy categories. The color of the pixels corresponds to the air quality measurement, from green at 25, yellow at around 200, and red above 400.
1) Use a file to remove the protrusions on the solderless breadboard so that it fits snugly in the suggested box. A snug fit is desired to ensure the USB cable can be plugged in without the board sliding around in the box.
2) Press the header that comes with the BME680 into the breadboard in row e as shown in the image below. Place the BME680 sensor on the header. You may also want to support the opposite side of the sensor so that it will solder straight. Solder the header pins, being sure not to make cold joints or short any pins.
3) Place the BME680 and Nano 33 IoT. The USB connector on the Nano faces to the outside, and the pins go in row e and i. The antenna on the Nano 33 IoT is easy to break. Use care when placing or removing the Nano 33 IoT.
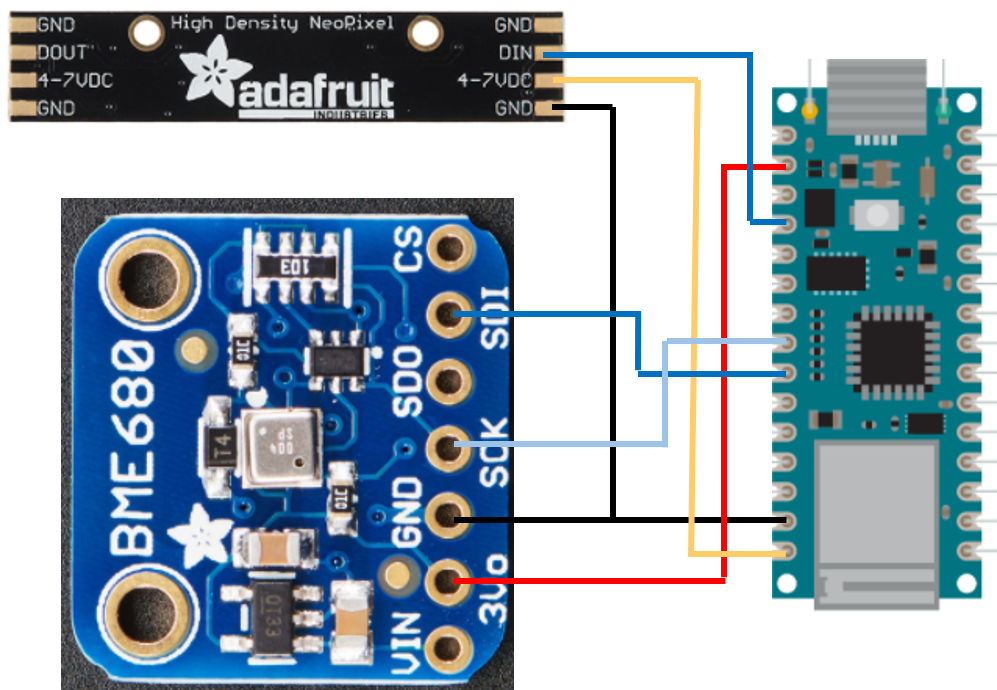
4) Place the wires in the breadboard. I strongly recommend color-coding your wires. I used yellow for both voltage levels, but since there are two separate power voltages (5 V and 3.3 V) it is better to use yellow and red to clearly show the two power levels.
5) Place the solderless breadboard in the bottom of the box. Mark holes for the NeoPixel wires and the USB connector.
6) Use a file or Dremel to make a 1.5 cm x 2 cm slot for the USB cable. Use a drill to make a hole for the NeoPixel wires. I suggest at least a 10 mm hole to make sure the NeoPixel stick lays flat. Drill several other holes in each side of the box for airflow. Resist the temptation to drill holes after assembly. I've destroyed a few prototypes when the drill bit slips.
7) Solder three approximately 2 cm-long wires to the NeoPixel stick. Solid core wires are best. Pre-strip the insulation before soldering to avoid accidentally damaging the pads by pulling on the wires. Be sure to use the side with DIN. (DIN is on the right side in the image below.) Only one ground connection is needed. Make sure the pads gets heated well to make a good solder joint.
8) Place the breadboard in the bottom of the box and feed the NeoPixel stick wires through the appropriate hole. Drill 1.5 mm pilot holes to hold the stick in place. Use slow, steady pressure to thread the M2 screws into the plastic case and hold the stick in place. Connect the NeoPixel wires as shown in the image above. You can use the 3.3 V power, but I suggest the 5 V power supply for the NeoPixels to give the best output.
Note: A 470-ohm resistor on the data line and a 1000 uF capacitor from input power to ground will help protect your NeoPixels. These components are not shown in these images.
9) Place the lid and plug in the USB cable.
ThingSpeak1) Create a ThingSpeak account if you don't already have one, or sign in to your account.
2) Create a ThingSpeak channel, using the top menu Channels > My Channels > New channel. Enable all eight fields using the checkboxes and provide names for each field. Record the write API key from the API Keys tab and the Channel ID on the upper left in the channel view.
1) Start a new Arduino sketch. In the Arduino IDE, use Sketch > Include Library > Manage Libraries to install libraries if you don't already have them. Enter the name of the library in the search bar. You need these libraries for this sketch:
- FlashAsEEPROM
- bsec
- ThingSpeak
- Adafruit_NeoPixel
- WiFiNINA
Use FlashStorage in the library manager to find the FlashAsEEPROM library. Some devices, such as ESP8266, may not need this library to use EEPROM.
2) Paste the code. Edit the WiFi information ssid and pass. Also edit the myChannelNumber and myWriteAPIKey.
3) Since the BSEC library is precompiled, you need to modify the build procedure. Modify the platform.txt file on your computer as described in step 3 of the BSEC GitHub site.
4) Select the appropriate COM port and program the device.
Create Email AlertLog in to ThingSpeak and use the top menu to select Apps > MATLAB Analysis.
2) Select New and name your analysis. Paste the code and change the channel ID to match your channel. If your channel is private, you will need to add the read API key.
% Channel Information
channelId = nnnnnnnn;

% Get hourly Air Quality measurements
myData = thingSpeakRead(channelId,'Field',7, 'numdays',1, ...
    'OutputFormat','TimeTable');
hourlyData = retime(myData,'hourly','linear');

% Calculate the maximum value and set a desired maximum
[largestValue, index] = max(hourlyData{:,1});
threshold = 4000;

% Provide the ThingSpeak alerts API key.  All alerts API keys start with TAK.
alertApiKey = 'TAKxxxxxxxxxxxxx';

% Set the email options
alertUrl="https://api.thingspeak.com/alerts/send";
options = weboptions("HeaderFields", ["ThingSpeak-Alerts-API-Key", alertApiKey]);

% Set the outgoing message
alertBody = sprintf(' Largest hourly value %.1f at %s', largestValue, hourlyData.Timestamps(index));
if (largestValue <= threshold)
    alertSubject = sprintf(" Over threshold for last 24 hours");
elseif (largestValue > threshold)
    alertSubject = sprintf(" Last 24 hours within specification");
end

webwrite(alertUrl , "body", alertBody, "subject", alertSubject, options);
3) Use the TimeControl app to schedule the code. Select Apps > TimeControl and click New TimeControl. Name your TimeControl, select recurring for Frequency. Choose Day for Recurrence. Pick MATLAB Analysis for the Action and select the code you just created for Code to execute.


Comments
Please log in or sign up to comment.