


Let's Get Started: The ARTIK 10 Alpha
Samsung is making a big effort into entering the Internet-Of-Things melee. ARTIK appears to be a true platform (hardware and software) with local connection services, coordination, security, and connectivity that will also connect with their own services (Samsung SAMIIO, or SAMI) in the cloud.
What are SAMI cloud services? SAMI is an open-API data exchange ‘platform’ that will allow devices and sensors to easily push data to the cloud. Once there, the data can easily be digested by mainstream mobile devices and other standard web applications. SAMI has a handful of APIs currently available. Soon it may offer the ability to control and access data associated with Leviton switches, Kwikset Deadbolts, Philips lightbulbs, and many more.
The real issue with providing your data to the cloud (or even a local device) is securing it. Even if the cloud provider’s service is hacked, the data should be encrypted and independently secured, and only accessible to your devices with your private keys.
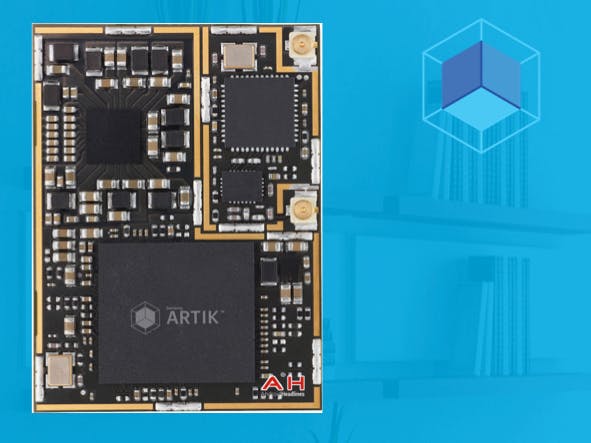
The ARTIK 10 processing module measures 29x39mm and boasts an ARM Octa-core processor capable of powering
a smartphone or media hub. It sports a
1.3 Ghz processor, 2GB of ram, and 16GB of eMMC flash memory.
The preliminary development board that the ARTIK module sits on is considerably larger to include the interface electronics for network, USB, and radio links (Z-wave, NFC, WiFi, Bluetooth, ZigBee, SIGFOX).
These communication links are ideal for integrating all of the various wireless devices and securing their data locally. In addition, ARTIK can work as a gateway for getting this secured data into the cloud for easy access from other devices. Built into ARTIK is a ‘trusted execution environment’ (TEE) that ensures sensitive data is stored, processed, and protected in an isolated environment. It can offer isolated safe execution of ‘trusted applications’ and can enforce (a) protected execution of authenticated code, (b) system integrity, (c) and data access rights. This type of environment is readily, necessarily, and often leveraged by encrypted digital content, e-commerce (payments), and enterprise data.
Going Deeper: Linux on the ARTIK Board
Unsurprisingly, ARTIK runs on Linux. The ‘/etc/os-release’ file indicates that the
distribution is based on Fedora 20, and ‘uname -a’
indicates that the Linux core is 3.10. The provided package manager is ‘Yum.'
Bringing the development board up and logging on:
Step 1: Connect the debug board to the development board using the debug cable.
After flipping both boards over, the blue tab
on the cable should be facing down.
Flip
the black clip up on the reference board connector, insert the cable into the
bottom of the reference board, and then press the black clip back down. (for detailed images and instructions (including instructions for using the board with OSX), check out ARTIK's getting started guide here).
Step 2: Connect the antenna onto the wi-fi+BT connector.
If all of the connectors are pointed at you, the wi-fi+BT connector will be the second from the left.
Step 3: Connect the USB-to-Serial (DB9 connector)
adaptor to the debug board.
When you plug the USB cable of the adapter into your PC, the port should automatically be detected and the drivers loaded. In windows, the device shows up as a “Prolific USB-to-Serial Comm Port."
Step 4: Identify the Comm Port and connect with PuTTy.
Through the device manager, identify the comm port. Using that information, you can connect to the device using a terminal program such as PuTTy. In the example below, the port number is “24”.
Once the comm port is identified, PuTTY can connect to it using a serial speed of 115200:
Step 5: Connect a network cable into the jack to give ARTIK network access.
Step 6: Power on the board.
Insert the power cable *and* then press the power button (the power button is the small black push button right next to the power connector). If everything is connected properly and PuTTY properly configured, you should see a linux console window actively booting Linux.
Step 7: Login to the board
At the end of the linux boot, the console window will provide you with a login prompt. The following default credentials should allow you to logon:
login: root
password: f@s)P!A$RTNER
Upgrading the firmware:
Shortly after receiving the initial prototype hardware, I receive a firmware update in the form of an “.img” disk image file (“artik10_sd_fuse.img”).
Using the Win32DiskImager utility available on Sourceforge,
I created a bootable SD card image for the ARTIK.
- Insert the SD card into your SD card reader and check which drive letter was assigned. You can easily see the drive letter (for example
G:) by looking in the left column of Windows Explorer. You can use the SD Card slot (if you have one) or a cheap SD adaptor in a USB port. - Download the Win32DiskImager utility from the Sourceforge Project page (it is also a zip file); you can run this from a USB drive.
- Extract the executable from the zip file and run the
Win32DiskImagerutility; you may need to run the utility as administrator. Right-click on the file, and select Run as administrator. - Select the image file you extracted above.
- Select the drive letter of the SD card in the device box. Be careful to select the correct drive; if you get the wrong one you can destroy your data on the computer's hard disk! If you are using an SD card slot in your computer and can't see the drive in the Win32DiskImager window, try using a cheap SD adaptor in a USB port.
- Click
Writeand wait for the write to complete. - Exit the imager and eject the SD card.
In my case, I used my laptop’s SD card slot and an unused SD
card to write the image to. Once the
image is written to the SD card, turn off the ARTIK and insert the card. In the following image, the SD card slot is to the right of the LEDs, and the
2 boot mode slide switches are to the left of the LEDs.
Normally, the 2 boot mode switches are set to “off." Before turning on the board set Switch ‘2’ to the ‘on’ position to allow the automatic firmware update. Once power is applied, the board should boot and automatically start updating itself. You can see the update happen in real time and watch its progress using the serial console window. After the update is complete, power down the ARTIK, remove the SD card and set both switches back to the “off” position.
With the SD card removed and the switch set back to their normal position, power the board back up and verify that it boots correctly.
One relevant thing I noted during the upgrade process was that the linux distribution is related to the ‘Yocto’ project.
Poky (Yocto Project Reference Distro) 1.7 artikpro /dev/ttySAC3
This fact, in combination with knowledge that it is based on
Fedora 20 (‘/etc/os-release’), is extraordinarily helpful when
doing Google searches on how to configure something.
Adding a new linux user to develop with:
Consistent with best practices, it is usually best to work on a system with your own identity, as opposed to relying on the default ‘root’ user.
Initially, logged in as ‘root’, use the following commands to create a new user:
adduser <new-user-name> -g root
passwd <new-user-name>
To provide this new user with sufficient privileges to do
system configuration, allow the user to have ‘sudo’ access. This is done using the utility “visudo” that pops up a ‘vi’ editor. In the file that is being edited, add the
line:
<new-user-name> ALL=(ALL) ALL
This will allow the user to have sudo privileges from any terminal and access to all commands.
Then logout and log back in as <new-user-name> to verify the last operations worked.
Providing SSH access:
Having a Linux shell console access that isn’t dependent on network drivers or other frail configuration is essential. But because the console shell continues to randomly print out status messages, it is not ideal to work in (particularly when editing with ‘vi’). Instead, the way to proceed is to provide the new user SSH access. Once established, shell access no longer requires a serial connection, multiple simultaneous shells are possible, and console debug statements will no longer interfere.
To allow the new user to ssh, edit the sshd configuration file:
sudo vi /etc/ssh/sshd_config
Add the <new-user-name> to the line at the end of file so it reads like:
AllowUsers meghauser root <new-user-name>
Network access:
The board’s default configuration uses DHCP. Generally, this is convenient, but in this case there is a slight wrinkle. Every time the board boots, it appears to get a new/different IP address. I assume that it may be presenting different and/or random generated MAC addresses, but I haven’t validated that.
To make network and SSH access simpler, it helps to assign the network interface a static IP address.
Temporarily, this can be done with:
ifconfig eth0 <newIP>
Unfortunately, though, that does not survive reboot. To ‘permanently’ set the IP address, edit the
file /etc/sysconfig/network-scripts/ifcfg-eth0 to look
much like this (after substituting your own desired network parameters):
# Generated by IoT Hub Network Manager
DEVICE="eth0"
TYPE="Ethernet"
ONBOOT="yes"
BOOTPROTO="static"
USERCTL="no"
IPADDR=192.168.200.123
NETMASK=255.255.255.0
BROADCAST=192.168.200.255
NETWORK=192.168.200.0
GATEWAY=192.168.200
Updating software packages:
The package manager used in the Yocto Fedora distribution is ‘Yum’.
The find out if there are any later packages available:
yum list updates
To actually update to the latest packages (I had to do it twice for it to complete):
sudo yum update
And to clean up and reclaim space:
yum clean all
Configuring wi-fi access:
Out of the box, the board comes with an operating wi-fi driver. To get it to act as an access point, or to get it to connect to your own access point, it will need configuration.
When searching on how to do this, be aware that the instructions for connecting to a WPA/WPA2 access point are different than the prior WEP ones. The following page provides pretty detailed instructions relevant to this linux distribution to allow you to connect to your WPA/WPA2 wi-fi access point:
http://forums.fedoraforum.org/showthread.php?t=235989
And since the wi-fi is started in the /etc/rd.d/rc.local
script, this is where you can add a command for the wireless connection to get
its IP address. If you are using DHCP,
use
/sbin/dhclient wlan0
If using a static address, use:
ifconfig wlan0 <ipaddress>
Tip:
An oddity I encountered using this device had to do with how the network interfaces interacted with ARTIK's preliminary web application. It appears that ARTIK's web application has an instance for each network interface. That is, any changes I did through the hardwired interface (eth0) only affected that configuration. If I simultaneously brought up a browser on the wireless interface (wlan0), I had to start all over.
Wrap-up:
In summary, this appears to be a very impressive platform, even in Alpha stage. By the time Beta and RTM will be ready, developers will be able to connect the boards to cloud services to help them build applications. I look forward to continued testing of ARTIK and SAMI in the coming weeks and months of this rolling release.


Comments
Please log in or sign up to comment.