Change Counts is a coin counter, but not any regular coin counter. It’s a coin counter that will display information online, so others can also see the dollar value of the coins counted. You may be asking now, why would you want to show people how many coins you’ve counted?
Well, for fundraising, many organizations incorporate penny wars, where teams compete against one another to raise money. In penny wars, each team has their own respective jar, and the point of the game is to achieve the highest score. Each team can increase their score by putting in pennies into their own jar. They can also put nickels, dimes, and quarters into other jars to decrease the other teams' scores. You may be wondering now, why do higher value coins lower a team's score? Well, pennies are worth 1 point, nickels are worth -5 points, dimes are worth -10 points, and quarters are worth -25 points. Therefore, team members should put pennies into their own jar to increase their score, and other coins into opponents' jars to decrease their score. This method of raising money is incredibly effective, as it is a fun game that allows teams to compete against one another.
However, from these penny wars there are two main issues. One is that much momentum is lost because the teams do not know how much each team has until the end of the donation period, so people won't know which jar to put the other coins into. This inevitably prevents people from donating as much as they potentially would if they knew the scores. Additionally, counting hundreds and thousands of coins is tedious and can take days after the donation period has ended to figure out who has won. The Change Counts IoT Coin Counter will eliminate that problem! Not only will all the coins be counted right away, but teams can also go online and see how much they need to beat the opposing team, which could potentially lead them to donate more.
How It WorksThere are three main parts of the IoT coin counter. They consist of the product design, user interface, and the coin profiling system. Each of the components have their own unique subsystems that function separately either as a physical or program enhancement.
Product Design
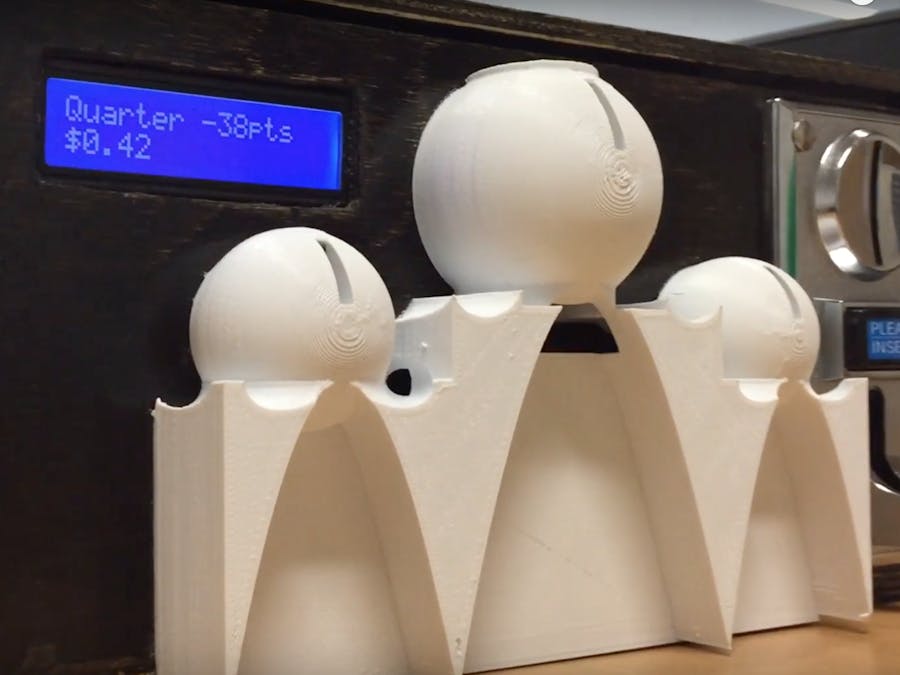
The product design consists of the front plate, and the overall design of the coin counter. The front plate resembles the Taj Mahal and derives from our team name, Team TAJ, which stands for Tiffani, Ali, and Jeremy. This plate adds aesthetic value to the final product. Additionally, the lid of the box is connected with hinges, allowing easy access to the electronic components within the box. Next, there is the acrylic window on the side. This was initially going to be used to see coins fall down a ramp and exit the coin counter. However, we no longer decided to use the LDC1000 inductance to digital converter. Because it was replaced with the coin acceptor, it allows people to see what the opposite side of the coin acceptor looks like. Finally, the large size of the box allows the components to be easily handled within the box.
User Interface
The user interface consists of the LCD screen on the coin counter box itself, as well as the online dashboard. Both of the displays give information about score and money raised. However, there are many differences. The LCD screen also shows the last coin that was inserted into the coin counter, which is something that the online dashboard does not show. In contrast, the online dashboard gives in depth stats of the overall penny wars event. It displays a graph of which team was winning at what time. It also shows the stats for each team instead of just one specific team. This allows anyone who participates in the donation drive to easily go to the webpage and quickly see an overview of the entire event and how much has been raised.
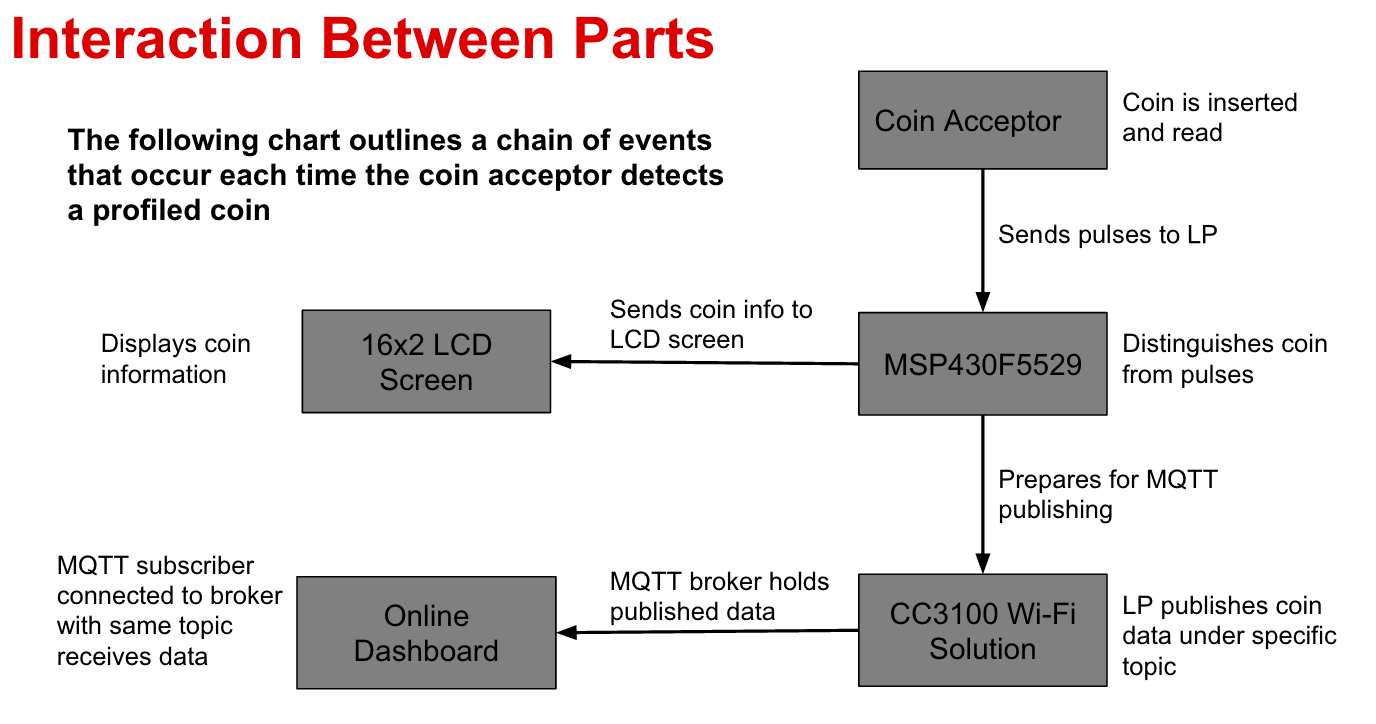
The online dashboard would not be a feature without the use of MQTT (Message Queue Telemetry Transport), which is commonly used in IoT devices and mobile applications. This was done through the use of IBM's Bluemix and Node-Red. This allowed us to create a node that receives the information from the MQTT publisher and display it on the webpage. For more information about incorporating MQTT to your IoT devices, click HERE. This simple method allows us to display the data from the coin counter online. Basic html, CSS, and javascript was needed to properly create this webpage. If you would like to see the webpage used for this project, visit http://iotcoincounter.mybluemix.net/test
Coin Profiling System
The coin profiling system consisted of just one part, the coin acceptor. The coin acceptor used in this project was easily programmable from the instructions given. However, it was not that easy because we also had to send the data to the MSP430F5529 LaunchPad. After one of the four coins were discerned, it would send a number of pulses to the LaunchPad. If a penny was inserted, one pulse would be sent. If a nickel was inserted, two pulses would be sent. If a dime was inserted, three pulses would be sent. Finally, if a quarter was inserted, four pulses would be sent. These pulses were not grouped when they were sent, so if a quarter was inserted, the LaunchPad would receive the pulses individually, which would cause the system to discern every coin as a penny. This is why we had to group the pulses with a timer to ensure that the coin was being interpreted by the system properly. Additionally, if a foreign coin that was not profiled was inserted, the coin acceptor would return the coin and send 0 pulses to the LaunchPad.
Throughout the project, we had many issues that we had to solve. One of the biggest issues we were dealing with was the LDC1000 inductance to digital converter. This is a fairly new product from Texas Instruments, and we were determined to use it to profile the coins instead of the coin acceptor, but because there was little information available for incorporating it into our specific setup and our unfamiliarity with the Code Composer Studio, we decided to switch.
Another issue was powering the entire system because the coin acceptor runs on 12 volts, while the LaunchPad runs at 5 volts, so connecting a 12 volt adapter to power both was not a proper solution. This is where we had to incorporate the LM7805 voltage regulater that steps the 12 volts down to 5 volts. To connect the entire system, we ran the circuit in parallel, attatching the LM7805 to the LaunchPad portion.
There were many other issues faced throuhgout this project, and they are explained in depth on our blog: https://changecounts.wordpress.com/


Comments
Please log in or sign up to comment.