How to Interface BMP180 module with Esp8266 and send the data to IOTGuru.cloud
In this IoT(internet of things) based project, I will explain how can we connect BMP180 sensor module, with esp8266 and this microcontroller will be using IOTGuru Library, in order to send the sensor reading to IOTGuru platform. In this project we will be using MQTT protocol example from IOTGuru Library app in order to send sensor data to the IOt guru website/App, So in this project we are making internet of thing based temperature forecasting system.What is MQTT ?
MQTT stands for Message Queuing Telemetry Transport. MQTT is the machine to machine connectivity protocol, and the best thing about this protocol that it can be connected with multiple devices, it is the system where we can publish, get and send subscribed messages as
client, So IOTGuru.cloud is the similar platform and with this IOGuru.Cloud platform we can send commands to control the outputs read and publish the data from the sensor and much more. However, by using MQTT Protocol we can establish communication between multiple devices. Also by using MQTT we can send a command with a client to control output or you can read data from a sensor and publish it to a client, Therefore, there are two main things in MQTT i.e client and broker.
So without any further due let’s get into it, Collect the Hardware Requirements
· Esp8266 Nodmcu
· BMP180 Sensor
· Bread Board
· Jumper Wires
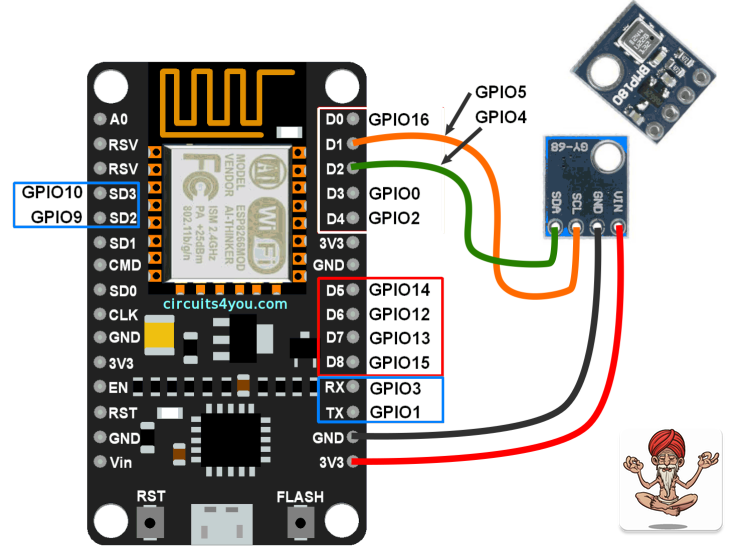
Wire up everything as I mention below in the Fritzing Diagram, 3v pin should be connected with vcc of sensor, ground to ground, D1 pin goes to the SDA pin of sensor and D2 pin goes to the SCL pin of BMP180 sensor module.
After wiring up everything let’s upload the code to Esp8266,
Collect the Software RequirementsInstall Arduino IDE, add these two libraries, by doing the follow steps.
After adding these two libraries let’s move for the Esp8266 Additional Board Setting for Arduino IDE, Follow the steps below
Go to File “Preferences” then click on “Additional Boards Manager URL”
http://arduino.esp8266.com/stable/package_esp8266com_index.jsonAdd the above line in the Additional URL Of Arduino IDE,
Go to Board Manager, and search for esp8266, Next Download and install as I showed below.
Next upload the code, But before uploading the code modify the code for your platform, Go To IOTGURU.cloud, Signup and login, and After it follow the below steps which is showed in the image below.
In order to modify the code, simply note down all the token details which are shown below in the image follow these steps and note down all the details from your account, nodes, and field.
Just add your Token code in the Arduino Ide Sketch and upload the code to your Esp8266,
After the upload next step is Add the Widgets to your IOTGuru app. Simply download and install the Android Based app From your play store and perform the steps below.
In this tutorial, we’ve shown you the basic concepts that will allow you to collect the sensor data and send it to the IoT Guru based app using theMQTT communication protocol. You can follow these basic steps to build more advanced projects iotguru.cloud.
We hope you’ve found this tutorial useful.


Comments
Please log in or sign up to comment.