


Hardware components | ||||||
| × | 1 | ||||
| × | 1 | ||||
Software apps and online services | ||||||
 |
| |||||
This tutorial will show you how to connect to the BME688 sensor and NavQPlus board, install and use the Python library and suggest some uses for it. We will review how to receive information from the sensor and send the data to Ubidots.
The NavQPlus board focuses on the common needs of mobile robotics systems. Robotic platforms such as the iRobot® Create® 3 have integrated this board into their systems and even competitions such as NXP HoverGames are increasingly driving its use. This board comes with a pre-installed version of Ubuntu, and is ROS2 compatible, which says it was very well prepared to support robotics development for machine learning, vision, computation, path planning, and low-power navigation among other applications. In addition to connection possibilities such as WiFi 5 / BTLE 5.0, it provides display interfaces such as HDMI, LVDS, MIPI DSI, for applications requiring the same (display and connectivity). For our case, we will use the NavQPlus board, to read incoming data from the i2c interface where our BME688 sensor will be connected and through the WiFi network connection, we will send these measurements to Ubidots, to visualize the information.
The BME688 sensor gives us all the environmental sensing we want in a small package. This small sensor contains temperature, humidity, barometric pressure and VOC gas detection capabilities. The use cases for this sensor are various and some of the typical applications are such as indoor and outdoor air quality measurement, detection of unusual gases and odors, which could indicate, for example, a leak or a fire, even in diaper condition detection, e.g. for baby care. And if we add to this target devices such as, home appliances, mobile devices, sensor networks / sensor nodes the applications become more interesting. For our case, our BME688 sensor will be in the work office and will take measurements of all these variables, in order to analyze the data in the future and make decisions based on this information.
The Ubidots platform is an IoT (Internet of Things) platform that enables decision making for systems integration companies globally. This product allows sending sensor data to the cloud, configuring dashboards and alerts, connecting with other platforms, using analytics tools and providing real-time data maps. All these tools save a lot of time and money, enabling better data-driven decisions. For our case, creating a dashboard to visualize the information is a good option, in fact we will leave an example of a dashboard for inspiration. Now that you understand all the tools that Ubidots offers, feel free to try them and integrate them into your project.
Connecting a NavQPlus for the first timeIf this is your first time trying to power up the NavQPlus board, we recommend you to follow the following tutorial to access the board and perform the wifi configuration:
Tutorial(Optional):https://www.hackster.io/crubio/connecting-a-navqplus-for-the-first-time-3cea3f
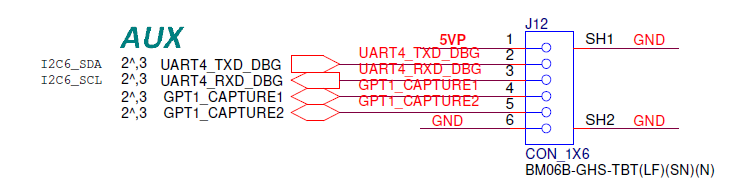
Accessing the external I2C busAUX connector: i2c bus is multiplexed with UART4 pins to the six-pin JST-GH connector and the external i2c bus is enabled on the NavQPlus AUX port. By default, these are configured for i2c and not UART4 (internal MCU).
A table of pinout is shown below. Note that pin 1 is on the left side of the connector:
More information: https://nxp.gitbook.io/8mpnavq/dev-guide/hardware-interfaces/i2c
I2C device detectionYou may need to install i2c-tools by running the following:
sudo apt-get install i2c-toolsTo detect that a device is present on the bus, you can execute the following command:
i2cdetect -y 5You may need to add user <user> to the i2c group to access the bus (to use i2c commands without root). To do this, run the following command, then log out and log back in:
sudo usermod -aG i2c <user>Then, in the terminal, type the following to clone the repository and install it:
git clone https://github.com/cristianrubioa/bme68x-python
cd bme68x-python/library
sudo python setup.py install
You can also use pip to install the library, as follows, although you will have to download the examples separately:
sudo pip install bme680The library should now be installed.
Running the built-in exampleThe library includes some examples that print sensor readings (temperature, pressure, humidity and gas resistance value) continuously. You will find the examples in bme68x-python/examples.
As a recommendation, it is useful to run the sensor for at least 20 minutes the first time you use it. The sensor readings will vary gradually and then stabilize after a while. This drift will occur each time you start taking readings, but after that, the readings should stabilize fairly quickly each time, usually after a couple of minutes.
To run the example, type the following:
cd bme68x-python/examples
python read-all.py
You can press CTRL + c to stop the execution of the example.
If you want to record the sensor values in a text file, it is easy to do so by redirecting the program output to a text file in the terminal, as follows:
python read-all.py > bme68x-data.txtNote that the values are comma separated, so you should be able to import them into a spreadsheet to plot them fairly easily.
Imports and configuring the sensor for NavQPlusReading the sensor values on the BME688 is fairly straightforward, but requires some configuration values to be set initially.
First, you will need to install smbus. To do this, simply run it in your terminal:
pip install smbusIn the example bme68x-python/examples/read-all.py we must import the smbus library and define the bus where our sensor is located, in order to pass it as a parameter to the BME688 function.
import bme680
import time
from smbus import SMBus

BUS = SMBus(5)

try:
    sensor = bme680.BME680(bme680.I2C_ADDR_PRIMARY, BUS)
except (RuntimeError, IOError):
    sensor = bme680.BME680(bme680.I2C_ADDR_SECONDARY, BUS)
With this, we should now see our BME688 sensor reading in our NavQPlus.
Sending data to Ubidots for visualizationAt this point, you must create an Ubidots account.
requests is a popular Python library that simplifies making HTTP requests.
pip install requestsCreate and run a Python script in your computer's terminal:
nano bme688_ubidots.pyThen copy and paste the below code in your terminal (review Code section), Or Or you can open this example in the folder bme68x-python/examples/. You must assign your Ubidots TOKEN. For more information, please see the Ubidots REST API Reference.
Once the code has been completed with your Ubidots TOKEN and coordinates, press CTRL + o and ENTER to save. To exit the Python editor, press CTRL + x and return to the computer's terminal.
Now, run the below script in your computer's terminal:
python bme688_ubidots.pyIf successful, your terminal will immediate begin reporting server responses:
To visualize your work in Ubidots, go to the Device Management tab of your account and visualize the device created:
Feel free to create a dashboard to your liking, you can take the following dashboard for inspiration.


Comments