What is a better indicator of democracy than the people’s ability to select their leaders and the future of their countries in elections or referendums? Selecting freely, without fear of oppression and with assurance that the results are not amended in any ways without their consent.
Some countries still rely on the ink-and-paper based methods to get the voting results, which can take significant time to process and the voting cards themselves can be easily tampered. Others started to use electronic voting solution, however such solutions are not standardised and prone to hacking.
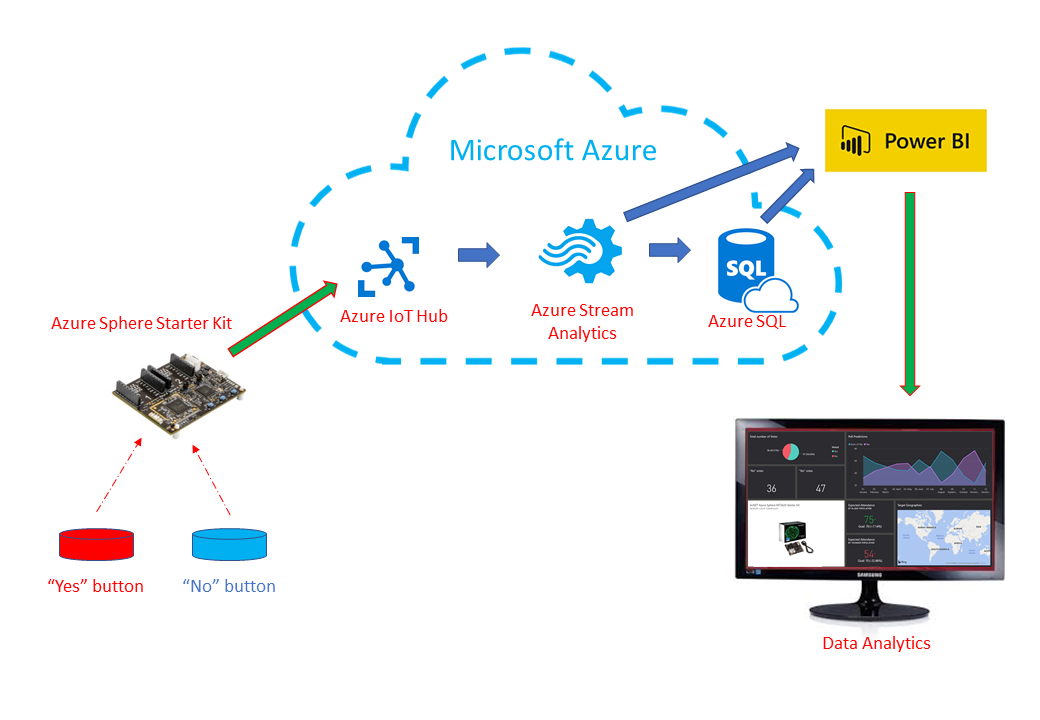
Platforms like Azure Sphere are designed to provide end-to-end security and can revolutionise the voting process. This project describes demo solution of the voting machine, based on AvNET Azure Sphere MT3620 Starter Kit.
Right now, it allows you to say only “yes” or “no” by pressing built-in user buttons. However, thanks to MikroE click boards extension, it can be easily converted into real voting machine which can also verify uniqueness of each voter, e.g. via biometric finger print reader or using NFC reader to read the cheap of his / her ID.
UN - Sustainable Development Goals (SDG):All United Nations Member States adopted in 2015 so-called “The 2030 Agenda for Sustainable Development”. This project can support UN agenda with its one particular Sustainable Development Goal, i.e. SDG # 16: to promote peace, justice and strong institutions.
Secure solutions utilising platforms like Azure Sphere can help to ensure that the data is protected at rest and in transit, attempts to compromise devices physically or programmatically are detected and reported, confidentially of voters is protected by the strongest encryption keys and overall there is a trust in the data collected and presented, promoting higher level of transparency and accountability across the relevant institutions.
Infrastructure Setup:1. In Azure portal, create and link to each other Azure IoT Hub and Azure IoT Hub Device Provisioning Service (DPS) resources, using the following Quick Setup guide: https://docs.microsoft.com/en-us/azure/iot-dps/quick-setup-auto-provision.
Note: To use Device Twin capability, IoT Hub should be on the Standard pricing tier.
2. In Azure Sphere Developer Command Prompt, download CA certificate from Azure Sphere tenant using the following command:
azsphere tenant download-CA-certificate --output CAcertificate.cerYou should see confirmation that the CA certificate has been saved.
3. In Azure portal, upload certificate to Azure IoT DPS -> Certificates. After upload it will show new entry with an “Unverified” status.
4. Then open certificate record and click “Generate Verification Code” button.
5. In Azure Sphere Developer Command Prompt, download validation certificate signed with the DPS verification code from Step 4 above using the following command:
azsphere tenant download-validation-certificate --output ValidationCertification.cer --verificationcode <DPS_VERIFICATION_CODE>You should see confirmation that the validation certificate has been saved.
6. In Azure portal, upload validation certificate into “Verification Certificate” field of the record window from Step 4 and click “Verify” button. After validation, Azure will change the status of your certificate to “Verified”.
7. Switch to Azure IoT DPS -> Manage Enrollments menu and add new enrollment group with the primary certificate that we verified in Step 6 above.
1. In Azure Sphere Developer Command Prompt, execute the following command to get Azure Sphere tenant’s ID:
azsphere tenant show-selected2. In Azure portal, switch to Azure IoT DPS -> Overview and copy DPS ID Scope value.
3. From Azure IoT DPS -> Linked IoT Hubs copy the full name of the linked IoT Hub.
4. Download content of attached Git repo.
5. In Visual Studio, click File -> Open -> CMake, navigate to the repo’s Software -> VotingApp and then open app_manifest.json file.
6. Update placeholders highlighted in the screenshot below with the values of your Azure Sphere tenant’s ID, DPS ID Scope and IoT Hub names collected in Steps 1, 2 and 3 above.
7. Select CMakeLists.txt file and then click Build -> Rebuild Current Document (CMakeLists.txt). Verify that an image package is being generated as shown below.
8. In the toolbar, choose “GDB Debugger (HLCore)” as the target.
9. In Azure Sphere Developer Command Prompt, enable application development capability on Azure Sphere device:
azsphere device enable-development10. Back in Visual Studio, click Debug -> Start (or press F5) to deploy Voting Machine app to the device. If successful, Visual Studio will execute Voting Machine app on Azure Sphere device. In Output window, choose “Device Output” option. If you will press any of 2 buttons, you should see the message updates in the debug window.
1. In Azure, create new Stream Analytics job and add IoT Hub as its stream input
2. Add PowerBI as the output for Stream Analytics job and click Authorize.
3. Provide relevant output alias name, so that you can use it in the Stream Analytics query.
4. Alternatively, you can setup Azure storage account or a database as an output for Azure Stream Analytics job.
5. Last step is to visualise your data in the PowerBI dashboard. You may configure it online directly at https://powerbi.microsoft.com or use richer functionality with offline PowerBI desktop client.
Working model - YouTube videoThis is an example of my PowerBI dashboard, which combines historical data from the database with the live stream from the Azure Sphere device.
You can find short demo of the working solution here on YouTube.
Thanks and all the best with your own ideas and implementations on how to Secure Everything with Azure Sphere !


Comments
Please log in or sign up to comment.