The great job our first responders have done during the COVID-19 pandemic has being amazing and we want to thank them for their dedication and putting their health and lives on the line.
They have to deal everyday with bio-hazard materials and move medical supplies coming from different regions of the US and the world. We thought this project can be a proof of concept on a compact/manual/mobile air pump gripper for small light packages (up to 3 lb).
On the same note, postal services and parcel delivery companies can benefit by allowing their handlers move small packages without exposing themselves to viruses in the packages.
The vacuum gripper suction cups are easily replaceable or removable for sanitation and the manufacturing cost can be easily reduce by designing a function specific board.
MaterialsWe use the Adafruit feather boards for this project for its ability to be connected out of the box using the fast prototyping add-on board.
The system uses four vacuum gripper suction cup and elbow fitting sets to achieve better grasp of the surface.
Two cost efficient 12V air pumps from Sparkfun, and 7.2V LiPo batteries.
Lowes played an important source of material this time, vinyl tubing, quick connect couplers were acquire and acrylic sheet.
And, in order to hold the air pumps to the acrylic sheet we had to design 3D printed holders.
First, we drill on the acrylic sheet to allow the vacuum gripper elbow fitting attach to the base. The distance and location of the drills depends on the type of object you want the system to grip. We wanted to move rectangular smooth shape objects like parcel boxes or bio-hazard disposable small containers. We use four grippers, two on opposite sides of the base align on a rectangle shape, you can try a triangle or linear design if the weight of the object you plan to grip is mostly distributed on those shapes.
A washer is used on each side of the sheet, then securing the fitting with the provided nut as shown below:
Insert the suction cup into the fitting, make sure the cup flushes with the tip of the fitting for maximum suction grip.
The electronics used for the system did not require advance or fast microprocessors, but rather the ability to use digital signals to open/close a relay.
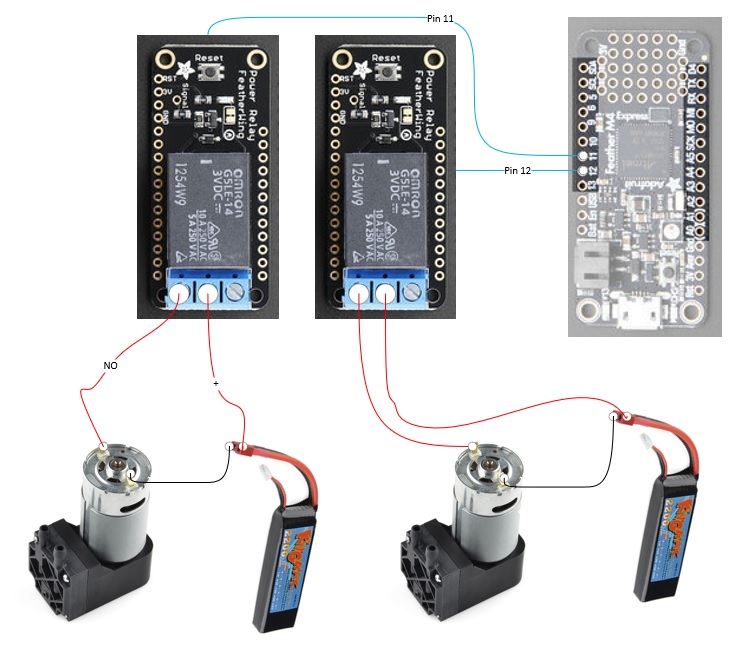
The Adafruit Featherwing tripler connects two power relay boards, As per the Adafruit pinout guide we solder close the corresponding pins 11 and 12 mapped into the Feather M4 Express. Note that if you use a Feather HUZZAH32 the pins change to 12 and 27 on air configuration. The Feather power relay board allows you to choose up-to 11 different pins.
The code to open/close the relays is simple digital writes to the corresponding pins.
//Turn off the relays
      digitalWrite(ledPin, LOW);
      digitalWrite(ledPin2, LOW);
      //For 2.5 seconds
      delay(2500);
      //Turn on the relays
      digitalWrite(ledPin, HIGH);
digitalWrite(ledPin2, HIGH);This section shows step by step how to put together the Pickup with ease system.
Secure the 3D printed pump holders to the base by using screws.
Repeat the process for both 3D printed pump holders. Attach the Featheriwing tripler board, in the pre-drill holes.
Slide the 12V air pumps inside the holders. The holder secures the pump by a tight fit. You can use a rubber band if feel a loose hold.
Insert the vacuum gripper elbow fittings thru the corresponding openings using a washer on each side of the sheet, then securing the fitting with the provided nut.
Attach a 1/4 tubing section to the 1/4 to 3/8 adapter (repeat for the other air pump)
Attach a quick connect splitter since we want two suction cups attached to one air pump.
Connect the each splitter output to a vacuum gripper elbow fitting.
Connect the positive node of the 12V air pump to the COM (central connector) in the Featherwing power relay board. Note that the nodes on the pump do not differentiate between positive or negative. Repeat for the other air pump.
Slide the 7.2V batteries and connect the negative cable to the negative node in the air pump. The positive cable connects to the NO on the Featherwing power relay board. Repeat for the other battery.
You are set. Here is a picture of how the system looks.
Watch the above video for a fun way to test the system.
We use five different rectangular shape boxes with different weights. The following table summarizes the contents and weights used on our testing.
We notice that Box 3 contents were not secure inside the box. When lifting the box, the contents shift from one side of the box to the other increasing the weight held by a couple of grippers making difficult to manage the package. Although as seen on the video the system was able to keep the grasp and lifted.
Weight distribution and a smooth grip surface were the two main factors to achieve a secure hold to the object.
Future workWe plan to add an on/off switch, and/or a remote control interface (BLE, WiFi). Also try to reduce the size print of the system since it is bulky and heavy.
Although, the proof of concept was a huge success and fun.
Thanks for reading.


_3u05Tpwasz.png?auto=compress%2Cformat&w=40&h=40&fit=fillmax&bg=fff&dpr=2)


Comments
Please log in or sign up to comment.