


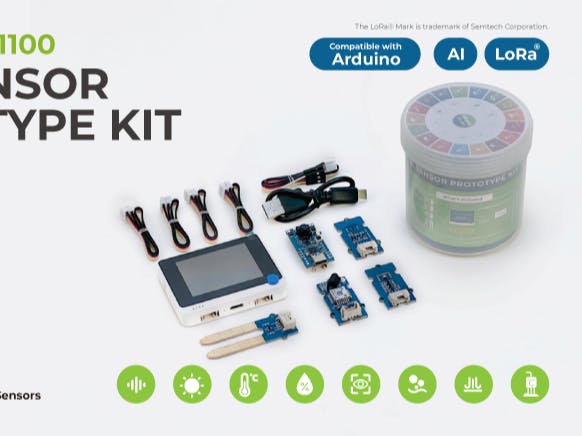
Hardware components | ||||||
 |
| × | 1 | |||
Software apps and online services | ||||||
 |
| |||||
| ||||||
.
I received the SenseCAP K1100 prototype kit few days back and had been doing some work with it. Since there isn't a LoRa network around my area, I was exploring the WiFi feature of the kit. In the article, I explained how to use the kit to collect and send the light and IMU sensors' data, together with the Vision AI module's inference result to the Blynk cloud.
.
Setup.
I followed the Quick Start with Blynk to get the kit connected to the Blynk cloud. Here you will ceate a Blynk cloud account and configure a template and create you SenseCAP device. You too create a Web Dashboard for the device. The quick start guide provides comprehensive detail about the instructions which I am not going to repeart them here.
.
.
And you can use the mobile Blynk App to configure a mobile dashboard like this:
.
.
In addition, I followed the instructions of the Wio Terminal Light Sensor and Wio Terminal IMU Sensor guides and added the code which will read and send the light sensor and IMU sensor data to the Blynk cloud.
.
With Arduino IDE and the required libraries installed, you uploaded the code and observed the live data on the web and mobile dashboards.
.
.
.
Code.
This is the Blynk template and WiFi setting:
#define BLYNK_TEMPLATE_ID "blynk template"
#define BLYNK_DEVICE_NAME "blynk device name"
#define BLYNK_AUTH_TOKEN "blynk token"


// Your WiFi credentials.
// Set password to "" for open networks.
char ssid[] = "wifi ssid";
char pass[] = "wifi password";
.
This starts to connect to WiFi and Blynk cloud:
Blynk.begin(auth, ssid, pass);
// You can also specify server:
//Blynk.begin(auth, ssid, pass, "blynk.cloud", 80);
//Blynk.begin(auth, ssid, pass, IPAddress(192,168,1,100), 8080);
.
This code gets light sensor data and write to cloud at virtual pin #3
int light = analogRead(WIO_LIGHT);  //Get the Wio Terminal light value.
Serial.print("Light Value: "); Serial.println(light);
Blynk.virtualWrite(V3, light);
..
This reads IMU sensor data and write to virtual pin #0, #1 and #2:
float x_values, y_values, z_values;
x_values = lis.getAccelerationX();
y_values = lis.getAccelerationY();
z_values = lis.getAccelerationZ();

int x = x_values*100;
int y = y_values*100;
int z = z_values*100;

Serial.print("X: "); Serial.print((float)x/100);
Serial.print(" Y: "); Serial.print((float)y/100);
Serial.print(" Z: "); Serial.println((float)z/100);

Blynk.virtualWrite(V0, (float)x/100);
Blynk.virtualWrite(V1, (float)y/100);
Blynk.virtualWrite(V2, (float)z/100);
.
This code carries out the vision detection and uploads the detection data such as head counting and confidence value:
if (ai.invoke()) // begin invoke
    {
      while (1) // wait for invoking finished
      {
        CMD_STATE_T ret = ai.state();
        if (ret == CMD_STATE_IDLE)
        {
          break;
        }
        delay(20);
      }
     uint8_t len = ai.get_result_len(); // receive how many people detect
     if(len)
     {
       Serial.print("Number of people: ");
       Serial.println(len);
       object_detection_t data;       //get data

       for (int i = 0; i < len; i++)
       {
          Serial.println("result:detected");
          Serial.print("Detecting and calculating: ");
          Serial.println(i+1);
          ai.get_result(i, (uint8_t*)&data, sizeof(object_detection_t)); //get result
          Serial.print("confidence:");
          Serial.print(data.confidence);
          Serial.println();
          Blynk.virtualWrite(V5, data.confidence);
          Blynk.virtualWrite(V4, len);
        }
     }
     else
     {
       Serial.println("No identification");
       Blynk.virtualWrite(V4, 0);
       Blynk.virtualWrite(V5, 0);
     }
    }
    else
    {
      delay(1000);
      Serial.println("Invoke Failed.");
    }
  }
.
Summary..
This is a quick introduction to the SenseCAP K1100 and the hardware and software setup of programming the prototype kit using Arduino IDE.
.
Userful links.
Quick Start with SenseCAP K1100
.


Comments
Please log in or sign up to comment.