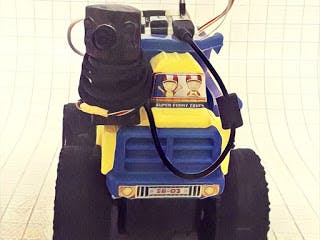
This project is about making a remote control car with a view through an attached camera.
Hardware side:- Toy car
- Two gear motors
- Raspberry B+ https://amzn.to/2VJIOBy
- WiFi dongle
- Camera USB https://amzn.to/35w1DMN
- Power bank (10A) (for Raspberry board)
- Battery (for gear motor)
- H-bridge circuit (L298N) https://amzn.to/2QS2FeI
Buy electronic component on utsource.net
- Install camera using FFmpeg (link)
- Install Local web (Apache)
- Make web page to control
- Control through Internet (by port forwarding)
Install a gear motor to the toy car. It will need your clever hand and some thinking to put all the things in right way. Also, put the H-bridge inside the car.
Brief introduction about H-bridge:
H-bridge is used to control motor direction: to make the motor run clockwise, A1 and A2 must be ON; and to run counter clockwise, B1 and B2 must be ON.
The below image is of a type of Mechanical H-bridge using a relay; this project will use H-bridge from IC L298N.
The H-bridge also has 4 inputs: A1, A2, B1 and B2 (indicated in PCB as IN1, IN2, IN3 and IN4) which will triggered by Raspberry GPIO.
Make connections from Raspberry to H-bridge
Connections are as follows:
- GPIO0 - IN1
- GPIO2 - IN4
- GPIO3 - IN3
- GPIO4 - IN2
- GND Raspberry - GND H-bridge
For example, to make the car run forward 🠚 2 motors have to run clockwise 🠚 IN2 & IN4 should be ON; IN1 & IN3 should OFF 🠚 GPIO2 & GPIO4 should ON; GPIO0 & GPIO3 should OFF.
Step 2: Install cameraIn the previous article, follow the instruction there to install FFmpeg into Raspberry. (Link here)
Step 3: Make a web page to controlInstall Apache and PHP by following command:
sudo apt-get install apache2 php5 libapache2-mod-php5After installation, input the Raspberry IP address (this case is 192.168.1.71) in a web browser to see if the local web working or not. If it is working, it will have the result as shown here:
This webpage is saved at /var/www/html/. Next is making a local web which will load camera image from Step 2, and have 4 buttons to control the motor of car.
cd /var/www/html/
 gedit camera.php
Then input following content:
<html>
     <head>
         <meta charset="utf-8" />
         <title>Raspberry Pi - Camera rotate</title>
     </head>
    <body style="background-color: white;">
 <center>
 <img height="240" width = "320" src="http://192.168.1.71:8090/test.mjpg" />
 <br>
 <button id="myP" onmousedown="mouseDown(02)" onmouseup="mouseUp(02)">Backward</button>
 <button id="myP" onmousedown="mouseDown(03)" onmouseup="mouseUp(03)">Turn right</button>
 <button id="myP" onmousedown="mouseDown(37)" onmouseup="mouseUp(37)">Forward</button>
 <button id="myP" onmousedown="mouseDown(27)" onmouseup="mouseUp(27)">Turn left</button>
 <br>
<!------------------------------------------------ php -->
 <?php
 //set the GPIO0, GPIO7 mode to output    system("gpio mode 0 out");
 system("gpio write 0 0");
 system("gpio mode 2 out");
 system("gpio write 2 0");
 system("gpio mode 3 out");
 system("gpio write 3 0");
 system("gpio mode 7 out");
 system("gpio write 7 0");
//-----update button status
 $output = shell_exec("cat temp");
 if ($output ==0) {
 echo ("<img id='status' height=48 width = 120 src='data/ON.png'/>");
 }
 else {
 echo ("<img id='status' height=48 width = 120 src='data/OFF.png'/>");
 }  ?>
</center>
 <!------------------------------------------------ javascript -->
 <script src="camera.js"></script>
    </body>
 </html>
Save file, go to the web browser, input 192.168.1.71/camera.php and you will see the camera image along with 4 buttons.
To make those buttons work with 2 motors (e.g., push "Backward" button and 2 motors should run anti-clock wise; and so on for the other buttons), two more files need to be done:
- (1) The file camera.js contains
mouse_upandmouse_downfunctions for Raspberry GPIOs, also, updates this signal coming to Raspberry or not. - (2) The file camera_rotate.php receives content from camera.js, then will apply GPIO output commands which makes the GPIO state 0V or 5V.
This project's webpage can be download here (Google share). All files should be saved in /var/www/html. From here, go to local web (192.168.1.71/camera.php) 🠚 you can see: the camera image. The car wheel will rotate if a button is clicked (wheel will stop when the button is released).
Attach the power bank to the car. This power bank will feed the Raspberry board.
Attach the camera, another power for the H-bridge motor, and the car cover.
Done! Now open local web at 192.168.1.71/camera.php to control it.
Control through Internet (by port forwarding)
In order to control it through Internet (any where in world!), the port needs to open in the router.
From the Raspberry:
- Change port of
/etc/apache2/ports.conffrom 80 to 8082 - Change port of
/etc/apache2/sites-enabled/000-default.conffrom 80 to 8082
From the Router:
- Depend case on case at Router manufacturer, follow Router manual to open port 8082 for Local web, and port 8090 for camera
Now, find the Internet IP address by webpage, e.g., http://www.canyouseeme.org/. Put the Internet IP address with the Raspberry webpage, now the car can control from anywhere in world!


_3u05Tpwasz.png?auto=compress%2Cformat&w=40&h=40&fit=fillmax&bg=fff&dpr=2)

Comments