Air condition is the most consumption energy in house. However most air condition use simple IR remote control to control temperature without consider ing the surround environment. As a result, users sometimes feel too cool or too hot. Too cool mean you waste energy to extra cool the room. Too hot make users uncomfortable.
Project ConceptThis project try to solve these issues by building smart IR Remote control for Air condition. The setting temperature will vary by considering these parameters
- Users' activities (sleep, active) by detecting number of movements per minute
- Weather outside (temperature, clouds, clear sky, raining)
- Time of day (night, afternoon, morning)
- Room temperature
- Setting temperature by users
These parameters will be used to calculate three variables for control Air condition
- Setting target temperature
- Fan speed (auto, high)
- Duration time before change temperature to target temperature
With this approach, we can save energy by higher temperature setting automatically in some scenario, e.g. sleeping, raining outside or at night. Lower temperature in hot day or when user has active activity in the room.
Please see table below for how to calculate control variables from these environment factors.
These parameters will be set in files AirAlgorithm.cpp and AirAlgorithm.h. Changing temp duration allow user to adapt body temperature to new temperature setting especially at night.
Project DesignIn this project we use ESP32 dev module to receive data from NXP IoT, get weather data from internet and control both IR LED and IR Receiver. NXP IoT will send data about the configuration setting (Enable or disable each parameters used to calculate the matrix) Room temperature, Setting temperature and movement detection. These information have been sent to ESP32 via BLE. At the startup, ESP32 will connect to internet via Wifi and get information about date/time and weather condition in specific locations (hard programmed in the ESP32 firmware) ESP32 will calculate all these parameters as shown in the matrix table and send IR command to control air condition.
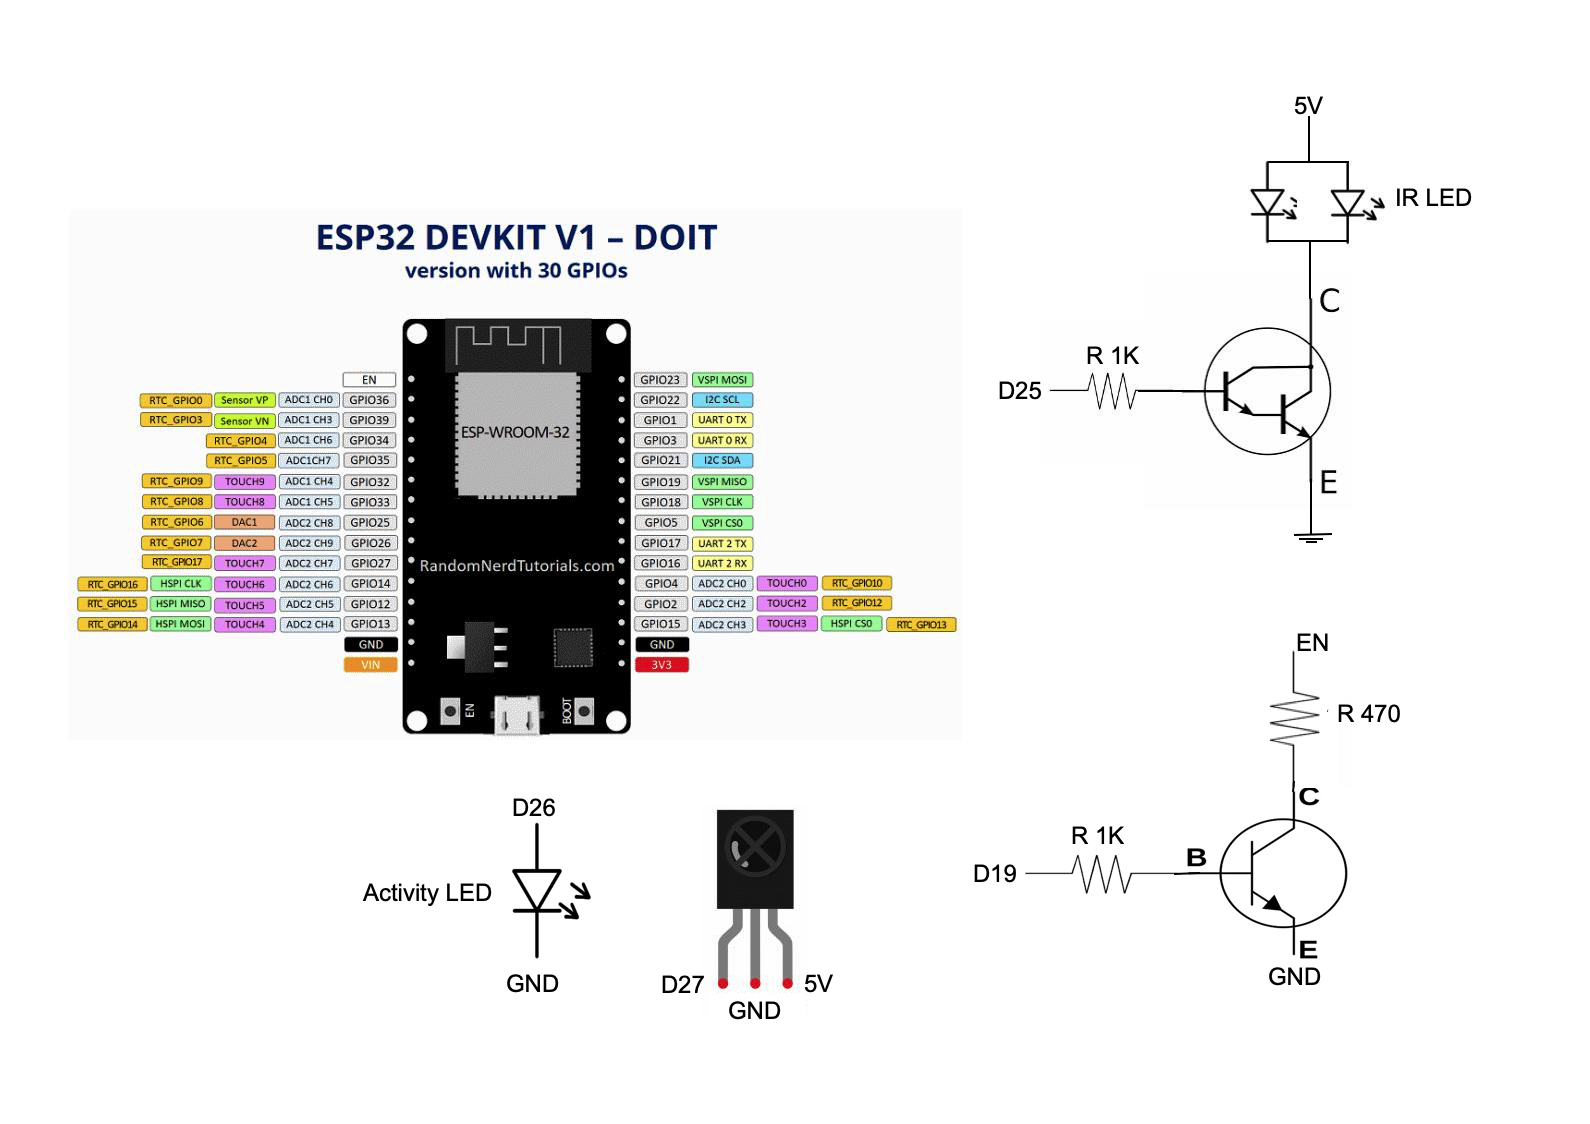
Project ImplementationHard wareESP32 connect to IR receiver (detect IR command for Air condition) and two IR LED to send IR command. We use 2 IR LED to improve angle and distance driving via darlington transistor MPSA14. Normal LED connect to D26 show the status of ESP32. It will blink every one second to show system still working. If LED turn off or turn on for longer period that mean system hang up and need to reboot with reset switch. Another reset circuit had been added to reset the system by output signal at D19. This happen when system hang or BLE disconnected, system will try to restart again.
For building this project we use small cosmetic box with prototype PCB. Because of simple circuit. There is no need for design specific PCB. Just adapt the PCB to suit your box. But two IR LED should align in different direction to increase angle of transmitter.
Project BuildWe use prototype PCB for this simple wiring circuit and use small cosmetic box for packaging as show in the pictures.
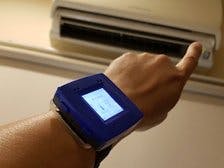
I use NXP IoT as wearable device for detecting movement. I created simple strap for mounting NXP IoT with magnetic at the back. This made it easy to snap on when you move and take out when you sleep.
NXP IoT will send these data sensors to ESP32 via BLE.
- Movement detection
- Configuration setting flag which are checking weather flag, checking activities flag, checking time of day and sleep mode
- Setting temperature by users
- Turn on/off air condition
- Room temperature
All code had been implemented in NXP Rapid IoT Studio with drag and drop features.
Note Air maintenance screen is for future implementation. It will warn users to clean the air filter. It has not implement in this project yet.
Arduino Code for ESP32There are two separate projects for ESP32.
- ESP32-IRTxRx use to detect IR code sent from original remote control. There are a lot of Air condition brands in market. We need to detect IR code first and then put IR code in main project (AirCoolRC1 project).
- AirCoolRC1 is the main project to control air condition.
All codes use in this project are available at
https://github.com/wtos03/AirEnergySave.git
Project ConfigurationArduino IDE need to add support ESP32 board by adding following url https://dl.espressif.com/dl/package_esp32_index.json into Addition Board Manger URLs field under preference menu. Please make sure that you get the latest version 1.0.1 We use previous version 1.0.0 and found many problems about Wifi and BLE work together. After upgrade to 1.0.1, problem is less.
Because the program is bigger than default config partition. You need to change partition scheme as in the picture.
There are few things need to config in the project depend on user environment.
- Set IR code for your air condition model
- Set SSID, password for WiFi connection
- Set openweather key and location of your device
Set IR code
To get IR code we use ESP32-IRTxRx project. Open serial terminal you will found screen like this
Use the original remote control point to IR Rx and press once. You will get series of data. Copy these data to any editor like this
Notice about the middle of data. There is one value much more than others. This project use Mitsubishi air condition, it send two identical command at once. Different air condition may have different sending method. Copy data only first part to put in AirCommand.h You need to repeat these tasks for the following command.
- Temperature setting 22 - 28 with fan set to auto
- Temperature setting 22 - 28 with fan set to high
- Turn off command
Please note that for Turn on command, you can choose which temperature setting and fan setting you want at startup by
#define TURNON 4 <- Number of command in AirCoolIR.h
Set SSID, password for Wifi connection
Open project AirCoolRC1.ino and search for ssid, password. Put your ssid and password of router you want to connect.
Set openweather key and location of your device
This project use weather information from https://openweathermap.org. There are two parameters to set
- API key, you will get this key when you apply account at https://openweathermap.org
- Your location in format Cityname, Country for example London, GB or London, USA The list of city name is here http://bulk.openweathermap.org/sample/city.list.json.gz. Format for Web API is http://api.openweathermap.org/data/2.5/weatherq=+location+&units=metric&APPID=key
This project can run stand alone after plug in. The green LED will blink to show that it's active. If the green LED turn on/ off for long time. There is something wrong and you may need connect to serial terminal for troubleshooting. At startup, it will connect to openweather to get weather information via Wifi and turn off Wifi then connect with NXP IOT via BLE and calculate parameter to control the Air condition. Start the loop until the time duration reach the target and send IR command to set target temperature with target fan speed. Turn on Wifi and get weather information again. See below picture for information sending via serial port
There are three parameters effect the air condition control.
- Target temp may be more or less than the setting temp depend on environment.
- Fan speed which is auto or high.
- Duration in minute to send IR command for target temp. Please note that duration is in minute. But Duration left is in seconds which change every seconds.
The top of screen will show room temperature, status of each flags to use in calculation which is set in NXP IoT. Timer is the time to calculate number of movement detection in one minutes. This number of movement/ min be used to classified activity's type which specify in AirAlgorithm.h.
Outside temp - setting temp will show the outside weather status not the subtraction of temperature. This value defined in AirAlgorithm.h. For example 0 mean weather is hot outside.
Room temp - setting temp will show the room weather status not the subtraction of temperature. This value defined in AirAlgorithm.h. For example 0 mean inside room is hot.
The next line shows "Before adjust temp, wind and duration." This value is the raw value after calculation with many factors involved. But before we use these values, we need to adjust these values into min- max scope. For example target temp should be in range -3 - +3 Degree celsius. Fan speed should be 0 (auto) or 1 (high). Duration time should be in range 10 - 60 mins.
Test the remote by Turn on/ Turn off at the NXP IOT and change setting temperature. The value of target temp, fan speed and duration will vary depend on your environment. Wait until duration time is reached. If target temperature is different from setting temp. ESP32 will send IR command to set new temperature value and start to recalculate again.
Project Wrap-upThis project can reduce energy consumption in air condition by setting appropriate temperature depend on environment. At night when you sleep, it will increase 1 -2 degree to save energy. If weather outside is raining or cloudy, it may increase temperature by 1 degree from the setting. However, the calculation is complex tasks and need time to adjust the algorithm for each individual users. In the future, if we can use AI to process these data. The result may be more accurate by using historic data and preference for each users to predict the target temperature.


Comments
Please log in or sign up to comment.