
Hardware components | ||||||
| × | 1 | ||||
 |
| × | 1 | |||
 |
| × | 1 | |||
| × | 1 | ||||
 |
| × | 1 | |||
 |
| × | 1 | |||
 |
| × | 6 | |||
 |
| × | 1 | |||
Software apps and online services | ||||||
 |
| |||||
| ||||||
| ||||||
 |
| |||||
 |
| |||||
By the end of this tutorial, you'll have built a working light device with pushbutton switch, connected it to ThinCloud, and be able to send it commands from a GraphQL client. You'll also configure the light to send state change updates to Thincloud when the pushbutton is pressed to notify the cloud that the light's state has changed - such as would need to occur when the light is turned on or off.
This tutorial is suited for developers just starting out with Thincloud who want to follow along a basic example to build a device and get it connected and operational with ThinCloud. It assumes no prior knowledge or use of Thincloud, but developers are encouraged to review the Thincloud documentation for a deep-dive on the concepts covered in this tutorial.
ThinCloud provides cloud connectivity for consumer devices, out-of-the-box integrations with Yonomi, Google Assistant, and Amazon Alexa, user-device access roles and permissions, and much more. For more information on ThinCloud, please see the Yonomi website.
Request a ThinCloud instance, here.
Recommended PrerequisitesWhile this training includes all the code required to build your device and does not assume mastery of any specific technology, familiarity/experience with the following technologies will be helpful (links provided below):
- C/C++ Language (used to write device firmware)
- GraphQL & GraphQL Playground
- JSON
- MQTT - here or here
- mTLS Communication and x509 Certificates
The list above links to external sites that host introductory tutorials and training on each of these topics.
Do I have to actually build hardware to use Thincloud?
ThinCloud AlternativesNo, you don't. If you want to learn how to use Thincloud through a tutorial but don't want to fuss with building hardware or would rather work with IDE-based examples instead of a C++-based-examples, check out the Building a Simple Virtual Device with Thincloud Tutorial, which covers the same steps as this tutorial but uses a virtual device running in MQTTBox instead of a real one.
What Will We Build?Before we start building, let's figure out what we want our light device to do.
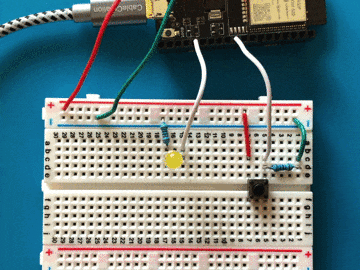
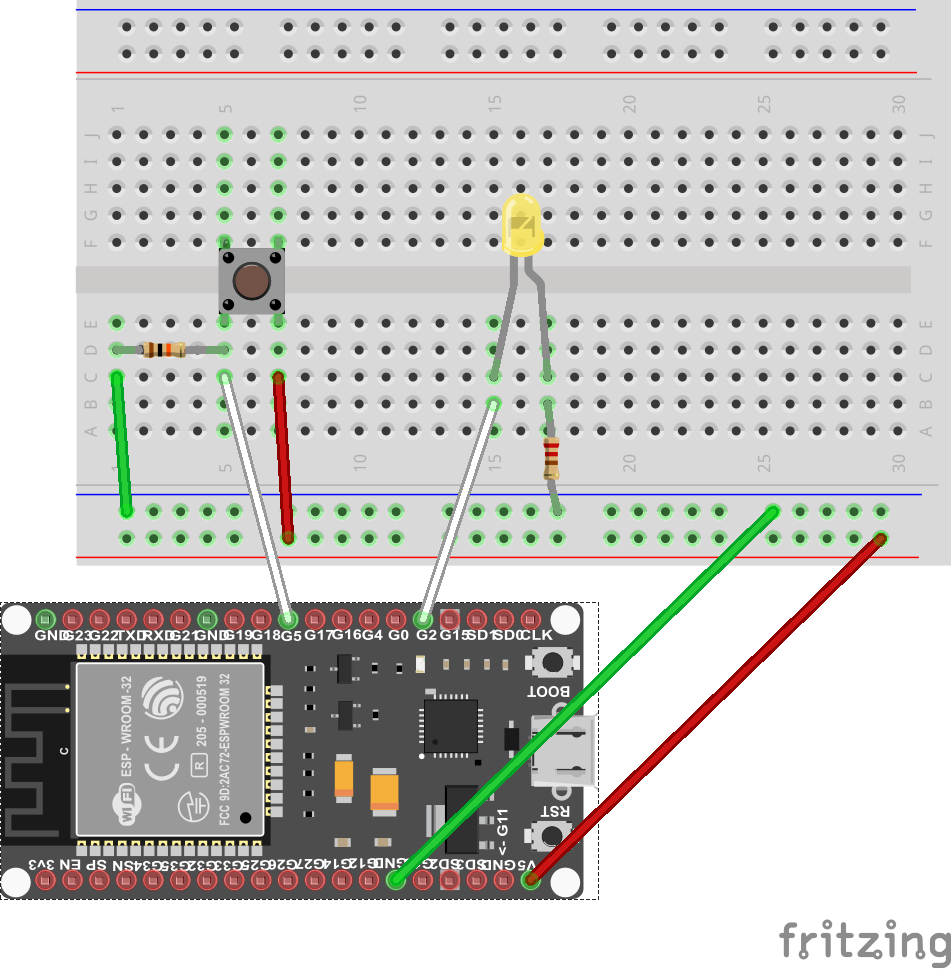
This will be a simple light device. It will consist of an LED and a pushbutton, connected using wires and resistors to an ESP32 Microcontroller. This light will be connected to the internet and securely registered to the Thincloud IoT Cloud backend. The light will then be associated with a user, who will have access to control it using a web-based client.
The pushbutton will turn the light on or off when pressed and send an update to the cloud (Thincloud) when the light's state changes from on-to-off or from off-to-on.
Using pulse width modulation, we'll add the ability to set a brightness level on the LED. Last, the light will support the ability to blink on and off 1-10 times at a fast, medium or slow rate of speed using a "blink" command.
That's it!
At the end of the project we'll have built a device that communicates over MQTT to Thincloud and can be controlled both locally (physically) and remotely using a web-based client:
We're only building one light device for this project, so the process we'll use will be tailored to that scale, but what if we were building 100?
Or 1, 000?
Or 5, 000 a day?
Thincloud was built to handle IoT deployments from startup-scale to enterprise-scale, efficiently and cost-effectively, and there are some important concepts that smart-device makers will consider as they build their products. If you'd like to know more about the IoT device development process and how this project would look at a larger scale than just one device, check out this guide on The IoT Product Development Process.
If you're already well-versed in that process then continue to the next section of this tutorial. Read the full tutorial here.
What to expect:
Step 1: Build the DeviceStep 2: Acquire CertificatesStep 3: Configure ThinCloudStep 4: Test MQTT ConnectionStep 5: Create The End User AccountsStep 6: Complete Your Light Device
Wilson Hughes
 Camille Vargas


Comments
Please log in or sign up to comment.