


Hardware components | ||||||
 |
| × | 1 | |||
 |
| × | 1 | |||
| × | 1 | ||||
 |
| × | 1 | |||
| × | 1 | ||||
Software apps and online services | ||||||
 |
| |||||
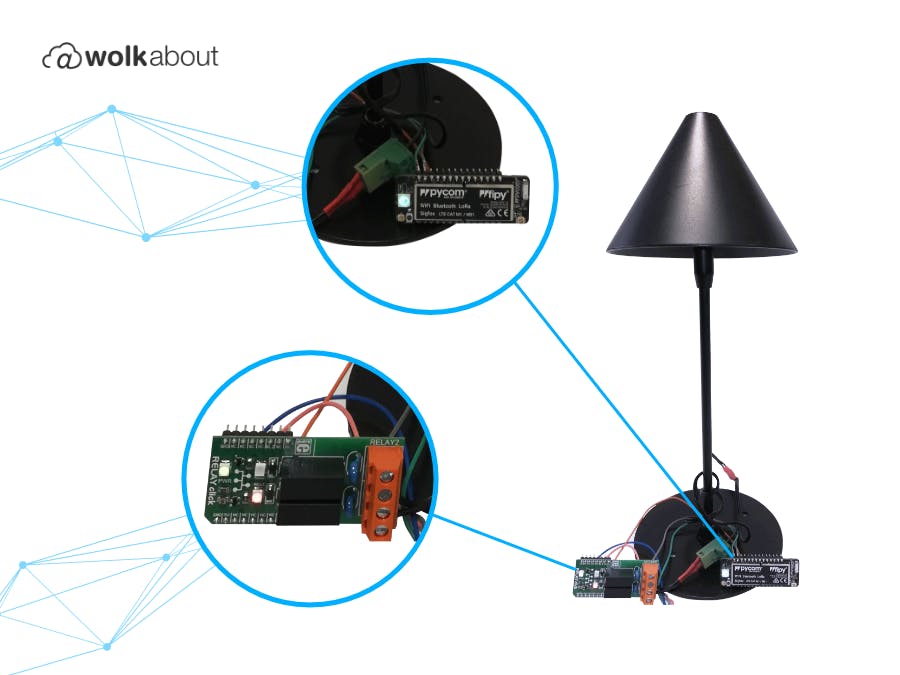
Pycom boards offer an easy way to make the Internet of Things applications using various networks (WiFi, Bluetooth, LTE, LoRa, and Sigfox) through the code written in MicroPython.
MicroPython is a lean and efficient implementation of the Python 3 programming language that includes a small subset of the Python standard library and is optimised to run on microcontrollers and in constrained environments.
For this purpose, WolkAbout made WolkConnect-MicroPython, a library that is responsible for all the communication with WolkAbout IoT Platform through a simple and easy to use API.
To showcase our library, we've put together a little project to enable remote control over a small LED lamp in our office. We used Pycom's FiPy board, but the code should seamlessly run on Pycom's other boards as well. However, there may be some differences regarding what pins should be used on different boards, so please refer to your board's pinout diagram.
RequirementsBefore beginning, make sure that your board is programmed correctly by getting the latest firmware and that you have the Pymakr plugin installed in Atom or in VS Code. Apart from Pymakr, we've found that you can also use ampy to check how your code runs on the board, and mpfshell to manage files on your board and enter REPL mode as well. For any additional information, visit Pycom's docs page.
SetupSo what needs to be done? You need to clone WolkConnect-MicroPython in order to have access to the wolk.py module, which you will need to copy onto the board later.
git clone https://github.com/Wolkabout/WolkConnect-MicroPython.gitYou will also need to copy Pycom's implementation of an MQTT client that is a dependency for WolkConnect-MicroPython and can be found here: mqtt.py. There is also a copy of this module in the attachments under the same name.
Besides those two modules, there are only two additional files: boot.py - first script to be run on the device that will set up the board, and main.py - where the actual control over the LED lamp will take place. Both of these files can be found in the attachments of this post.
Before you start copying the files over to the board, you need to make some changes to the main.py, namely editing the WiFi credentials on line 21
# WiFi
WIFI_SSID = "WIFI_SSID"
WIFI_AUTH = WLAN.WPA2  # WEP, WPA, WPA2, WPA2_ENT
WIFI_PASSWORD = "WIFI_PASSWORD"
and entering the credentials you get from WolkAbout IoT Platform when creating a device.
To get these credentials, you need to create a device first by using a device type. The device type for this project, "Smart light-deviceType.json", is available in the attachments, so create a copy of it. Log in to or create your account on WolkAbout IoT Platform and select Device Management from the application menu and change to the Device Type Management tab.
Here click the + and choose the option to Import device type and then navigate to the copy of the device type saved from the project's attachments.
Now that a device template is available, you can create a device from it by clicking Create device.
Here, you need to give your device a name and enter MQTT for the Connectivity Type. Check the checkbox for Create Default Semantic (this is necessary for creating widgets on your dashboard later on).
Then, click Save and the form with device credentials will be displayed. Store these streams of information however you want and then enter them into main.py on line 17:
wolk.DEVICE_KEY = "device_key"
wolk.DEVICE_PASSWORD = "some_password"
Additionally, enter the reference used for the Switch actuator of our device.
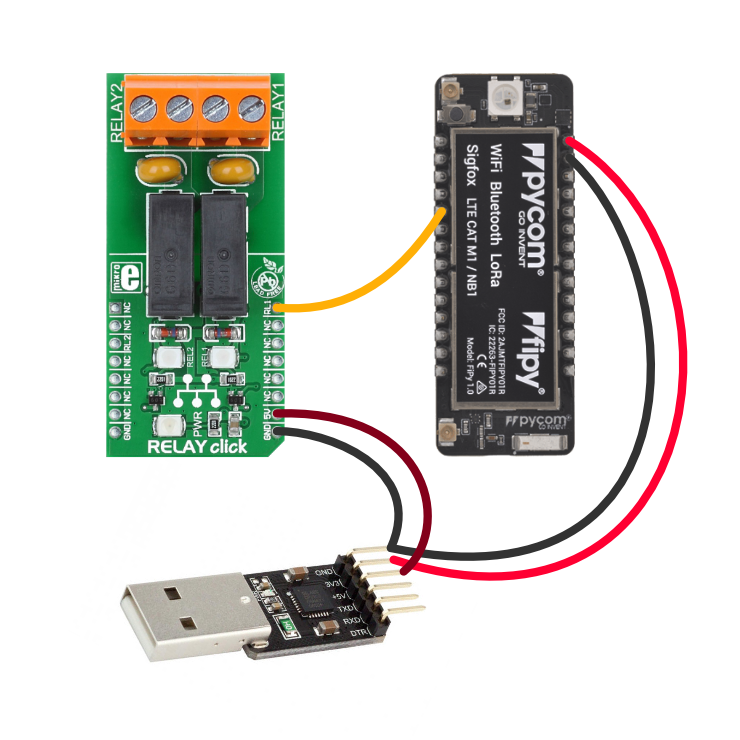
wolk.ACTUATOR_REFERENCES = ["SW"]We used pin P3 on our FiPy board to connect the Relay click, but if you happen to use another pin, edit line 27:
LIGHT_SWITCH = Pin("P3", mode=Pin.OUT)and these are all the changes that need to be made to the project.
Now, you can connect the board by using USB and copy over the required files so that they conform to the following structure:
> flash
 - boot.py
 - main.py
 > lib
   -wolk.py
   -mqtt.py
After connecting the board to your PC, you will need to get the name of the port. On Linux, you can run dmesg | grep tty and on Windows go to Device Manager and find the name listed under Ports. You will need this to set up your Pymakr project or for connecting with mpfshell.
If you use the Pymakr plugin, create a directory, open it as a project in Atom or VS Code and then copy boot.py and main.py into this directory. Make a directory named lib and then copy wolk.py and mqtt.py to it. Now you can synchronise the project by pressing the Sync icon from the console.
Using mpfshell, copying files can be done by navigating to a local folder that contains all the necessary files and running mpfshell -c "open ttyUSB0"
You will be in the flash directory, so here run put boot.py and put main.py
After that, run cd lib and then put wolk.py and finally put mqtt.py
Once that all the files are in place you can enter REPL mode by entering repl. Now you can perform a soft-reboot of the device by pressing CTRL+D (exit REPL mode with CTRL+] ). The board will run boot.py that will start main.py and duplicate its output to the terminal so you can make sure that the device can connect to the WiFi network. At this point, the onboard LED should glow a faint red, signalling that the light switch is in the off state.
Finally, to change the state of the light switch, you need to create a dashboard on WolkAbout IoT Platform and place a widget for controlling the switch. To do so, switch over to the to the Reports and Visualisation section, click + button and enter a name for the dashboard and defining the scope to the device that was previously created.
Then you can add a widget to your dashboard by clicking Add widget
Select Actuators then select Switch from your device and click Save. Now, if your board is powered on, you should see the current of the switch and you can change its state by toggling the switch on or off. The device will receive the command and toggle the switch on.
That’s it! You managed to gain remote control over a light switch from the web and even from your mobile device (Android or iOS). Your lights are now IoT-enabled.


Comments
Please log in or sign up to comment.