COVID-19 Challenges
Coronavirus disease 2019 (COVID-19) is an infectious disease caused by severe acute respiratory syndrome coronavirus 2 (SARS-CoV-2). It was first identified in December 2019 in Wuhan, Hubei, China, and has resulted in an ongoing pandemic.
The virus is primarily spread between people during close contact, [ most often via small droplets produced by coughing, sneezing, and talking. The droplets usually fall to the ground or onto surfaces rather than traveling through air over long distances. Transmission may also occur through smaller droplets (called aerosol) that are able to stay suspended in the air for longer periods of time. Aerosol transmission can happen during some medical procedures and potentially in crowded indoor spaces that are inadequately ventilated. Less commonly, people may become infected by touching a contaminated surface and then touching their face.
As the Hospitals are the most infectious space and crowded with patients of different conditions it is necessary to disinfect the hospital premises in order to reduce the spread of COVID-19. Utilizing manpower for this purpose is also not an option since cleaning process may lead the human being infected with disease himself and other persons with contact. This project is to build up an self running robot that disinfect hospital floors by sweeping the floor with disinfectant automatically. And even avoid direct contact with a human being while it is working.
Building up the robot step by step
1. Build the robot chases
Robot chases should be adequate to contain 2 wheels connected to DC motors for the movement purpose and one wheel connected to another DC motor under the robot in order to use it as sweeper by pasting sponge/scrubbers underneath the wheel. It should be able to carry a water bottle with miniature water pump and a platform should be there for the sensor unit. Servomotor is used to turn the ultrasonic sensor whenever is needed. Fix them on the platform on the robot chases front. A soldered PCB board can be used to connecting the components or a breadboard. Create a platform for water bottle and mini water pump away from the electronics.
2. Electronics
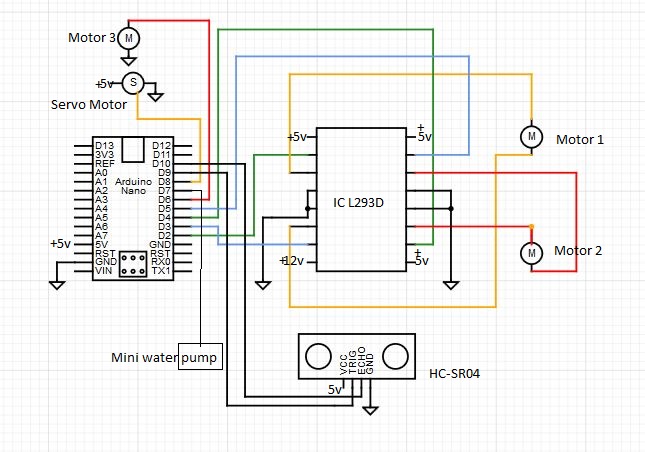
Arduino Nano is used to control the operation of servo motor, ultrasonic sensor, L293D motor driver IC and Mini water pump.
L293D Motor driver
The 16 pins of L293D IC are connected according to the following.
Pin 1 : +5V (Enable motor driver1)
Pin 2 : Arduino data pin D2 (Motor control)
Pin 3 : Motor 1
Pin 4 : Ground
Pin 5 : Ground
Pin 6 : Motor 1
Pin 7 : Arduino data pin D3(Motor Control)
Pin 8 : +12v(External motor supply)
Pin 9 : +5V (Enable motor driver2)
Pin 10 : Arduino data pin D4 (Motor control)
Pin 11 : Motor 2
Pin 12 : Ground
Pin 13 : Ground
Pin 14 : Motor 2
Pin 15 : Arduino data pin D5 (Motor Control)
Pin 16 : +5v(IC supply)
Now using Arduino data pins D2, D3, D4 and D5 the DC motors connected to the moving wheels can be controlled.
Ultrasonic sensor
The sensor used is HC-SR04 compatible with Arduino which contains four ip/op pins as follows.
In order to generate the ultrasound we need to set the Trigger Pin on a High State for 10 µs. That will send out an 8 cycle sonic burst which will travel at the speed sound and it will be received in the Echo Pin. The Echo Pin will output the timein microseconds the sound wave traveled.
If the object is 20 cm away from the sensor, and the speed of the sound is 340 m/s or 0.034 cm/µs. But what you will get from the Echo pin will be double time required because the sound wave needs to travel forward and bounce backward. So in order to get the distance in cm we need to multiply the received travel time value from the echo pin by 0.034 and divide it by 2.
Trigger pin is connected to arduino data pin 9 and echo is connected to arduino data pin 9.
Servo motor
The servo motor pins are as follows.
1.+Vcc
2.Servo control
3.Ground
Servo control is connected to Arduino data pin 9 and header file servo.h is included in the program for controlling. Setting servo motor by 0 degrees will turn ultrasonic sensor to the right and setting it by 180 degrees it will turn the sensor to the left.
-----------------------------------------------------------------------------------------------------------------------
Connect cleaning motor (motor 3) to Arduino pin D6 and water pump to Arduino pin D7.
Solder according to the schematics. Upload the code to Arduino Nano using Arduino IDE software.
Working
The robot measures the distance to obstacle and moves forward if distance is greater than 12 cm. If its below 12cm, robot stops and turn ultrasonic sensor using servo motor to the right and then measure distance to obstacle in right and then turns left and measure obstacle distance to the left. The robot will turn to the side which ever showing more distance and continue. The water pump starts pumping the disinfectant to the cleaning sponge/scrubber and motor 3 rotates the cleaning sponge/scrubber fixed to a wheel as soon as the power is on. To power arduino nano use a USB cable supported rechargeable(Portable)battery thus the robot is rechargeable.


Comments