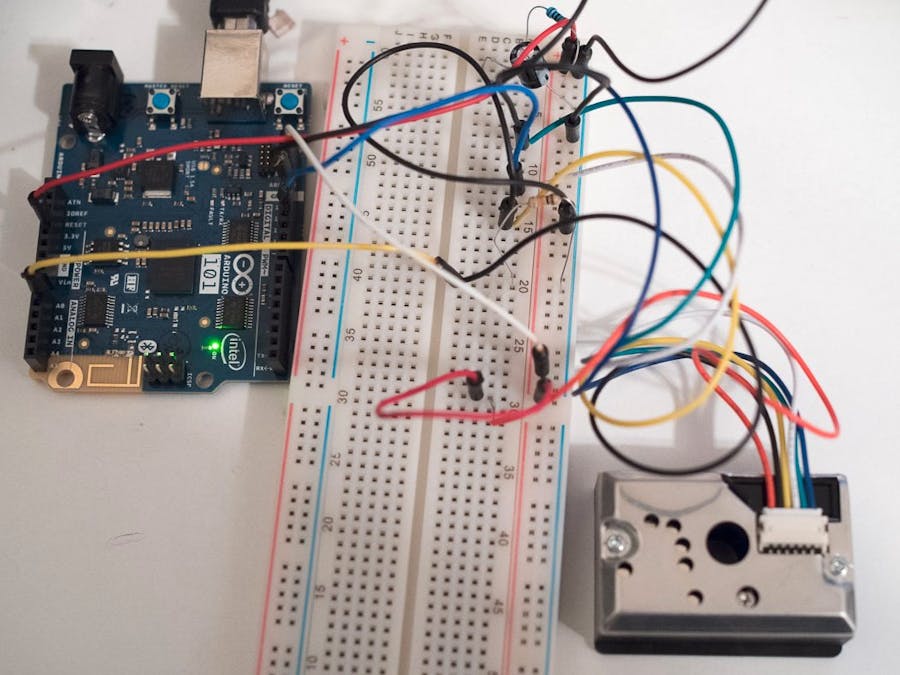
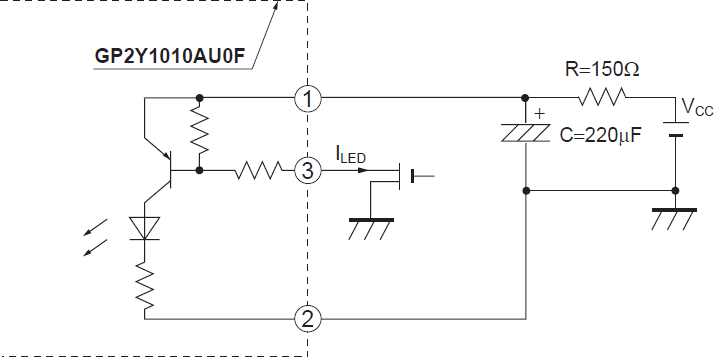
The version of the sensor that I purchased from Amazon came with the sensor, a wiring harness, resistor and capacitor. Connect the wiring harness to the sensor, and then connect the wires to a bread board.
- Wire 1 - Blue is connected to power through the resistor and ground via the capacitor.
- Wire 2 - Green is wired directly to ground
- Wire 3 - White is wired to a digital output - in this case - D12 on the 101
- Wire 4 - Yellow is wired directly to ground.
- Wire 5 - Black is wired to an Analog Input, in this case A0 on the 101. A 10k ohm pulldown resistor is used so the value doesn't float.
- Wire 6 - Red is wired to power directly.
Note that the the colors of the wires in your harness may be different than the colors listed above. Connect 3.3v and ground to their respective points on the breadboard.
The SketchThe sketch itself isn't very complicated. It can be found in the github repository linked below, and is based in part off of a tutorial I found via google. If you use different pins besides Analog 0 and Digital 12, be sure to modify these lines accordingly:
const int dustPin = A0;
const int ledPin = 12;
There's some math done in the sketch that normalizes the read voltage on A0 and converts it to ug/m^3 based on an equation derived from the Sharp datasheet. Note that for lower analogRead() values, you'll actually get a negative dust level.
// 0 - 3.3V mapped to 0 - 1023 integer values
 calcVoltage = voMeasured * (3.3 / 1024);
 // linear eqaution taken from http://www.howmuchsnow.com/arduino/airquality/
 // Chris Nafis (c) 2012
 dustDensity = (0.17 * calcVoltage - 0.1)*1000;
Finally, if you want more/less frequent updates, change the final delay at the bottom of the sketch.
 if (dustChanged) {
   dustCharacteristic.setValue(dustDensity);
 }
 delay(1000);
Add a new device to your ARTIK Cloud account by clicking on "Connect another device..."
Search for "Sharp GP2Y1010AU0F Dust Sensor" and name it.
Click on the Gear next to the newly created device...
And generate a device token...
Copy down the Device ID and Token. These will be used in the script that uploads values to the ARTIK Cloud.
Uploading valuesEither download the zip or clone the github repository with:
git clone https://github.com/zanycadence/dust_sensor_ARTIK
At a command line, enter the directory and then:
cd node_app/
to enter the node apps directory. The app uses noble to connect to the 101. Install the dependencies by executing
npm install
and change the dustBearer and dustId to the Token and ID values generated earlier
//device info
var dustBearer = "Bearer INSERT_DEVICE_TOKEN_HERE";
var dustId = "INSERT_DEVICE_ID_HERE";
Note that the dustBearer variable should start with "Bearer " and then your device token.
The node app itself isn't anything too complicated - it searches for the service and characteristic set in the arduino sketch and then connects and waits to receive notifications from the device. Theres a function at the end called postToCloud() that recursively calls itself with a setTimeout(). The value is set to 600000ms (around 10 mins) initially to conform to the device limits of the ARTIK free tier. Feel free to change this to a more suitable value.
setTimeout(function(){
   console.log("writing to cloud");
   var test_dust = build_args(dust, dust_data, new Date().valueOf(), dustBearer, dustId);
   c.post(artikCloud, test_dust, function(data, response){
     console.log(data);
   });
 postToCloud();
}, 600000);
Finally, save your modifications and start the app by running:
node app.js
To get this data, I shortened the setTimeout() delay to 5 seconds and let the sensor log a bit of data. Then, I blew out a candle directly over the sensor that corresponds to the peak observed in the graph. I've got a fan running, so the particles from the smoke dissipated pretty quickly.


_baVEVgguW1.jpg?auto=compress%2Cformat&w=48&h=48&fit=fill&bg=ffffff)


Comments
Please log in or sign up to comment.