


Hardware components | ||||||
 |
| × | 1 | |||
 |
| × | 1 | |||
 |
| × | 1 | |||
 |
| × | 1 | |||
| × | 2 | ||||
Software apps and online services | ||||||
| ||||||
 |
| |||||
| ||||||
 |
| |||||
 |
| |||||
Hand tools and fabrication machines | ||||||
 |
| |||||
 |
| |||||
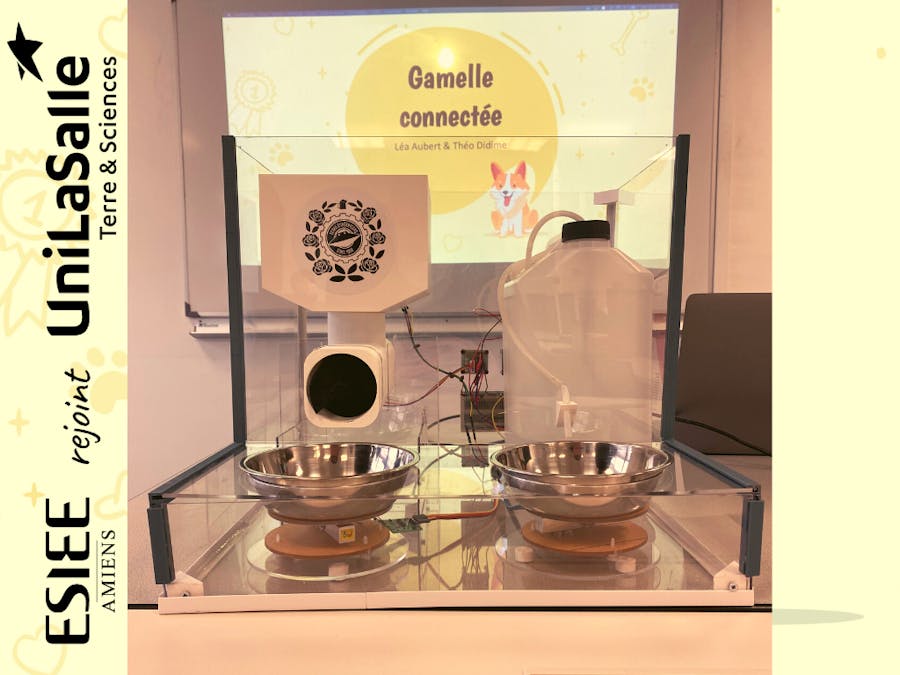
As part of our fifth year of engineering school in ESIEE Amiens (part of UniLasalle), in the RIOC (stands for Réseaux Informatiques et Objets Connectés) section, we decided to make a connected pet feeder as our end-of-year project.
Being in the Computer Networks and Smart Objects branch of study (RIOC), we had already studied LoRa networks and Android apps. This project has been the occasion to bring together all of the skills that we had learned during our cursus.
Objectives of the projectWe wanted to make a pet feeder for small dogs or cats that respected the following conditions :
- Two bowls : one for the kibbles and one for the water
- Two tanks : one for the kibbles and one for the water
- Controllable from an Android Application
- Communicating in LoRa
- The datas collected by the system are saved in a database
We started the project with a 3D simulation of our object.
Then, we reflected on how we would place the captors and how we would convey the kibbles and water from the tanks to the bowls.
The first visual we came up with was something like that :
Then we quickly realized that this design would not be very functional, so we decided to adapt it. We chose to have the water directly delivered into the bowl by a small hose. For the kibbles, we decided to make them fall directly into the bowl from a pipe placed directly above it.
After these adaptations, we created a cardboard scale model of our object.
During the process, we also were able to refine our choices about the sensors and the electronic components. We needed :
- two scales to put under the bowls
- an ultrasound sensor to watch the quantity of kibbles in the tank
- a pump to be put in the water tank
- a relay to activate the pump
- a stepper motor
- A simple board to that we could plug all of our components
- a SodaQ board that integrated LoRa
In order to have made-to-mesure parts, we chose to use exclusively 3D printed components. To realize our parts, we drew them on Fusion 360.
We printed :
- A worm screw, which would be powered by the stepper motor in order to push the kibbles towards the bowl.
- A tank with a hole, for the kibbles.
- A pipe to convey the kibbles from the tank to above the bowl. This pipe is where we would insert the worm screw.
- Three different types of brackets to support the structure.
Some of these pieces can be seen in the attachments.
The circuitHere is an insight of our circuit :
We chose to use the LoRaWAN protocol to ensure the communication between our pet feeder and the Android application that pilots it. We decided to use this protocol for several reasons.
- First, LoRa allows low bandwidth communication, which makes it energy efficient and a perfect candidate for a smart object.
- Also, this protocol grants uplink and downlink communication, which was a prerequisite for our project, because we need to retrieve datas from the sensors and to send instructions to the motor and the pump.
- Finally, because it uses the LoRa protocol instead of for example Wifi, our pet feeder only needs to be powered with 5V. It allows the user to place it on a site that does not have wifi, like the end of a garden or a kennel.
Our architecture is the following :
Our SodaQ board retrieves datas from the sensors and sends them to the TTN Gateway in a payload. The TTN Gateway redirects the payload to a Node-Red container hosted in a Docker. We use Node-RED to post the treated datas to a Cloud Firestore database, which is interconnected with our Android application. The communication both occurs in uplink and downlink.
The Arduino programOur program consists of several functions, roughly one for each sensor, and of a switch-case that manages the LoRa communication.
Here are some of the main functions :
getKibblesWeight() is the function that returns the current weight of the kibbles bowl content.
float getKibblesWeight(){
    scale1.set_scale(calibration_factor1);
    debugSerial.print("CROQUETTE: ");
    units_1 = scale1.get_units(), 10;
    if (units_1 < 0)
    {
      units_1 = 0.00;
    }
    debugSerial.print(units_1);
    debugSerial.print(" grams");
    debugSerial.println();
    return units_1;
}
kibbles_tank() is the function that returns a boolean to tell if the kibbles tank is almost empty or not, thanks to the ultrasound sensor.
bool kibbles_tank(){
    digitalWrite(trig, HIGH);
    delayMicroseconds(10);
    digitalWrite(trig, LOW);
    lecture_echo = pulseIn(echo,HIGH);
    cm = lecture_echo /58;
    bool result;
    debugSerial.print("Distance en cm :");
    debugSerial.println(cm);
    if(cm>=11){
      result = true;
      }else{
        result = false;
      }
    return result;
}
To make sure that the bowl would not overflow, we put two safety conditions into the loop() function :
if(getWaterWeight() > maxWater){
    electrovanne(false);
    }
   if(getKibblesWeight() > maxKibbles){
    moteur(false);
}The Things Network is a community-based, open source LoRaWAN network for the Internet of Things (IoT). Currently, the network consists of more than 40, 000 contributors grouped in more than 400 communities in 90 countries that have deployed more than 4, 000 gateways. It is possible for individuals, universities, companies and municipalities to contribute to the deployment or to use The Things Network for free.
ESIEE Amiens possesses a gateway, which allowed us to use TTN for our project. Thanks to TTN, we were able to communicate in LoRa and to monitor the communications happening passing through the gateway.
We registered our device on The Things Network and we customized the Encoder and Decoder functions to fit our needs.
Node-RED is a flow-based development tool for visual programming developed originally by IBM for wiring together hardware devices, APIs and online services as part of the Internet of Things.
Node-RED offers many libraries to work with, including the MQTT library, which we used to retrieve and to send back payloads. Node-RED also has built-in nodes for the sending and receiving of HTTP Requests.
We made a Node-RED container on Docker so that we could access it more easily.
Here is what our flow looks like :
The most important branches are the branch that receives the TTN Payload, and the two branches that receive the POST query sent by the Android App.
The "uplink" branch starts with a MQTT-in node, then the payload goes through a function to decode it. The branch ends with a http-request node that sends a POST query to our Cloud Firestore database. The goal of this branch is to create a new entry in the database for each payload that is received from TTN.
The two "downlink" branches start with a http-request node that receives a POST query coming from the Android app. We made two different paths, one for each command that can be received (/refill for when the user clicks on the "refill" button on the app, and /mode when he wants to pass in automatic mode). Depending on the value retrieved from the POST, the payload is treated through functions and then sent to the circuit tanks to a MQTT-out node.
Cloud FirestoreCloud Firestore is a flexible and scalable database for mobile, web and server development powered by Firebase and Google Cloud.
We needed to store our datas. We had already worked with Cloud Firestore at school, so we decided to consider using this solution. What really convinced us to use Cloud Firestore is the convenience offered by it. After some trials and errors on Postman to find the good path for our HTTP requests, we were able to get and post datas on our database very easily. We then just had to migrate our Postman queries to Node-RED to automatize the process. For the downlink communication (from the app to the circuit), we used the built-in Firestore tutorials and connections that are provided by Android Studio.
We created a new project and we linked it to our Android app.
This is the architecture of our collection :
We have a "gamelles" collections that contains several documents, which are themselves composed of four fields.
Android StudioThe principle of our object was to be piloted remotely. To that extent, we needed to have something with an interface so that the user could check the datas from the sensor and send commands to the object. We felt that the most pertinent way to make it was to create a phone application, based on the fact that almost everyone possesses a smartphone nowadays. We chose Android over Apple simply because we had received courses of Android Studio but none of us ever had the occasion to develop in Swift.
We therefore made a simple Android application with a few activities.
- One main activity, with at the top two buttons (light blue) to switch between manual and automatic mode for the refilling of the bowls. There also is a button to show the state of the tanks, and one button to refill each bowl.
- An activity that shows the state of the tanks.
The main activity is the following :
From this simple interface, you can check the current weight of the bowls, refill the kibbles or the water bowl and click on a button to have an insight on the tanks. You can find the source of this activity in the attachments.
In order to retrieve datas from our Cloud Firestore database, we used the com.google.firebase.firestore library.
Final resultConclusionIn conclusion, this project gave us an opportunity to use all the skills we that were introduced to us during our years of engineering studies. We are very proud to have been able to make a functioning object that communicates bi-directionally, with a data storage, HTTP queries, and a mobile app. By making this pet feeder, we have worked with several technologies, explored several paths before settling for a solution to each problem and in that, we have learned a lot, as much technically than functionally.
AcknowledgmentWe would like to thank all the people that helped us make this project a success.
First, we would like to thank Mrs Aby, M. Pomportes, M. Dailly and M. Douay for their precious advices and the time they spent with us at school during the making of our pet feeder.
We would also like to thank Gaulthier which guided us and enabled us to make 3D prints, which we had never made before.
Thanks also to Corentin and Adrien for helping us cut plexiglas with the laser and thanks to Clément for making the wire of our pump waterproof with the heat-shrinkable tubing and the hot glue.


_t9PF3orMPd.png?auto=compress%2Cformat&w=40&h=40&fit=fillmax&bg=fff&dpr=2)


_3u05Tpwasz.png?auto=compress%2Cformat&w=40&h=40&fit=fillmax&bg=fff&dpr=2)
Comments
Please log in or sign up to comment.