


_Owo51ooXAa.png?auto=compress%2Cformat&w=40&h=40&fit=min&dpr=2)


Hardware components | ||||||
 |
| × | 1 | |||
 |
| × | 1 | |||
 |
| × | 1 | |||
 |
| × | 1 | |||
 |
| × | 1 | |||
 |
| × | 1 | |||
Software apps and online services | ||||||
 |
| |||||
Hand tools and fabrication machines | ||||||
 |
| |||||
To join the celebration of Clear Air Month, we have developed a special project. The purpose of this month is to encourage many people around the world to take action for having clear and healthier air in places where they spend most of their time. This can be at work, at home, or even in more populated places like hospitals. For this reason, we developed a small and lightweight Ambient Air Quality Monitor station where you can read many environmental variables such as temperature, humidity, IAQ (Indoor Air Quality), and Co2 (ppm).
Product list- RAK5005-O | WisBlock Base Board / RAK19007 | Base Board 2nd Gen
- RAK4631 | nRF52840 SX1262 | Module for LoRaWAN
- RAK1906 | BME680 | Environmental Sensor
- RAK1921 | SSD1306 | OLED Display
- Female-to-female jumper wires
- Android smartphone (optional)
This Ambient Air Quality Monitor station is divided into two sections. First, the top cover with the roles display and locking with screws. Second, the bottom is where the WisBlock and the sensor are going to be settled.
Grab the two files from our account in RAKwireless - Thingiverse and let's get started with the slicing process for the bottom, with the Ultimaker Cura. software.
Slice process
Open the Weather_Station_Bottom.3mf file by clicking the icon folder on the top-left side. After that, when the model appears on the building plate, place it where you need it. Then make sure to use the recommended parameters for PLA, you can find them below the image, later click on the Slice option at the bottom-right.
PLA Parameters
- Layer height: 0.15mm
- Temperature: nozzle: 210ºC, bed: 60ºC
- Speed: 60mm / s
- Supports: off
- Bed adhesion: skirt
When the slicing process is finished, the software estimates the time and the material needed for printing the piece. After this, save the.gcode file on your USB or microSD and start printing.
Note: You can repeat this process for the other part Weather_Station_Top.3mf and for any of this parts, you don't need to add printing support.
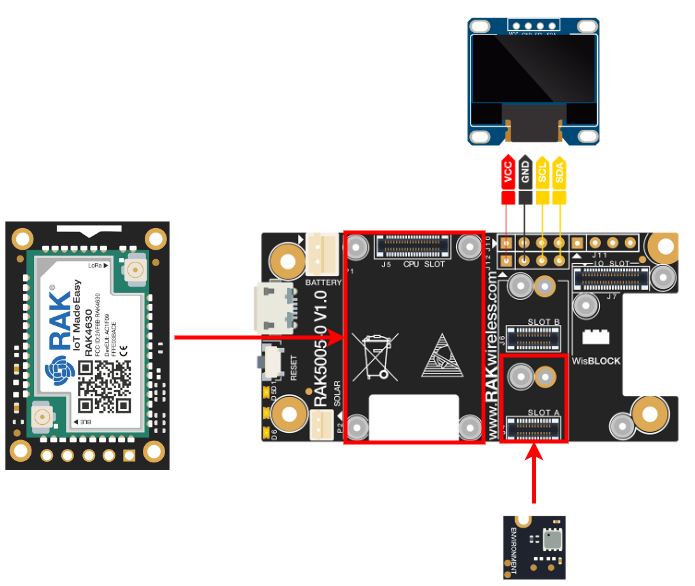
The WisBlock modules that we are going to use for this IoT hardware project consist of a base, a core, a display and a sensor. Before anything else, let’s dig deeper into what each module does and how it works:
RAK5005-O, also known as the WisBlock Base Board
This base board provides power and data for all the WisBlock modules. It supports the core, the display connection and the sensor itself. We are going to see how everything looks together later on.
RAK4631, also known as the WisBlock LPWAN Module
Based on the Nordic nRF52840, an ultra-low-power MCU this is the core of the project, and contains a SX1262 Semtech LoRa® IC and BLE (Bluetooth low energy)
RAK1906, also known as the WisBlock Environmental Sensor
This sensor is based on the Bosch® BME680 module and it can measure many magnitudes at the same time such as:
- Temperature
- Humidity
- Altitude
- IAQ (Indoor Air Quality)
- Gas: CO2
RAK1921, also known as the WisBlock OLED Display
This display is a 0.96 in OLED display with a 128x64 pixel resolution. You can use it via I2C protocol.
Now that you know what modules you need and how they work, let's connect the RAK4631 Core to the CPU slot. Then, the RAK1906 sensor in the Slot A of the RAK5005-O base, both use the M1.2x3 screws. Next, plug the BLE antenna, and for connecting the RAK1921 OLED Display, we recommend using male pin header with 2.54mm pitch. Here is the schematic to see how the connections go.
It should look like the following image:
Then, you can connect the RAK1921 Display to the male header using female-female jump wires, just like this.
NOTE: If you want a better reading of the RAK1906 sensor, you can mount it facing outwards, in that way any heat generated by the core or the base doesn’t affect the measurements.
Arduino BSP installation
For this step, you can refer to our Documentation as we need the BSP for the RAK4631 core. After you have the BSP installed, we need some extra libraries. Go to Tools > Manage libraries... to open the Library Manager. Then search them using the name and install those we highlight in the following images, or you can also find them in the code.
Check for the library name “BSEC Software Library“ made by Bosch Sensortec
Check for the library name “U8g2“ made by oliver.
Creating the Sketch
Copy the firmware for this project and paste it into a new Arduino sketch. To do it, click on File>New and then paste the following code (you can also find it on our GitHub):
Take into account deleting the Void Loop and Void Setup before pasting the new code
/**
 * @file EnvironMeter.ino
 * @author chris.mendez@rakwireless.com
 * @modifications by harold.duarte@rakwireless.com
 * @brief This sketch demonstrate reading data from a RAK1906 Environment Sensor and send it to cellphone through BLE.
 * @version 0.1
 * @date 2022-01-17
 *
 * @copyright Copyright (c) 2022
 **/


#include <bluefruit.h>      // This one is already installed by the BSP.
#include "bsec.h"           // Click to install library: http://librarymanager/All#bsec
#include <U8g2lib.h>        // Click to install library: http://librarymanager/All#u8g2


// Helper functions declarations
void checkIaqSensorStatus(void);
void errLeds(void);
float readAltitude(float readPres, float seaLevel);

// Forward declarations for functions
void ble_connect_callback(uint16_t conn_handle);
void ble_disconnect_callback(uint16_t conn_handle, uint8_t reason);

#define PIN_VBAT WB_A0

uint32_t vbat_pin = PIN_VBAT;
float vbat_mv;
uint8_t vbat_per;

#define VBAT_MV_PER_LSB (0.73242188F) // 3.0V ADC range and 12 - bit ADC resolution = 3000mV / 4096
#define VBAT_DIVIDER_COMP (1.73)      // Compensation factor for the VBAT divider, depend on the board

#define REAL_VBAT_MV_PER_LSB (VBAT_DIVIDER_COMP * VBAT_MV_PER_LSB)

/**
   @brief  BLE UART service
   @note   Used for BLE UART communication
*/
BLEUart g_BleUart;

/** Flag if BLE UART client is connected */
bool g_BleUartConnected = false;

U8G2_SSD1306_128X64_NONAME_F_HW_I2C u8g2(U8G2_R0);

//Sensor data
String sensordata1,sensordata2;
float temp, pres, hum, alti, gasi, iaqq, co2;
char data[32] = {0};

// Might need adjustments
#define SEALEVELPRESSURE_HPA (1013.25)

// Create an object of the class Bsec
Bsec iaqSensor;

String output;

/**
   @brief Get RAW Battery Voltage
*/
float readVBAT(void)
{
  float raw;

  // Get the raw 12-bit, 0..3000mV ADC value
  raw = analogRead(vbat_pin);

  return raw * REAL_VBAT_MV_PER_LSB;
}

/**
   @brief Convert from raw mv to percentage
   @param mvolts
      RAW Battery Voltage
*/
uint8_t mvToPercent(float mvolts)
{
  if (mvolts < 3300)
    return 0;

  if (mvolts < 3600)
  {
    mvolts -= 3300;
    return mvolts / 30;
  }

  mvolts -= 3600;
  return 10 + (mvolts * 0.15F); // thats mvolts /6.66666666
}

void bt_init()
{
  // Config the peripheral connection with maximum bandwidth
  // more SRAM required by SoftDevice
  // Note: All config***() function must be called before begin()
  Bluefruit.configPrphBandwidth(BANDWIDTH_MAX);
  Bluefruit.configPrphConn(92, BLE_GAP_EVENT_LENGTH_MIN, 16, 16);

  Bluefruit.begin(1, 0);
  // Set max power. Accepted values are: -40, -30, -20, -16, -12, -8, -4, 0, 4
  Bluefruit.setTxPower(4);
  // Set the BLE device name
  Bluefruit.setName("RAK4631_Environmeter");

  Bluefruit.Periph.setConnectCallback(ble_connect_callback);
  Bluefruit.Periph.setDisconnectCallback(ble_disconnect_callback);

  // Configure and Start BLE Uart Service
  g_BleUart.begin();

  // Set up and start advertising
  // Advertising packet
  Bluefruit.Advertising.addFlags(BLE_GAP_ADV_FLAGS_LE_ONLY_GENERAL_DISC_MODE);
  Bluefruit.Advertising.addTxPower();
  Bluefruit.Advertising.addName();

  /* Start Advertising
    - Enable auto advertising if disconnected
    - Interval:  fast mode = 20 ms, slow mode = 152.5 ms
    - Timeout for fast mode is 30 seconds
    - Start(timeout) with timeout = 0 will advertise forever (until connected)

    For recommended advertising interval
    https://developer.apple.com/library/content/qa/qa1931/_index.html
  */
  Bluefruit.Advertising.restartOnDisconnect(true);
  Bluefruit.Advertising.setInterval(32, 244); // in unit of 0.625 ms
  Bluefruit.Advertising.setFastTimeout(30);   // number of seconds in fast mode
  Bluefruit.Advertising.start(0);             // 0 = Don't stop advertising after n seconds
}

// Configuration
void setup(void)
{
  // Initialize the built in LED
  pinMode(LED_BUILTIN, OUTPUT);
  digitalWrite(LED_BUILTIN, LOW);

  Serial.begin(115200);
  Wire.begin();

  // Set the analog reference to 3.0V (default = 3.6V)
  analogReference(AR_INTERNAL_3_0);

  // Set the resolution to 12-bit (0..4095)
  analogReadResolution(12); // Can be 8, 10, 12 or 14

  // Let the ADC settle
  delay(1);

  // Get a single ADC sample and throw it away
  readVBAT();

  time_t serial_timeout = millis();
  // On nRF52840 the USB serial is not available immediately
  while (!Serial)
  {
    if ((millis() - serial_timeout) < 5000)
    {
      delay(100);
      digitalWrite(LED_BUILTIN, !digitalRead(LED_BUILTIN));
    }
    else
    {
      break;
    }
  }

  u8g2.begin(); // OLED display init
  bt_init();    // BlE init

  iaqSensor.begin(BME680_I2C_ADDR_PRIMARY, Wire);
  output = "\nBSEC library version " + String(iaqSensor.version.major) + "." + String(iaqSensor.version.minor) + "." + String(iaqSensor.version.major_bugfix) + "." + String(iaqSensor.version.minor_bugfix);
  Serial.println(output);
  checkIaqSensorStatus();

  bsec_virtual_sensor_t sensorList[10] = {
    BSEC_OUTPUT_RAW_TEMPERATURE,
    BSEC_OUTPUT_RAW_PRESSURE,
    BSEC_OUTPUT_RAW_HUMIDITY,
    BSEC_OUTPUT_RAW_GAS,
    BSEC_OUTPUT_IAQ,
    BSEC_OUTPUT_STATIC_IAQ,
    BSEC_OUTPUT_CO2_EQUIVALENT,
    BSEC_OUTPUT_BREATH_VOC_EQUIVALENT,
    BSEC_OUTPUT_SENSOR_HEAT_COMPENSATED_TEMPERATURE,
    BSEC_OUTPUT_SENSOR_HEAT_COMPENSATED_HUMIDITY,
  };

  iaqSensor.updateSubscription(sensorList, 10, BSEC_SAMPLE_RATE_LP);
  checkIaqSensorStatus();
}

/**
   @brief  Callback when client connects
   @param  conn_handle: Connection handle id
*/
void ble_connect_callback(uint16_t conn_handle)
{
  (void)conn_handle;
  g_BleUartConnected = true;

  Serial.println("BLE client connected");
}

/**
   @brief  Callback invoked when a connection is dropped
   @param  conn_handle: connection handle id
   @param  reason: disconnect reason
*/
void ble_disconnect_callback(uint16_t conn_handle, uint8_t reason)
{
  (void)conn_handle;
  (void)reason;
  g_BleUartConnected = false;

  Serial.println("BLE client disconnected");
}

// Function that is looped forever
void loop(void)
{
  unsigned long time_trigger = millis();
  if (iaqSensor.run()) { // If new data is available
    temp = iaqSensor.temperature;
    hum = iaqSensor.humidity;
    pres = iaqSensor.pressure;
    alti = readAltitude(pres, SEALEVELPRESSURE_HPA);
    gasi = iaqSensor.gasResistance / 1000;
    iaqq = iaqSensor.iaq;
    co2 = iaqSensor.co2Equivalent;

    sensordata1 = "1," +String(temp) + "," + String(hum, 1) + "," + String(alti, 1);
    sensordata2 = "2," +String(iaqq, 0)+ "," + String(co2, 0);
    //sensordata = String(temp);
    // Get a raw ADC reading
    vbat_mv = readVBAT();

    // Convert from raw mv to percentage (based on LIPO chemistry)
    vbat_per = mvToPercent(vbat_mv);

    displaying();

    if (g_BleUartConnected)
    {
      g_BleUart.print(sensordata1);
      delay(100);
      g_BleUart.print(sensordata2);
    }

  } else {
    checkIaqSensorStatus();
  }
}

// Helper function definitions
void checkIaqSensorStatus(void)
{
  if (iaqSensor.status != BSEC_OK) {
    if (iaqSensor.status < BSEC_OK) {
      output = "BSEC error code : " + String(iaqSensor.status);
      Serial.println(output);
      for (;;)
        errLeds(); /* Halt in case of failure */
    } else {
      output = "BSEC warning code : " + String(iaqSensor.status);
      Serial.println(output);
    }
  }

  if (iaqSensor.bme680Status != BME680_OK) {
    if (iaqSensor.bme680Status < BME680_OK) {
      output = "BME680 error code : " + String(iaqSensor.bme680Status);
      Serial.println(output);
      for (;;)
        errLeds(); /* Halt in case of failure */
    } else {
      output = "BME680 warning code : " + String(iaqSensor.bme680Status);
      Serial.println(output);
    }
  }
}

void errLeds(void)
{
  delay(100);
  digitalWrite(LED_BUILTIN, !digitalRead(LED_BUILTIN));
}

void displaying() {
  u8g2.clearBuffer();         // clear the internal memory

//  // Battery percentage showing
//  u8g2.setFont(u8g2_font_5x8_tf); // choose a suitable font u8g2_font_ncenB10_tr
//
//  memset(data, 0, sizeof(data));
//  sprintf(data, "%d%%", vbat_per);
//  u8g2.drawStr(110, 10, data);

  // Environment data showing
  u8g2.setFont(u8g2_font_7x13_tf); // choose a suitable font u8g2_font_ncenB10_tr -- u8g2_font_profont11_tf

  memset(data, 0, sizeof(data));
  sprintf(data, "T:%.2f C", temp);
  u8g2.drawStr(3, 12, data);

  memset(data, 0, sizeof(data));
  snprintf(data, 64, "RH:%.2f %%", hum);
  u8g2.drawStr(3, 25, data);

  memset(data, 0, sizeof(data));
  sprintf(data, "A:%.2f m", alti);
  u8g2.drawStr(3, 37, data);

  memset(data, 0, sizeof(data));
  sprintf(data, "IAQ:%.2f ", iaqq);
  u8g2.drawStr(3, 49, data);

  memset(data, 0, sizeof(data));
  sprintf(data, "CO2:%.2f ppm", co2);
  u8g2.drawStr(3, 62, data);

  u8g2.sendBuffer(); // transfer internal memory to the display

}

float readAltitude(float readPres, float seaLevel) {
  float atmospheric = readPres / 100.0F;
  return 44330.0 * (1.0 - pow(atmospheric / seaLevel, 0.1903));
}
Assembling the 3D case
Now let’s begin with the fun part: The assembling process! After printing the bottom section you need to place the RAK5005-O with the four M2.5x4 screws and one M1.2x3 screw for the RAK1906 Sensor. It looks like this
For the top section, slide the RAK1921 OLED Display into the space for it.
The “c“ mounting is for an optional Li-Ion cell if you want the project to be powered by batteries, just like this
Then connect the RAK1921 OLED Display to the RAK5005-O and should look this way:
For securing the top section use the M2.5x4 screws and should look like this:
You can find the app on the PlayStore, download it and open it, then click on the Bluetooth symbol
And then select the Device “RAK4631_Environmeter“ and it will connect and show you the same info as in the OLED display.
We Finish! After this journey, you successfully build your own Ambient Air Quality Monitor station using the WisBlock modules which can read many variables at once like temperature, humidity, altitude, and CO2 level. You can even connect it to your phone and read the data over Bluetooth. This project could be upgraded by sending the data via LoRaWAN® and making something like life incubators, cold storage facilities, transportation for food and beverages, and many more. As we always say #IoTMadeEasy.
Also, follow us on our Hackster Hub and be part of our community to keep updated with more DIY IoT projects and news.
Please share with us, write about your doubts and interact with us in the comment section.
ResourcesEnvironMeter - Apps on Google Play

_Owo51ooXAa.png?auto=compress%2Cformat&w=60&h=60&fit=min&dpr=2)


_M6kErcYJ84.png?auto=compress%2Cformat&w=40&h=40&fit=fillmax&bg=fff&dpr=2)


Comments
Please log in or sign up to comment.