Avoid illegal logging in protected areas.
We can find that just in Mexico (my home country) [1] 70 percent of the wood consumed is of illegal origin according to a study carried out by one of the most prestigious universities UNAM (QS ranking # 100).
I’ll create a system that is capable of recognizing, through Machine Learning the sounds generated by falling trees, chainsaws and human voices in protected areas, thus warning that illegal logging may be occurring.
I especially want a system that can help protect forests and the species that inhabit them.
Most solutions are based on raising awareness, but looking at more dedicated solutions we can find:
- TreeTAG is an emerging smartphone-based supply chain traceability system developed by Earth Observation Systems that tracks the location of logs transported from the forest to the mill.
Disadvantages: Very complex system that requires authorized personnel to be manipulated.
- Stardust is a dust-like material that can be sprayed onto wood and detected only with a hand-held device.
Disadvantages: You need to tag manually every tree which is labor intensive and expensive.
Solution:The system, will be easily reproducible, energy efficient and powerful thanks to the ML algorithms that will be implemented combined with the cloud services that we will use for deployment.
With the PSoC 62S2 Wi-Fi BT Pioneer Kit, I will obtain an audio signal which, through SensiML model, we can pass through a neural network. That will tell us if the noise of a saw cutting the trees or human voice in the forest, and MQ135 for fire smoke.
Displaying the information of the events detected in a simple webapp, together with a map which will indicate the position of the event.
Features:- Low-power battery consumption (PSoC and LoraWAN).
- High accuracy (thanks to SensiML).
- Easy production at large scale, due to its simplicity.
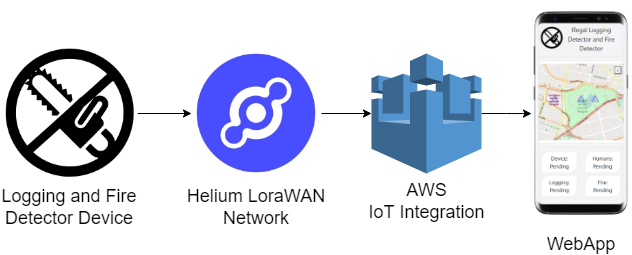
- Our device connects to the LoraWAN network through WiFi LoRa 32.
- Once in the Helium network, the data is processed in the Helium Console, connecting to the AWS IoT Gateway.
- In our AWS IoT Integration we receive the data sent by the device to a Topic.
- The web page is subscribed to the topic where we are sending the sensor data, and on the page we display the result.
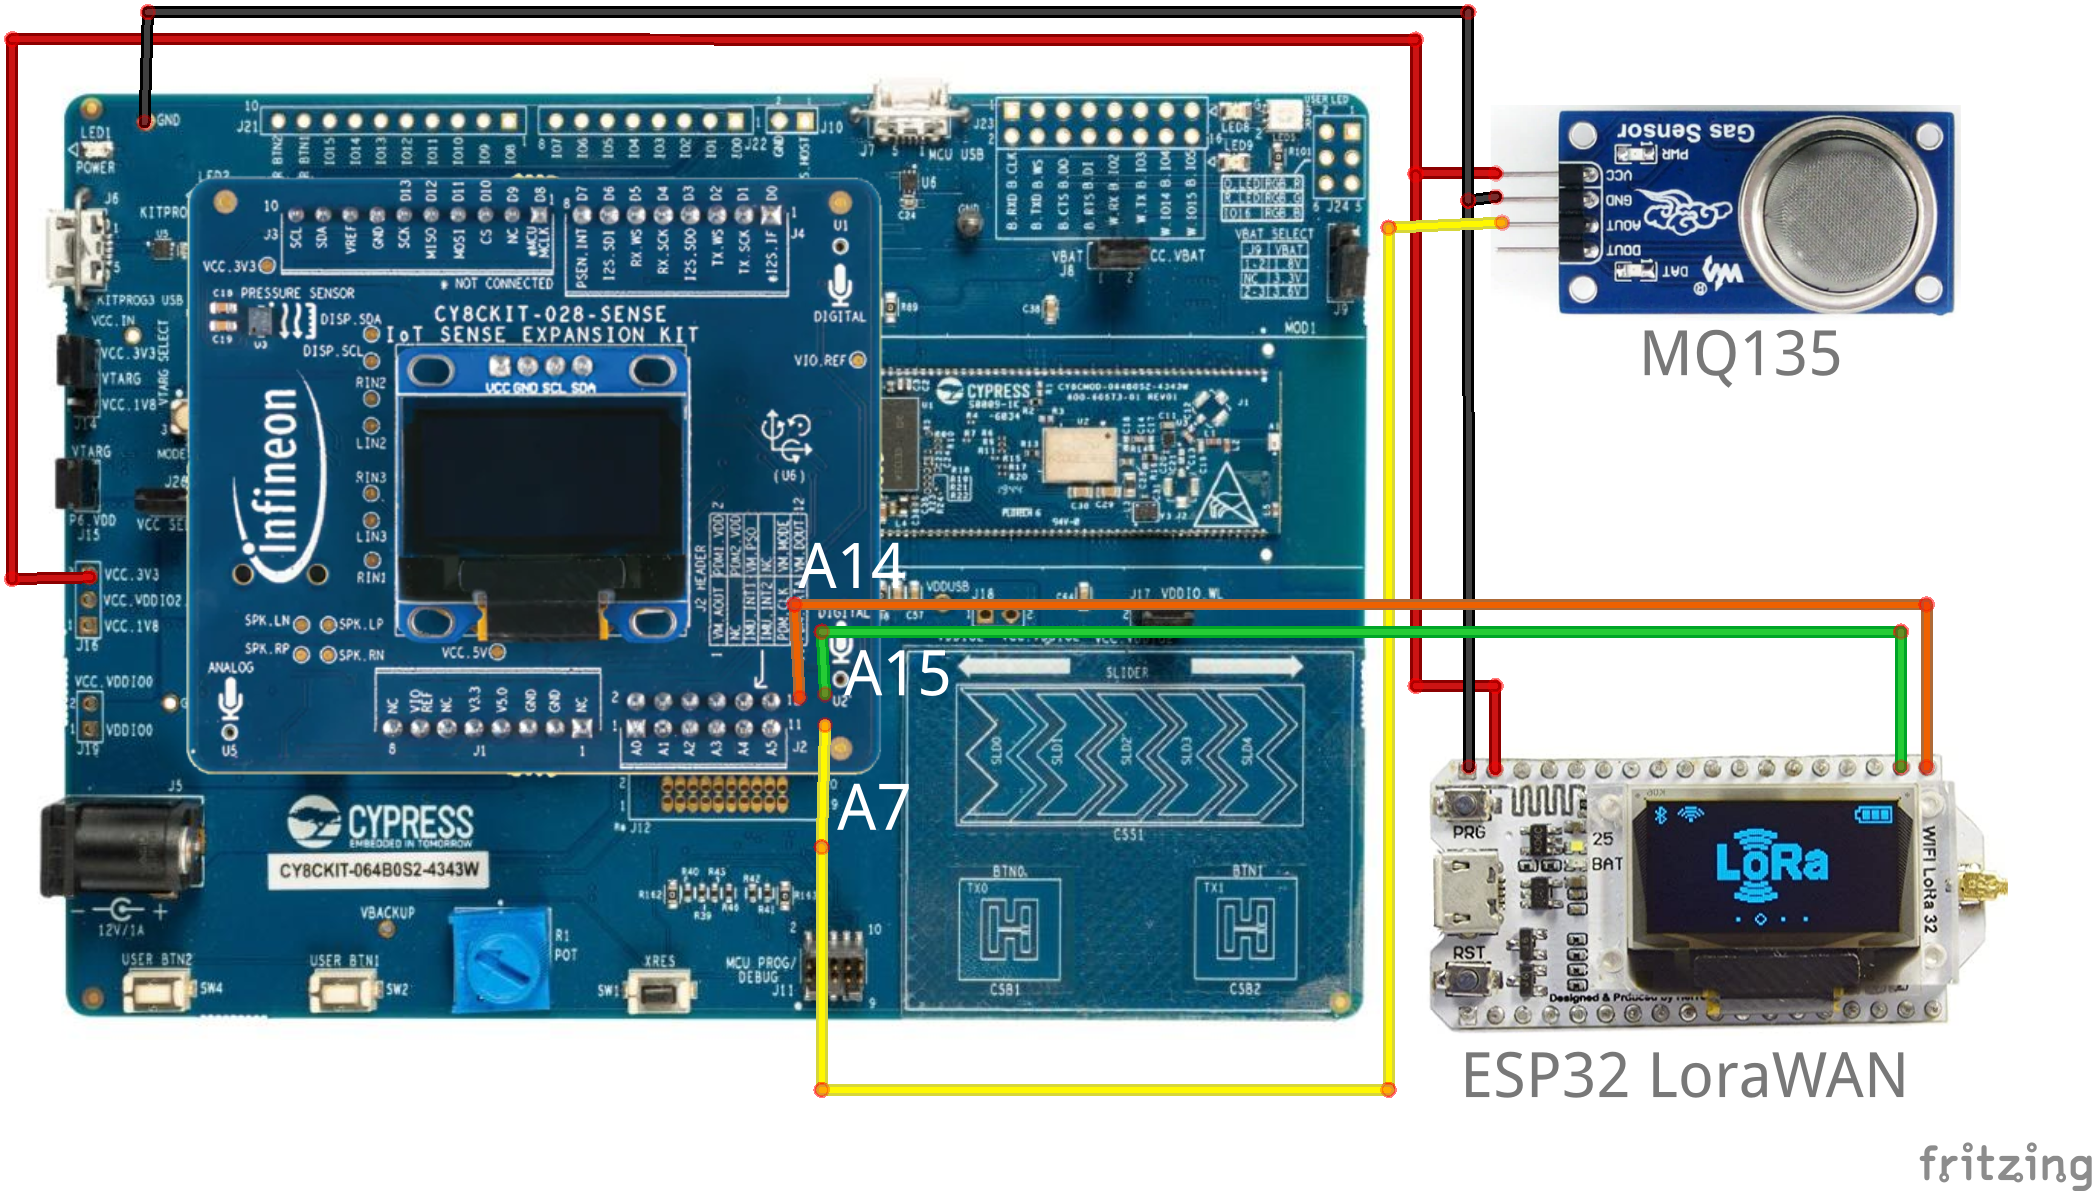
- The MQ135 sensor is connected to analog pin A7 on the PSoC™ 62S2.
- The WiFi LoRa 32 is connected to pins P9_6 and P9_7 to receive the information from which sensor to the board.
NOTE: The connection details of both diagrams are explained below.
Capturing Data:In this section I will explain how to get audio data from the PSoC to the Data capture lab.
Setting up the PSoC:First we have to configure the PSoC in data capture mode. Fortunately, the example project within the Modus Toolbox is already configured in audio data capture mode, so you only have to flash it on the device to start capturing data.
Once the device is flashed we will have to open a new project in SensiML with the following configuration for data capture.
If everything works correctly we can start receiving data and registering it within our project.
Capturing Data:In the case of my project, the easiest thing was to record the sound of several chainsaws, people and neutral audio data in order to properly train the model.
NOTE: The captured audios will be in the SensiML_Data_Capture_Lab.
Labeling Data:In this case, I did the labeling of the following categories for my model.
The system is capable of detecting the sound of mechanical saws, humanvoice and neutral silence, in order to avoid false alarms of the system.
SensiML:These were the specifications for the data in SensiML.
These were the specs of the model's training.
Here the results of the precision of the model against the data used.
And finally the specifications of the Knowledge Pack that is in the repository.
In this case you can see in the video how the model works correctly for the detection of human voice and detection of a Chainsaw. We are doing this test by seeing the PSoC serial output.
NOTE: the serial output is at 1000000 baudrate.
Our WiFi-LoRa-32 device, in addition to sending the data received from the PSoC to the Helium network, provides power to our entire device since it has a LiPo battery module and a regulated 3.3v.
The MQ135 sensor is an analog device that detects foreign gases in the environment, such as smoke, alcohol, etc... (some tests will be done with alcohol and not with smoke due to the risk of starting a fire indoors)
Therefore we have to connect it to a specific analog readout pin.
This device is already fully designed to be used with the PSoC, however being able to display images on the screen can be complicated. In the Modus Toolbox example program we can find an example of the Cypress logo for the screen.
As we believe that designing all this with just X and _ can be very cumbersome and tiring, we prefer to create a python script that allows us to convert a 128x40 image into an array of data that can be displayed on the screen.
As we can see in the image we only have to upload our image and the program will convert it into an array that can be displayed.
We just have to copy and paste the string that the program gives us and that's it.
This is what it will look like once displayed on the screen.
Once with all the devices connected we have the following circuit.
In this section we will explain all the details of the data transmission since we send the POsC data to AWS IoT.
PSoC to Helium Network:Hardware:The hardware used for this module was a WiFi-LoRa-32.
WiFi LoRa 32 (V2.1). 1x.
LiPo Battery. 1x.
Sofware:The board software will be in the ESP32_Helium_OTAA folder where the Arduino IDE project will be.
Helium Console new Device :We have to create a new device in our Helium console, this can take up to 20 min to start sending data to the console, do wait a little bit.
Inside the ESP32_Helium_OTAA folder you will have to configure the credentials that we obtained in the previous step.
uint8_t DevEui[] = { 0xXX, 0xXX, 0xXX, 0xXX, 0xXX, 0xXX, 0xXX, 0xXX };
uint8_t AppEui[] = { 0xXX, 0xXX, 0xXX, 0xXX, 0xXX, 0xXX, 0xXX, 0xXX };
uint8_t AppKey[] = { 0xXX, 0xXX, 0xXX, 0xXX, 0xXX, 0xXX, 0xXX, 0xXX, 0xXX, 0xXX, 0xXX, 0xXX, 0xXX, 0xXX, 0xXX, 0xXX };US915 for Mexico, same if your are in the US, check your region please.
Every time our device is going to send data to the Helium network, it reads pins 21 and 13 to see the value that the PSoC is reading, because these values are sent every 10 seconds to the network and each one of the messages has a cost in data credits, therefore we are only sending a character that represents the reading.Because the helium network is getting bigger day by day, we can be certain that our devices will have coverage almost anywhere.
We can see in our code.
case DEVICE_STATE_SEND:
{
  LoRaWAN.displaySending();
  String test;
  bool human = digitalRead(HUMAN_PIN);
  bool saw = digitalRead(CHAINSAW_PIN);
  if(saw && human){
    test = "3";
  }
  else if(human){
    test = "1";
  }
  else if(saw){
    test = "2";
  }
  else{
    test = "0";
  }
  Serial.print("Human: ");
  Serial.println(human);
  Serial.print("Saw: ");
  Serial.println(saw);
  sendStringData(test);
  deviceState = DEVICE_STATE_CYCLE;
  break;
}Because the helium network is getting bigger day by day, we can be certain that our devices will have coverage almost anywhere.
Now as shown here is an example of how our device is sending data to the Helium network.
To communicate the Helium Network platform with AWS IoT, I decided to use the integration that Helium already has developed to avoid setbacks trying to implement my own.
This integration is based on creating an AWS IAM credential so that the Helium Console can make the corresponding publications in AWS IoT.
Here is a demonstration of the entire backend running at the same time.
WebPage Deploy:The deployment of the web page was done using ReactJS, OpenLayers (Maps) and AWS-SDK for javascript.
https://illegal-logging-and-fire-detector.s3.amazonaws.com/index.html
For security, to safely use and consume AWS services, identity pool credentials were implemented with the Cognito service.
The access keys for AWSIoT and Cognito must be placed in the following file.
Webapp/src/components/aws-configuration.js
var awsConfiguration = {
  poolId: "us-east-1:XXXXXXXXXXXXXXX", // 'YourCognitoIdentityPoolId'
  host:"XXXXXXXXXXXXXX-ats.iot.us-east-1.amazonaws.com", // 'YourAwsIoTEndpoint', e.g. 'prefix.iot.us-east-1.amazonaws.com'
  region: "us-east-1" // 'YourAwsRegion', e.g. 'us-east-1'
};
module.exports = awsConfiguration;The web page receives the sensor data through AWSIoT as a web socket, so it is important to define within the page, which is the topic that we are going to receive, in this case "/helium/devices" as we could see in the video of [Backend Video](# backend-demo).
In the following file, put the name of the topic to which you will be subscribed.
<IotReciever sub_topics={["/helium/devices"]} callback={this.callBackIoT} />Because the data we receive from Helium Payload is base64 encoding, we need to decode it with the following code in the webapp.
let temp = {
  name: JSON.parse(data[1]).name,
  payload: atob(JSON.parse(data[1]).payload),
}
This performs a conversion like the one we see in the image.
Depending on the result of the Payload we will be able to know what situation the device is detecting.
In turn we can know the type of situation due to the symbol shown on the map.
Case Closed:
Case open:
Platform UI:
Page URL:
https://illegal-logging-and-fire-detector.s3.amazonaws.com/index.html
FINAL DEMO:Thanks for reading!


Comments
Please log in or sign up to comment.