


Hardware components | ||||||
 |
| × | 1 | |||
 |
| × | 1 | |||
| × | 1 | ||||
| × | 1 | ||||
 |
| × | 1 | |||
Software apps and online services | ||||||
 |
| |||||
 |
| |||||
| ||||||
Inventory management is very complex job as we need to maintain it regularly. So, to make this complicated task easy we have made this load-based inventory management system. Once we set the reference load according to the weight of the product/object, it automatically senses the load and calculates the inventory on a particular shelf. This kind of systems have humongous corridor for applications in daily routine in various industries and local vendors.
We have built this system using monoZero, a Cellular IoT development kit. monoZero is a powerful development kit designed for swift prototyping of cellular IoT projects. Loaded with LTE-M / NB-IoT cellular modem and low power STM32 MCU, it hosts 5 different types of peripherals for allowing users to easily connect and control their variety of sensors or other devices.
This guide will walk through the
1. Hardware setup of Loadcell using monoZero,
2. Embedded firmware to read and send Loadcell data via MQTT using monoZ SDK
3. monoZ Cloud OSS configuration to receive the loadcell data via MQTT and display in a dashboard.
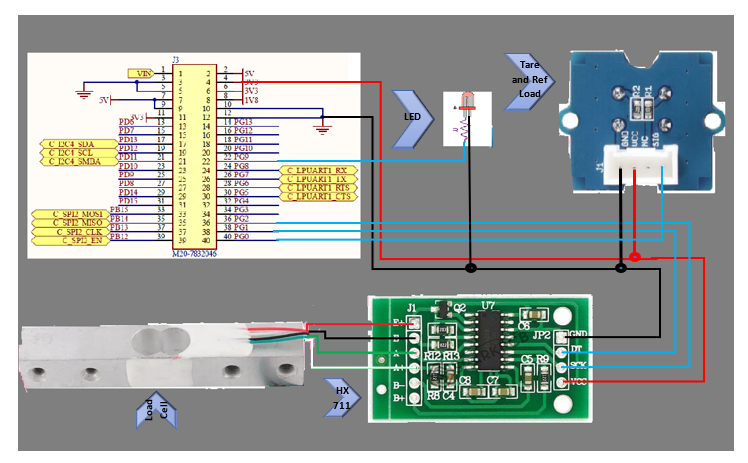
1. Hardware Description1.1 monoZero BG96 Board:
monoZero BG96 variant hosts globally available Quectel BG96 modem that supports internet service protocols like TCP, UDP, and PPP. The onboard STM32L4 Arm® Cortex®-M4 can be programmed via SWD (Serial Wire Debug). monoZero BG96 hosts 23 I/O peripherals with 1 x USB, 1 x LPUART, 2 x UART, 3 x I2C, 3 x SPI and 1 x CAN for external communication.
monoZero BG96 can easily and quickly, be configured using monoZ SDK for modem, protocol and peripheral configuration. Find more details of monoZero BG96 at docs.monoz.io
1.2 monoZero Grove Board :
monoZero Grove board allows user to access the pin-based peripherals (LPUART, SPI, I2C, etc) through grove ports (QWICC ports) thereby simplifying the hardware setup process. When Grove board is connected to monoZero BG96 v2 or v3, grove port 3 corresponds to LPUART peripheral.
1.3 Electronic Weighing Scale Sensor:
This is a standard load cell for measuring weight upto 5 Kg. The output of the load cell is in mili-volts and cannot be directly measured by a micro-controller. So an ADC with high resolution or an instrumentation amplifier is required to make the output of the load cell readable to a micro-controller.
1.4 Load Cell Amplifier Module:
HX711 module is a Load Cell Amplifier breakout board for the HX711 IC that allows you to easily read load cells to measure weight. This module uses 24 high precision A/D converter chip HX711.It has two analog input channels, the internal integration of 128 times the programmable gain amplifier. The HX711 uses a two wire interface (Clock and Data) for communication.
Other components- LTE-M / NB-IoT nano Sim: We have used 1NCE global sim in our setup.
- Antenna: RP SMA Male type antenna that can be used for frequency from 2.4GHz - 2.6GHz.
- SWD Connector: ST Link V2 debugger for firmware flash.
Connect Loadcell to grove board and stack grove board on monoZero BG96 board. Connect SMA antenna to main board and power on via USB-B cable. Please refer to the schematic for detailed connections.
monoZ SDK is a user-friendly tool that reduces user effort to build embedded application on monoZero HW. Download the working project file built using monoZ SDK from our GitHub (link provided at end of doc) and edit it as per your setup in case your setup differs from the setup described in this article.
3.1 Open the project file in STM32CubeIDE.
3.2 The code below shows the MQTT connection and credential details generated by monoZ SDK GUI. Depending on your setup you might need to go to the file "Lib -> tool_gen -> MZ_loadcell.c" and modify the code for function "send_payload_to_server" to provide your own credentials. Please refer to section 5.1 on how to get the device credentials.
static void send_payload_to_server(st_mqtt_message * pmsg)
{
	/* Set the mqtt Data and send to MonoZ_Lib */
	//mz_error_t status = mz_mqtt_pub(pmsg);

	mz_error_t status = MZ_init_cmd_direct("AT+QMTDISC=0\r\n", AT_TIME_15SEC, AT_TIME_15SEC);
	status |= MZ_init_cmd_direct("AT+QMTOPEN=0,\"cloud.monoz.io\",1883\r\n", AT_TIME_15SEC, AT_TIME_15SEC);
	status |= MZ_init_cmd_direct("AT+QMTCONN=0,\"weighing_scale\",\"MZ_IM_System\",\"meritech123\"\r\n", AT_TIME_15SEC, AT_TIME_15SEC);
	status |= MZ_init_cmd_direct("AT+QMTPUB=0,0,0,0,\"v1/devices/me/telemetry\"\r\n", AT_TIME_15SEC, 0);
	status |= MZ_init_cmd_direct(payload_string, AT_TIME_15SEC, AT_TIME_15SEC);

	/* Check the status of the request */
	if(MZ_OK == status)
	{
		/* print success on CLI */
		mz_puts("Data send to MonoZ_Lib\r\n");
	}
	else
	{
		/* print of error string on CLI */
		mz_puts("Data send to MonoZ_Lib FAILED\r\n");
		//mz_puts(mz_error_to_str(status));
	}
}
3.3 In case your connectivity provider is different you might need to go to file "Lib -> tool_gen -> MZ_modemconfig_bg96.c" and change the APN settings as per your requirement.
void sim7080g_setup(void)
{
	mz_raw_at_exe_csq();
	mz_raw_at_read_cops();
	mz_raw_at_exe_CGNAPN();
	mz_raw_at_write_CNACT(0,0);
	mz_raw_at_write_CNCFG(0,1,"\"iot.1nce.net\"","\"\"","\"\"",0);
	mz_raw_at_write_CNACT(0,1);
	mz_raw_at_read_CNACT();
}
3.4 Build the code and flash it to the board using cube IDE.
3.5 The following screen shows the expected CLI screen upon successful flashing.
Note: Refer to docs.monoz.io for STM32CubeIDE operations, CLI setup, SWD flashing.
4. Software Setup :Create an account in Centra-IoT platform or use existing account if you already have one. Contact https://monoz.io/contact-us/ for your cloud account in Centra-IoT. Please refer to "Configure Centra-IoT OSS" section for detailed description about using Centra-IoT cloud platform.
5. Configuring Centra-IoT OSS5.1 Create device:
- After login go to "Device group" and click the "+" icon to add a new device.
- Enter device details for the new device and click on “Add” button to create the device.
- Once your device has been added, Click on the Shield icon to open "Manage Credentials" pop-up.
- Enter your Client ID, Username and Password and save them. Now your device is ready to use. Make sure the same device details and credentials are provided in the MQTT settings of the Firmware as specified in section 2.2
5.2 Create dashboard to visualize telemetry data:
- Turn on monoZero and send at least one telemetry data to the cloud for reference.
- On Centra-IoT OSS go to your device page from the menu "Device Groups -> All". Click on the device to open its property sheet.
- In the property sheet select "Latest telemetry" tab and select the weight, Object_Qty, inventory_change and Wt/Qty and click on "Show on Widget" button.
- Select the map widget from the "Current bundle”.
- Click on "Add to dashboard" button.
- Select an existing dashboard if you have it or create a new one if you don't have an existing dashboard.
- Click on "Add" button to add the widget to the dashboard.
- Go to dashboards in Centra-IoT OSS and open your selected dashboard.
- The telemetry data can be visualized on the dashboard.


Comments
Please log in or sign up to comment.