


Hardware components | ||||||
 |
| × | 1 | |||
Software apps and online services | ||||||
 |
| |||||
| ||||||
Hand tools and fabrication machines | ||||||
 |
| |||||
_LWNORVejBN.png?auto=compress%2Cformat&w=48&h=48&fit=fill&bg=ffffff) |
| |||||
Greetings everyone and welcome back, Here's something bright.
This is the Web RGB LED light, GLOWMASTER 3000, which is completely customized with specially designed PCBs and a 3D-printed body.
The XIAO ESP32 C3 microcontroller, coupled with a custom WS2812B RGB LED circuit, is the centerpiece of this project. Thanks to the ESP32, we can run a web application sketch on the XIAO, which gives users access to a web application that controls RGB Light.
Additionally, we have included a power management circuit that uses a single 3.7V lithium cell to power the LED setup and XIAO. The user can charge the cell using this power manager circuit by connecting a 5V adaptor to the DC jack located on the device's bottom.
Furthermore, we created the model so that the lid is printed from transparent PLA, which acts as a diffusion material for diffusing RGB glow, and all the electronics are kept in a body that resembles a box.
We placed Voronoi Patterns on top of the diffuser to increase the project's aesthetic impact and give it a pattern theme. Fusion360's Plug-In Extension made this possible.
This article is about the complete build process of this project, so let's get started with this build.
Materials RequiredThese were the materials used in this project.
- Custom PCBs (provided by Seeed Studio Fusion)
- Seeed XIAO ESP32 C3
- IP6306 Power management IC
- 10uF Capacitors
- 2000mAh 3.7V Li-ion Cell
- 3D Printed Parts
- WS2812B LEDs
- Rocker Switch (Push Button Type)
- DC Barrel Jack
- Indicator LED 0805 Package
- SMD Inductor 1uH
For this project, we begin by creating the model, which was made up of the base body and the lid. The Cad files for the parts we used in this project—the DC Jack, the lithium cell, the RGB LED circuit, and the main circuit—have been added here.
The idea was to make a body that resembled a rectangular box with a lithium cell in the middle, an RGB LED circuit above it, the main circuit on one side, and a rocker switch and DC jack on the bottom.
We created a unique model for the lid that included a layer of printed Voronoi patterns on top to add appeal. Here, printing the Lid in two filament colors—transparent for the base layer and black for the voronoi patterns—was our aim.
We utilized an add-in or extension called Voronoi Pattern Generator to produce the voronoi patterns in Fusion360. This is a straightforward extension for pattern generation; We can customize the voronoi patterns by choosing the cell style, count, scale, and other parameters.
A Voronoi Patterns is a type of tessellation pattern in which a number of points scattered on a plane subdivide in exactly n cells, enclosing a portion of the plane that is closest to each point
This extension let us sketch the patterns, and then we can extrude or cut any body based around the sketch.
After exporting both the base body and lid into mesh files, we 3D printed the base body using orange PLA and the lid using two filaments: black PLA and transparent PLA.
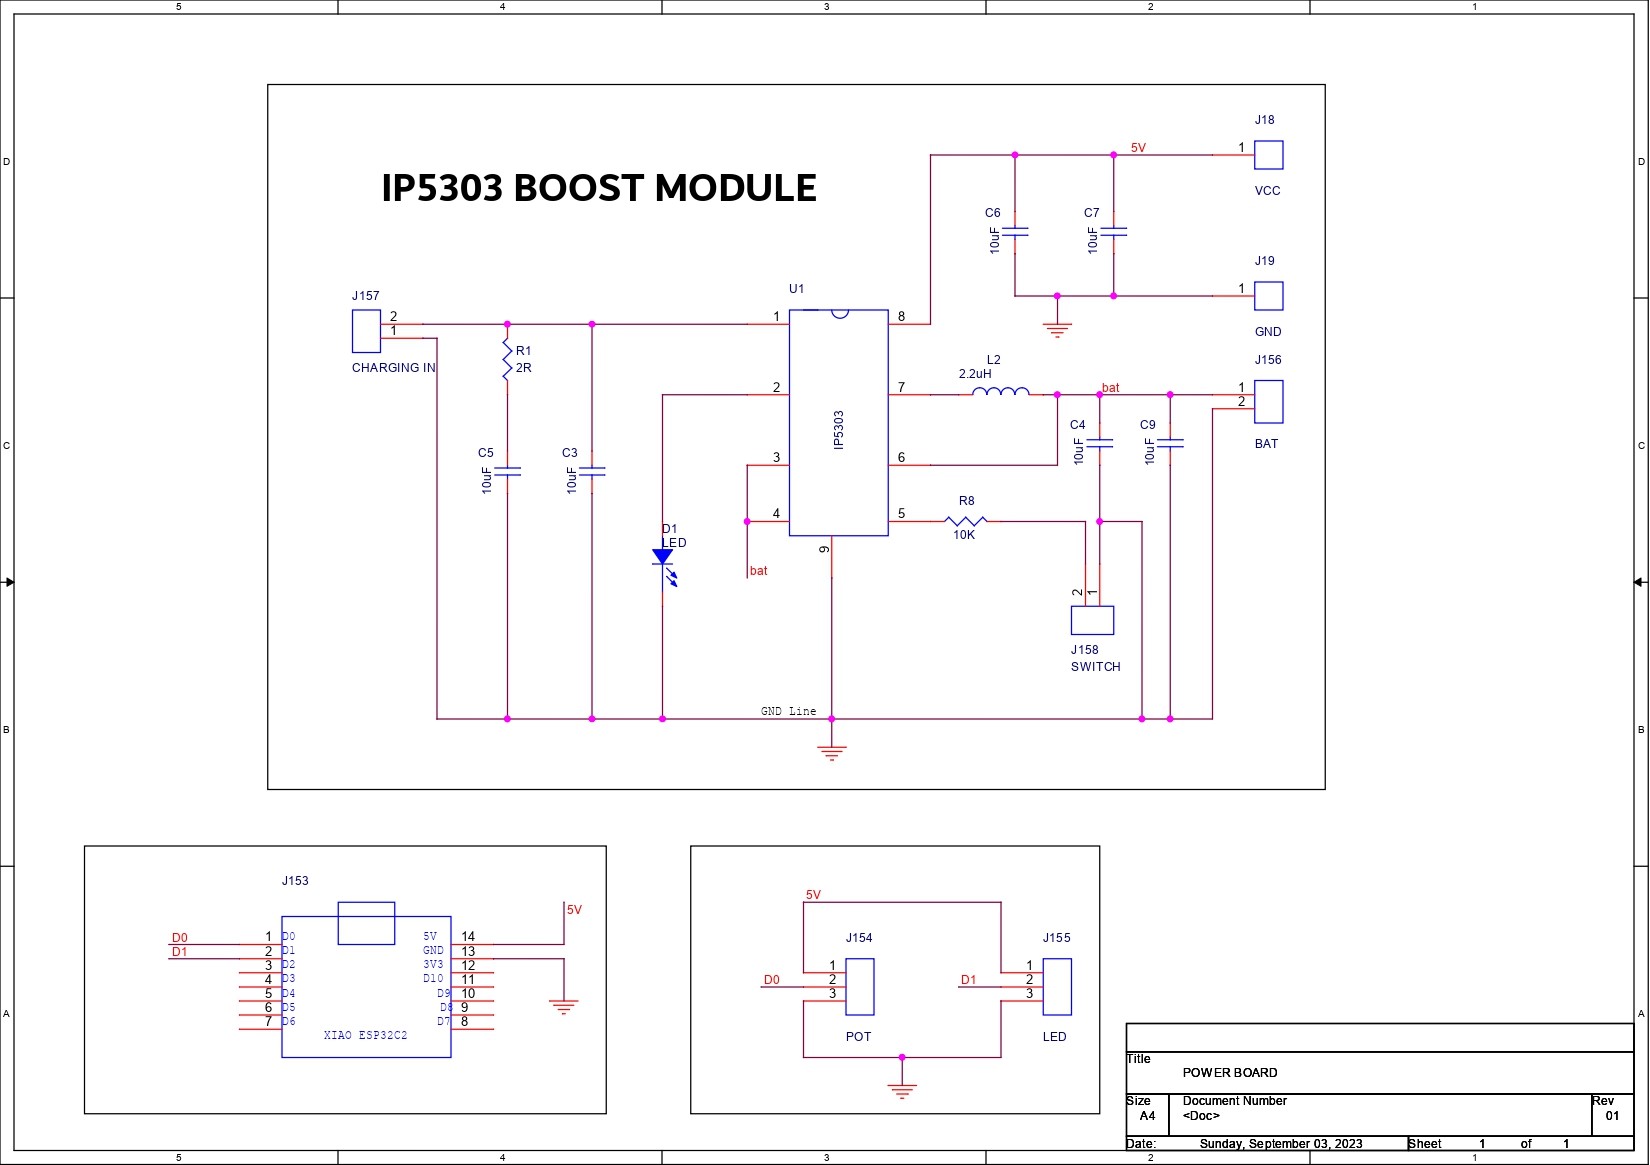
PCB DesignPCBs was made next, and it included a straightforward XIAO breakout board with an advanced power management integrated circuit (IP5303) that charges and discharges a lithium cell and supplies a steady 5V to power the RGB LEDs and the XIAO.
We have reused this circuit from a previous RGB Lamp Project, which you can checkout from the below link.
https://www.hackster.io/Arnov_Sharma_makes/cone-lamp-with-xiao-211fed
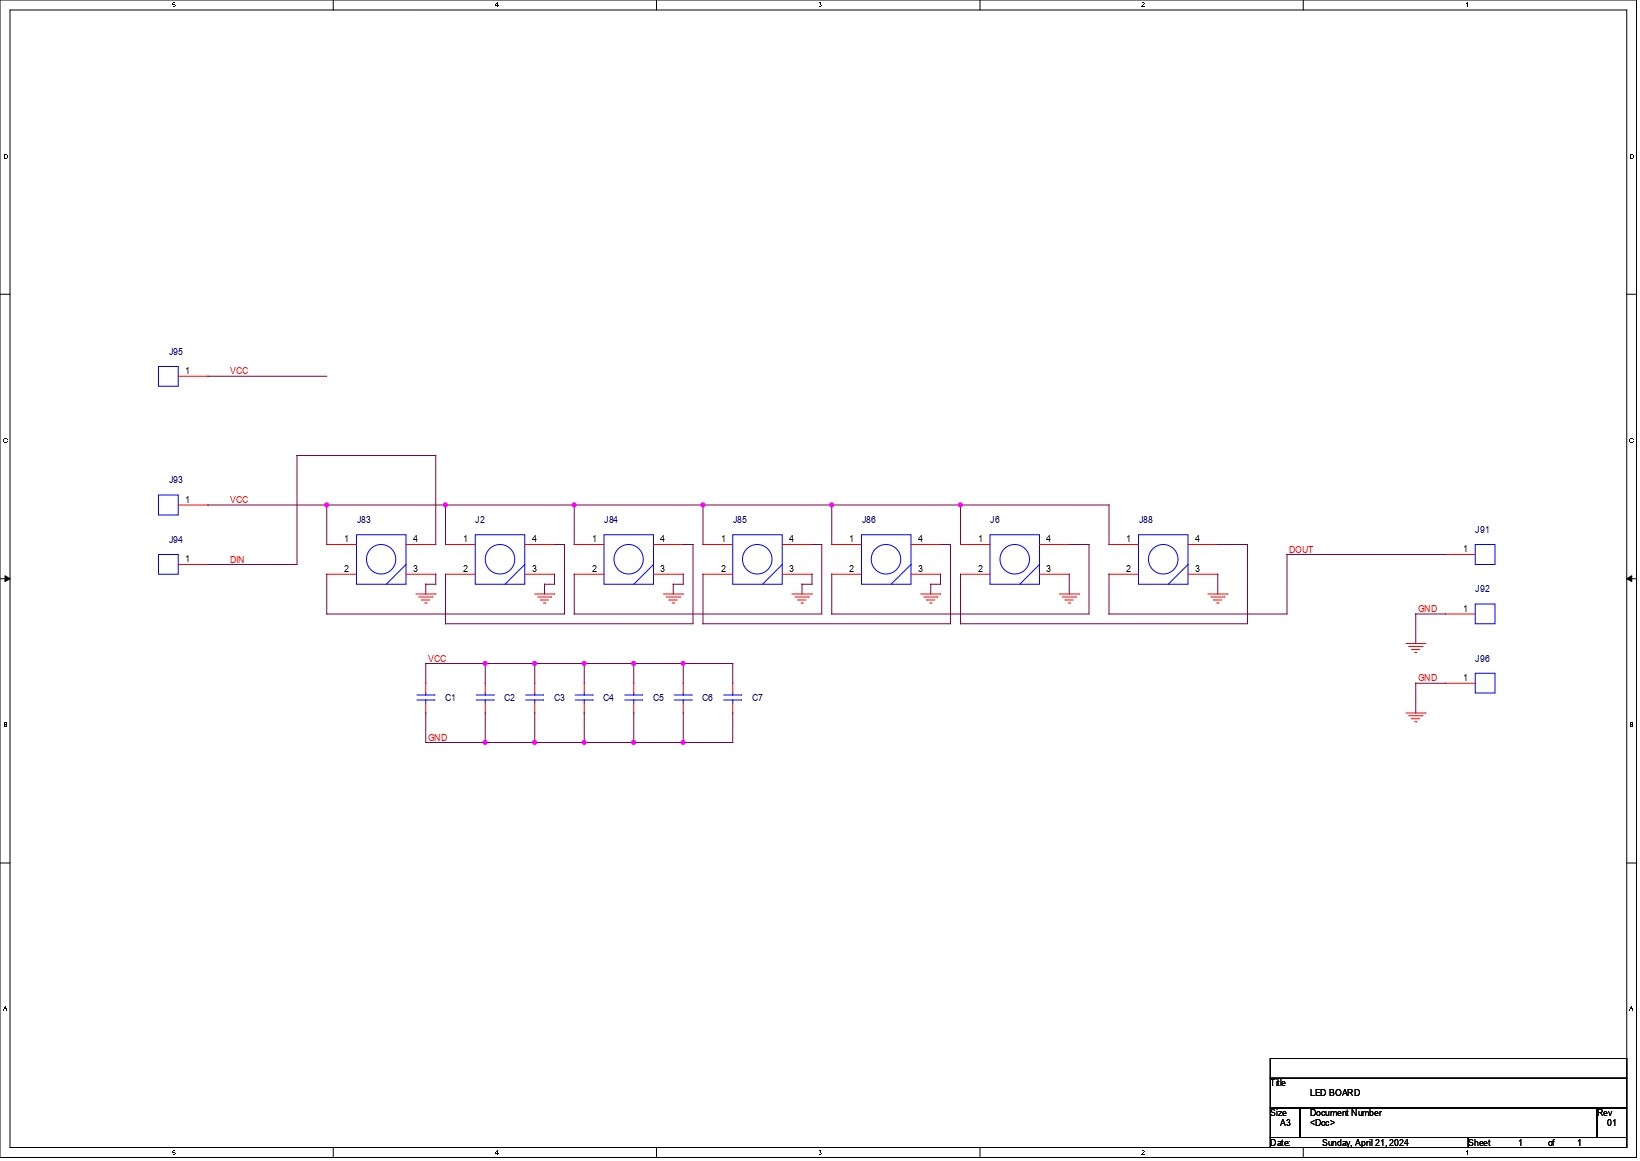
We are using a PCB that we previously constructed, which has seven WS2812B LEDs wired in parallel, for the RGB LED Board.
It also has seven SMD capacitors, one for every LED.
Seeed Fusion ServiceAfter finalizing the PCB, we exported its Gerber data and sent them to Seeed Studio Fusion for samples.
An order was placed for White Soldermask PCB.
PCBs were received in a week, and their quality was super good considering the rate, which was also pretty low.
Seeed Fusion PCB Service offers one-stop prototyping for PCB manufacture and PCB assembly, and as a result, they produce superior-quality PCBs and fast turnkey PCBAs within 7 working days.
Seeed Studio Fusion PCB Assembly Service takes care of the entire fabrication process, from Seeed Studio Fusion Agile manufacturing and hardware customization to parts sourcing, assembly, and testing services, so you can be sure that they are getting a quality product.
After gauging market interest and verifying a working prototype, Seeed Propagate Service can help you bring the product to market with professional guidance and a strong network of connections.
PCB Assembly Process- Using a solder paste dispenser needle, we first apply solder paste to each component to begin the PCB assembly process. In this case, standard 63/37 Sn/PB solder paste is being used.
- next, we added all the SMD Components in their location using an ESD Tweezer.
- We lifted the circuit board and placed it on our Miniware MHP50 Hotplate which heats the circuit from below up to the solder paste melting temperate, as soon as solder paste reaches that temperature it melts and all the components are connected to the pads.
- The through-hole components, which are used to add XIAO to this circuit and only include two CON7 Female header pins, were then added.
In order to prepare the RGB LED Circuit and XIAO Board assembly, we connect the GND and D0 of the XIAO Board to the Din of the RGB LED Circuit, as well as the 5V of the XIAO Board to the VCC of the RGB Circuit.
Next, in order to verify that our setup is operational, we uploaded the test sketch below.
#include <FastLED.h>
#define NUM_LEDS 7
#define DATA_PIN D1
#define CLOCK_PIN 13

CRGB leds[NUM_LEDS];

void setup() {
	Serial.begin(57600);
	Serial.println("resetting");
	FastLED.addLeds<WS2812,DATA_PIN,RGB>(leds,NUM_LEDS);
	FastLED.setBrightness(84);
}

void fadeall() { for(int i = 0; i < NUM_LEDS; i++) { leds[i].nscale8(250); } }

void loop() {
	static uint8_t hue = 0;
	Serial.print("x");
	for(int i = 0; i < NUM_LEDS; i++) {
		leds[i] = CHSV(hue++, 255, 255);
		FastLED.show();
		fadeall();
		delay(10);
	}
	Serial.print("x");

	for(int i = (NUM_LEDS)-1; i >= 0; i--) {
		leds[i] = CHSV(hue++, 255, 255);
		FastLED.show();
		fadeall();
		delay(10);
	}
}
Once the setup was tested, we connected a 2000mAh 3.7V lithium cell to the XIAO Board, which also has connectors for battery.
The next step is to attach a rocker switch to the switch terminals on the circuit. In this case, we are using a unique kind of rocker switch called a bell type rocker switch, which is essentially a push button that resembles a standard rocker on-off switch.
Before starting the assembly process, we uploaded the primary code onto the XIAO Board before securing it in place as once its secured in place, we can no longer program it.
Main CodeBefore starting the assembly process, we uploaded the main code into the XIAO Board before securing it in place as once its secured in place, we can no longer program it.
#include <WiFi.h>
#include <FastLED.h>
#define LED_PIN     D1
#define NUM_LEDS 50
CRGB leds[NUM_LEDS];
const char *ssid = "UR SSID";
const char *password = "UR PASS";
WiFiServer server(80);
String redString = "0";
String greenString = "0";
String blueString = "0";
int pos1 = 0;
int pos2 = 0;
int pos3 = 0;
int pos4 = 0;
String header;
unsigned long currentTime = millis();
unsigned long previousTime = 0;
// Define timeout time in milliseconds (example: 2000ms = 2s)
const long timeoutTime = 2000;
void setup() {
Serial.begin(115200);
FastLED.addLeds<WS2812, LED_PIN, GRB>(leds, NUM_LEDS);
// Connect to Wi-Fi network with SSID and password
Serial.print("Connecting to ");
Serial.println(ssid);
WiFi.begin(ssid, password);
while (WiFi.status() != WL_CONNECTED) {
delay(500);
Serial.print(".");
}
// Print local IP address and start web server
Serial.println("");
Serial.println("WiFi connected.");
Serial.println("IP address: ");
Serial.println(WiFi.localIP());
server.begin();
}
void loop(){
WiFiClient client = server.available();   // Listen for incoming clients
if (client) {                             // If a new client connects,
currentTime = millis();
previousTime = currentTime;
Serial.println("New Client.");          // print a message out in the serial port
String currentLine = "";                // make a String to hold incoming data from the client
while (client.connected() && currentTime - previousTime <= timeoutTime) {            // loop while the client's connected
currentTime = millis();
if (client.available()) {             // if there's bytes to read from the client,
char c = client.read();             // read a byte, then
Serial.write(c);                    // print it out the serial monitor
header += c;
if (c == '\n') {                    // if the byte is a newline character
if (currentLine.length() == 0) {
// HTTP headers always start with a response code (e.g. HTTP/1.1 200 OK)
// and a content-type so the client knows what's coming, then a blank line:
client.println("HTTP/1.1 200 OK");
client.println("Content-type:text/html");
client.println("Connection: close");
client.println();
// Display the HTML web page
client.println("<!DOCTYPE html><html>");
client.println("<head><meta name=\"viewport\" content=\"width=device-width, initial-scale=1\">");
client.println("<link rel=\"icon\" href=\"data:,\">");
client.println("<link rel=\"stylesheet\" href=\"https://stackpath.bootstrapcdn.com/bootstrap/4.3.1/css/bootstrap.min.css\">");
client.println("<script src=\"https://cdnjs.cloudflare.com/ajax/libs/jscolor/2.0.4/jscolor.min.js\"></script>");
client.println("</head><body><div class=\"container\"><div class=\"row\"><h1>XIAO ESP32 C3 WEB LED</h1></div>");
client.println("<a class=\"btn btn-primary btn-lg\" href=\"#\" id=\"change_color\" role=\"button\">Change Color</a> ");
client.println("<input class=\"jscolor {onFineChange:'update(this)'}\" id=\"rgb\"></div>");
client.println("<script>function update(picker) {document.getElementById('rgb').innerHTML = Math.round(picker.rgb[0]) + ', ' +  Math.round(picker.rgb[1]) + ', ' + Math.round(picker.rgb[2]);");
client.println("document.getElementById(\"change_color\").href=\"?r\" + Math.round(picker.rgb[0]) + \"g\" + Math.round(picker.rgb[1]) + \"b\" + Math.round(picker.rgb[2]) + \"&\";}</script></body></html>");
// The HTTP response ends with another blank line
client.println();
// Request sample: /?r201g32b255&
// Red = 201 | Green = 32 | Blue = 255
if(header.indexOf("GET /?r") >= 0) {
pos1 = header.indexOf('r');
pos2 = header.indexOf('g');
pos3 = header.indexOf('b');
pos4 = header.indexOf('&');
redString = header.substring(pos1+1, pos2);
greenString = header.substring(pos2+1, pos3);
blueString = header.substring(pos3+1, pos4);
// Update all 7 LEDs with the new color
for (int i = 0; i < NUM_LEDS; i++) {
leds[i] = CRGB(redString.toInt(), greenString.toInt(), blueString.toInt());
}
FastLED.show();
delay(500);
}
break;
} else {
currentLine = "";
}
} else if (c != '\r') {  // if you got anything else but a carriage return character,
currentLine += c;      // add it to the end of the currentLine
}
}
}
// Clear the header variable
header = "";
// Close the connection
client.stop();
Serial.println("Client disconnected.");
Serial.println("");
}
}
Ensure that the necessary libraries for this sketch are installed before uploading. Additionally, in order to link the XIAO with your router, you had to enter the SSID and password into the sketch.
Open the serial monitor after uploading the sketch, then copy the IP address that is generated. You may use this IP address to launch a web application in any browser.
Assembly Process- The rocker switch from the main assembly circuit must first be desoldered before being inserted into the slot on the main body to begin the assembly process.
- Then, we installed the Barrel DC Jack and tightened it using the included nut.
- The barrel DC jack is connected to the circuit is charging IN by using the wires that we attached to the positive and negative ends of the DC jack.
- The wiring procedure is now complete after we reconnected the rocker switch's wires to the circuit.
- Now, we position the lithium cell in the center and insert the main circuit into the main body at its designated spot.
- After that, the RGB LED Circuit is positioned above the cell and secured in place with hot glue.
- next, the lid is fitted on top of the main body and is fixed in place using four M2 Screws.
Assembly is now completed.
ResultHere's the result of this simple build, a WEB RGB LED made from scratch, user can use a WEB APP to control the color of the LEDs.
To further boost the aesthetics, we have included Voronoi patterns in this project which was developed utilizing a Voronoi generator extension in Fusion360 throughout the Cad process.
This project contains a lithium cell as a power source, which can last up to 4-5 hours of constant use. To charge the lithium cell, the user can use a 5V adaptor plugged into the barrel jack to charge the setup.
All the details regarding this project, including files, are attached, which you can download.
Leave a comment if you need any help regarding this project. This is it for today, folks.
Thanks to Seeed Studio Fusion for supporting this project.
You guys can check them out if you need great PCB and stencil service for less cost and great quality.
And I'll be back with a new project pretty soon!


_t9PF3orMPd.png?auto=compress%2Cformat&w=40&h=40&fit=fillmax&bg=fff&dpr=2)


Comments
Please log in or sign up to comment.