

Hardware components | ||||||
| × | 1 | ||||
 |
| × | 1 | |||
 |
| × | 1 | |||
_zhWsCcSEcl.jpg?auto=compress%2Cformat&w=48&h=48&fit=fill&bg=ffffff) |
| × | 1 | |||
 |
| × | 1 | |||
 |
| × | 1 | |||
 |
| × | 1 | |||
| × | 1 | ||||
 |
| × | 1 | |||
Software apps and online services | ||||||
 |
| |||||
| ||||||
| ||||||
| ||||||
 |
| |||||
| ||||||
| ||||||
Hand tools and fabrication machines | ||||||
| ||||||
| ||||||
This project is my third project for the IoT BootCamp instructed by Dr. Brian Rashap and Edward Ishman. I am so grateful I was selected along with three other amazing artists to attend this immersive ten week experience via the City of Albuquerque Public Art Program. The challenge was to create a temporary public art installation to compliment a larger project that will be taking place sometime in the near future called the "Rail Trail".
In short the "Rail Trail" is proposed to be a walking trail that will have segments that are near the Rio Grande Metro Railroad train tracks, some of these segments will feature public engagement areas where the City of Albuquerque aims to feature interactive public art. The "Rail Trail" project is in many ways still in its very early stages of ideation and this project is a response to the need to adapt and create something that could work in different situations, or locations. I needed to make something modular, portable, lightweight, and manipulatable. In addition this project had the requirement of practical application of environmental awareness, or immersive entertainment. I had less than 10 days to make it happen. My intention was to create an element that could prove concept and could be expanded upon and work in different ways. I wanted to create a space to platform other artists, and also keep the public aware of environmental conditions and when the train is close for safety and scheduling.
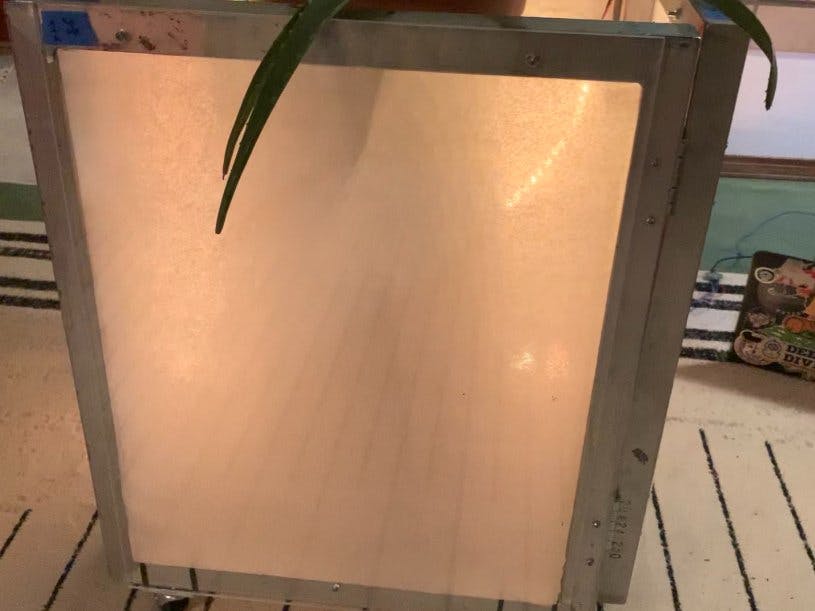
I chose to up-cycle aluminum screen print frames as my base form. I had the intention of wasting as little as possible, using recycled materials, used materials, and scrap materials at every opportunity. The frames are a material and size I am familiar with from my experience in the garment decoration industry. ( My T-Shirt shop 111tshirtlab.com) The aluminum frames are lightweight and I found them easy enough to drill into to add hinges.
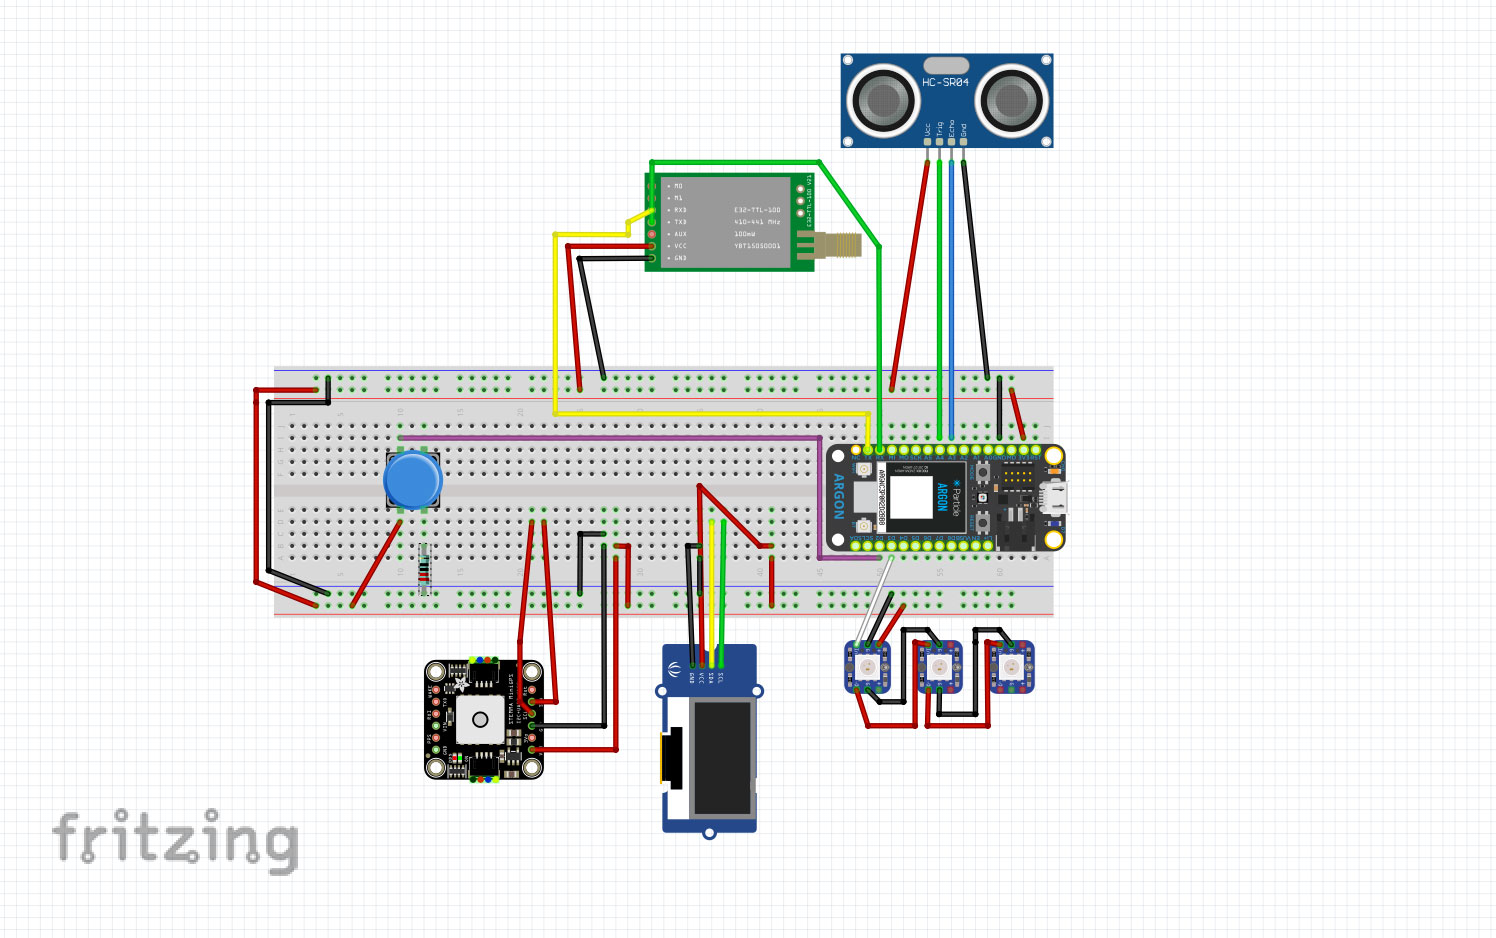
Inside the frames I simply adhered Neo-Pixel Strips. I Wired them up to a breadboard and Particle Argon.
I searched around and found an amazing component called the MSGEQ-7. We ordered one in on a breakout board with a 3.5mm headphone jack import. This is the way to go if you do not want to solder components together. This is also particularly important if you want to give some control of the lights to a Dj or audio performer. After a few days of studying the MSGEQ-7 data sheet and looking at a ton of other projects I found enough clues to cobble together the code in C++ on Visual Studio Code, that basically transforms the audio data in in to a 7 band eq visual representation in the illuminated Neo Pixel Strips. Let there be light !
So next I added the motion sensor, for this I used an ultrasonic distance sensor, coded to flash the lights bright blue when someone approaches. Basically if there is no performer and the screens are not being triggered by an audio out signal, the screen installation could serve as a safety beacon. To further illustrate the feature I added a text message integration and manual safety button that could be used to alert authorities of a potential emergency or security situation trackside along the Rail Trail.
Another important feature is that this installation is connected to a live weather feed, with current, real time, temperature, and wind conditions, along with a map of all the rail runner stations via google maps API.
I really wanted to integrate a live feed of the current train location but found this information was not available via an API currently. My solution was to create a GPS module and use LoRa which provides for long-range communications up to three miles. This low data, low power, and short range communication solution works perfect for this art installation along the Rail Trail because we specifically just want to know when trains are approaching to keep everyone safe. Additionally with the schedule, station, and real time GPS data, train passengers can make informed travel decisions as they enjoy the Rail Trail. I was able to link a data feed thru Adafruit.IO to a Node Red flow that displays all of this info in easy to read graphic interfaces, like gauges and maps that viewers can zoom in on from their phone. I imagine there can also be a screen displaying this info for passengers who may not have a phone or know how to scan QR code to get info.
While creating this project and beta testing the light sequences I was reminded of an amazing psychadelic poster art show I attended at the Denver Art Museum a few years back. There was a poster artist named Victor Moscoso who made offset prints in RGB colors that, under the right lighting conditions, would give the optical illusion of movement. I wanted to take advantage of this chromatic aberration and coded the lights to react with to the music using colors that would interact with 2D printed images and give the illusion of movement. I did a few chromatic color tests with color wheels and found distance also made a difference in the optical illusion.
I found some rice paper that was translucent enough to see thru but also served as a light diffusion for the NeoPixel LED lights, I printed some images on clear transparency sheets and distanced them at just the right distance from the lights and the rice paper. This provided the desired effect and I repeated the imagery on all sides. Next I experimented with screen printing the images on to paper off set in different colors and tested them with the lights. The result was "moving" 2-D images that seem to react to the beat!
I added wheels to the bottom and PlexiGlass to the front of the installation and it is now sturdy, mobile, and compact enough to fit in the front seat or back of my car.
I hinged up two more screens and added them to show how the installation can be a screen that goes in front of performers or can be a cube that goes around a mid sized planter with plant, a diamond shape, or can be configured as a hanging structure, flat on a wall, and could even go flat on the ground depending on the situation or performers needs.
I bought a dremmel tool to make openings in the aluminum frame where I could place components and sensors. This was a bit of a learning curve as I had never cut into aluminum before. I found it to be beneficial to score the area I was going to cut with a sharp blade so the dremmel had a groove to ride along.
Next on the laser cutter I set out to make miniature screen forms that I could use to further illustrate the modular nature of the idea. I made small sculptures out of the rectangular shapes and mocked up a version of the Rail Trail with these mini structures. I found some small succulents to decorate the scene along with gravel and I used some pieces I welded to give the trackside feeling of the Rail Trail and help those who have never heard of the Rail Trail, see the vision.
This project was always intended to serve as a platform for other artists and I hope to deploy it in a field test soon with a Dj behind it and highlighting another visual artists work inside the frames. I made sure to attach the plexiglass in a way that different art can be slid in and out so the visual imagery is always interchangeable.
This simple structure can be built upon and grow into a larger interactive art piece, or it can live as a small modular piece and be repeated along the Rail Trail.
With this project I hope to communicate a vision of the future along the rail trail. My intention was to create a platform for other artists to use and showcase their talents. This is just the first stage of what I hope to be a larger interactive art experience that is a multifunctional, illuminated, modular, safe, and fun attraction.
Before this class I had never even wired anything together or written a single line of code. So thankful to have learned a slew of new skills that can integrate into my art making practices.
Thank you for reading !
Follow me on insta @jamesblackeyes


Comments