The team is composed of Davide Giordano, Marco Ferraro and Riccardo Pattuglia, we are three Master of Engineering in Computer Science students at "La Sapienza" university in Rome and this is our final project for our Internet of Things class.
The IdeaMany times it's very hard to find parking spots inside huge parking lots in airports or shopping malls for example, especially during festivities or events, and it's quite inefficient to start roaming to eventually find one.
The main purpose of our application is to provide an interactive map of the parking lot that shows you its real time state and also lets you know if a spot is going to be free soon. As an additional feature you can even reserve a spot in advance, if there are any available.
General Design
The STM board is connected to every needed ultrasonic sensor and 3 LEDs, through the usage of a breadboard. The sensors are mounted on the ceiling above every parking spot and the 3 LEDs notify the state of the spot, mainly to physically signal if a spot is reserved or not.
Through the usage of the Wi-FI module, the board sends HTTPS requests to Firebase every time a sensor changes state, triggered by a change in distance from ceiling to ground.
In the Firebase Real-Time Database, every sensor is linked to a virtual parking spot denoted by its code and is updated every time the sensors gives new data.
The Android Application displays the database values using a parking lot map (which has to be customized for every parking lot) and it's color coded to be extremely immediate.
To reserve a spot, one simply clicks on a free spot on the map and inserts his car's plate and estimated time of arrival (up to 1 hour after the reservation, can be selected). At this point the reserved slot turns yellow in the application and the corresponding yellow LED next to the spot is switched on.
Whenever you are leaving the mall or the airport, you can signal up to 5 minutes before departure that your spot is getting freed, so that everybody can notice it through the application, changing the color of the corresponding spot to a different one.
To incentivize the usage of the departure feature, we added a point system that rewards your action by allowing you to collect points with which you can get discounts at the mall/airport when reaching a certain amount of points.
Hardware ImplementationComponents
The main component used for the project is the STM Nucleo64-F401RE, a board shipped with an ARM Cortex M0+, that provides the advantages of an ARM processor, but with reduced power consumption, ideal for the development and prototyping of IoT devices.
It is equipped with a Flash Memory of 512 KB and a SRAM of 96 KB that is more than enough for our purposes.
But the real advantage of this board over similar products resides in the possibilities to easily expand the functionalities of the STM32 Nucleo board thanks to the Arduino™ Uno V3 connectivity support and the ST morpho headers, that allow us to connect a wide choice of specialized shields to the main board, like umidity and temperature sensors, gyroscope, accelerometer, bluetooth, wifi, ethernet,...
WiFiShield
In our case we used the ST Morpho connectors to attach the wifi module X-NUCLEO-IDW01M1, that allows our device to connect to the internet and communicate with the backend (sending and receiving data). This module provides an afficient way to connect to the internet using a low amount of resources since it is designed to being used for IoT applications.
Ultrasonic Sensor
To check the presence of a car on a parking spot we used an ultrasonic sensor the HC-SR04, it has a max range of 5m, and a min range of 2cm, with an accuracy of 3mm, and also a measuring angle of 15°, but given te fact that uses waves the surface measured must be perpendicular to the sensor, and it's also for this reason that we chose to place the sensor on the ceiling.
.
Development Environment
The board can be programmed in two ways: by relying on the Mbed Online Compiler, a Development Enviroment (IDE) available online offered by the producer of the device, allowing to write and compile your code for a specific STM device, or using your IDE of choice. Obviously, even if requires some tuning to have it working, having an offline compiler and an IDE with important functions like autocompile and refactoring will make easier the development of your projects.
In our case we configured the GCC_ARM compiler with the mbed-cli provided by ARM (https://os.mbed.com/docs/mbed-os/v5.12/tools/developing-mbed-cli.html) to compile our code and used Visual Studio Code as editor.
Schema
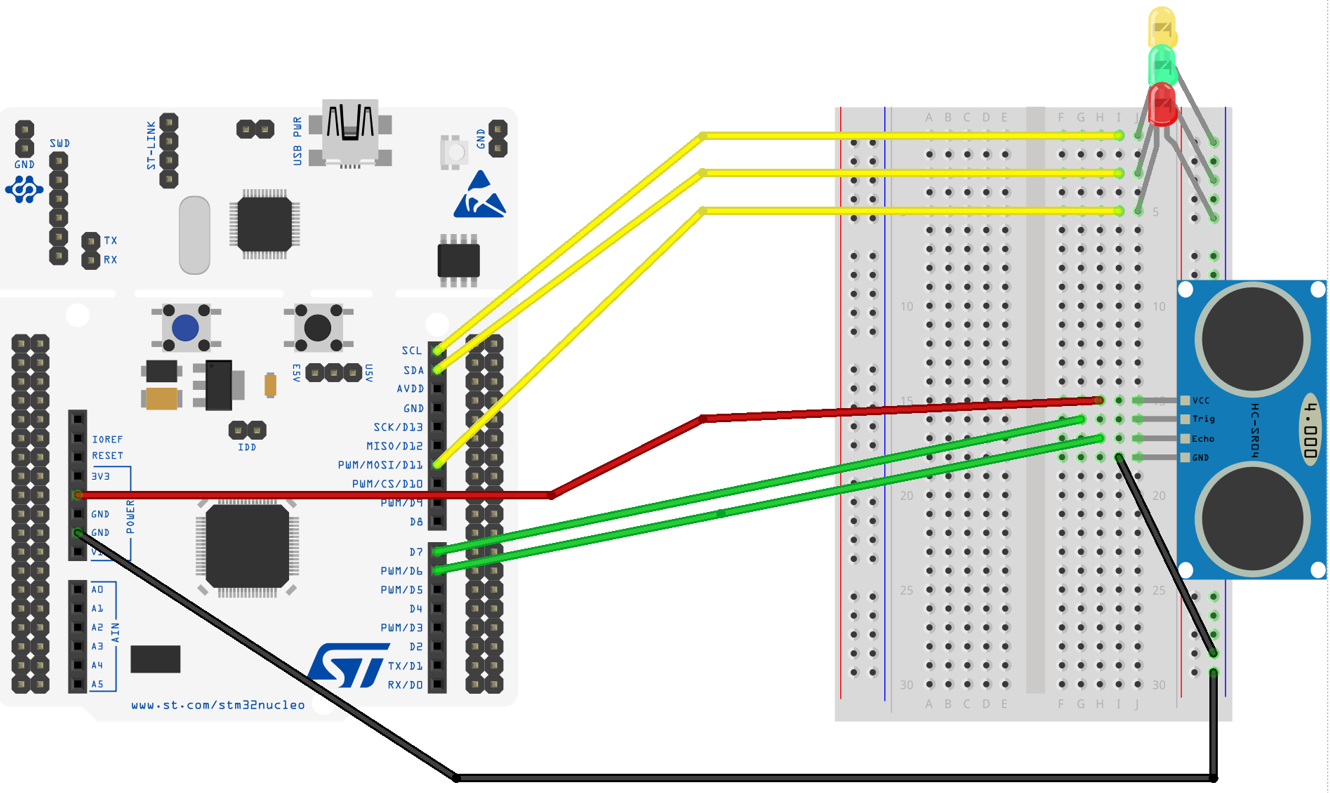
In this picture is illustrated how have been done the connections between the board, the sensors and the other components.
As can be seen, we have an ultrasonic sensor powered by the 5V of the board and connected to pin D6 and D7 of Nucleo, one for sennding data to the sensor, the other to get the results, while the colored leds are connected to D11, D14 and D15. The pin numbers are important since we have to configure them on the main program that will be compiled for the board.
Obviously they can be also changed, but taking into account that some of them are reserved (D0 and D1 are used for debugging when connecting the board to a computer, while D2 and D8 are used by the WiFi shield).
Programming
So now that the connections are done we have to program our board to actually use the connected sensor and LEDs and to send data to the server.
Since the sensors we used are very popular for IoT applications, it is already implemented a library for using this sensor with STM boards (https://os.mbed.com/users/ejteb/code/HC_SR04_Ultrasonic_Library/#e0f9c9fb4cf3).
So basically we only have to initialize the sensor passing the pins to which the sensor os connected and then we can start making measuraments:
ultrasonic mu(D7, D6, .1, 1, NULL);
mu.startUpdates();

mu.checkDistance();
int distance = mu.getCurrentDistance();
We take only measuraments that we think are correct (50cm<-> 4m) and classify it as free or occupied (<2m):
if(distance<4000 && distance>500){
           if(distance>2000){
               free+=1;
           } else {
               full+=1;
           }
       }
Then we have to deal with the backend, so we need to configure the driver for the WiFi shield in order to be able to connect to a WiFi Access Point and make simple HTTPS requests to the Google Firebase REST API (https://firebase.google.com/docs/reference/rest/database/).
The driver can be obtained on the mbed platform while the HTTPS requests can be done by relying on the mbed-http library (https://os.mbed.com/teams/sandbox/code/mbed-http/#6daf67a96a91).
Into the mbed_app.json file of your STM project you should configure the settings of your wifi module and also you AP credentials (SSID and password) to establish a connection.
{
   "config": {
       "wifi-ssid": {
           "help": "WiFi SSID",
           "value": "\"*******\""
       },
       "wifi-password": {
           "help": "WiFi Password",
           "value": "\"*********\""
       }
   },
   "macros": [
       "MBEDTLS_SHA1_C",
       "MBEDTLS_MPI_MAX_SIZE=1024",
       "MBEDTLS_MPI_WINDOW_SIZE=1",
       "MBEDTLS_NO_DEFAULT_ENTROPY_SOURCES",
       "MBED_HEAP_STATS_ENABLED=1"
   ],
   "target_overrides": {
       "*": {
           "platform.stdio-convert-newlines": true,
           "idw0xx1.expansion-board": "IDW01M1",
           "idw0xx1.provide-default": true,
           "idw0xx1.tx": "PA_9",
           "idw0xx1.rx": "PA_10",
           "drivers.uart-serial-txbuf-size": 512,
           "drivers.uart-serial-rxbuf-size": 512
       }
   }
}
Then you can make your calls to the server with two methods, one for checking if there is a reservation for that slot, and another one to send updates on the state of the slot (free or occupied):
void send_update(bool free)
{
   HttpsRequest *request = new HttpsRequest(network, SSL_CA_PEM, HTTP_PATCH, "https:*****");
   request->set_header("Content-Type", "application/json");
   HttpResponse *response;
   if (free)
       response = request->send(slot_free, strlen(slot_free));

   else
       response = request->send(slot_full, strlen(slot_full));

   if(response->get_status_code() == 200) is_free = !is_free;
   delete request;
}

bool get_reserve()
{
   HttpsRequest *request = new HttpsRequest(network, SSL_CA_PEM, HTTP_GET, "https://*************");
   HttpResponse *response;
   response = request->send(NULL, 0);
   if(response !=NULL && response->get_status_code() == 200){
       if(strcmp("null",response->get_body_as_string().c_str()) == 0){
           delete request;
           return false;
       }
       else {
           delete request;
           return true;
       }
   }
   delete request;
   return false;
}
it is crucial to delete the request after it has been processed, otherwise there will be an out of memory exception and the board will crash, since the amount of SRAM is very limited and gets saturated quickly by multiple requests.
Application Development
Cloud Database
We decided to use Firebase Realtime Database because in our opinion it is one of the best choices for any Android application that might need remote storage. It is very well integrated in the Android ecosystem and it is really easy to use and to understand, thanks to its comprehensive and clear console.
We can integrate Firebase within our application thanks to some dependencies inserted into the application gradle file.
This allows us to easily get the instance of the database when we need to retrieve/put data from/into the database. This is done by calling the getInstance() method and by specifying the reference (the root of the database) we want to access. Through an iterative cycle, it is then possible to navigate the database tree and get data from it.
An example of how we can access to Firebase is the following:
final FirebaseDatabase database = FirebaseDatabase.getInstance();
final DatabaseReference ref = database.getReference("reservations");
ref.child("parking"+(position+1)).addListenerForSingleValueEvent(new ValueEventListener() {
        @Override
        public void onDataChange(@NonNull DataSnapshot dataSnapshot) {
            for (DataSnapshot park: dataSnapshot.getChildren()) {
                if(park.getKey().equals(slot)){
        ...
            }
        }
});
Application Development
Our application is written using the Android SDK 21 so this means that we can install it on about 97% of the Android devices in the world. This represents a perfect balance between the target number of devices and the quality of the used Java libraries which are compatible with the newest Android versions.
Moreover, it is very light; its size is about 6 Megabytes. This is obviously a great feature for all those devices which have not extensible memories.
We coded it in the Android Native programming language and we developed seven different activities.
User Interface
The user interface is very immediate, you can look at different parking lots, check your active reservations and have a look at you bonus points status.
If you need to reserve a spot you can select a free (green) spot and insert your car plate and estimated time of arrival to reserve it.
At this point it is possible to inform the system of your departure at the press of a button.
Thank you for reading, we hope that you enjoyed this post.
Links and ContactsGitHub
On this GitHub you can find all the code used in this project!
Slides
Here are the slides of our Final Presentation
Find us on LinkedIn:


Comments
Please log in or sign up to comment.