


Hardware components | ||||||
 |
| × | 1 | |||
_zhWsCcSEcl.jpg?auto=compress%2Cformat&w=48&h=48&fit=fill&bg=ffffff) |
| × | 1 | |||
 |
| × | 1 | |||
 |
| × | 1 | |||
 |
| × | 1 | |||
 |
| × | 4 | |||
 |
| × | 30 | |||
 |
| × | 2 | |||
Software apps and online services | ||||||
 |
| |||||
 |
| |||||
 |
| |||||
| ||||||
This project was part of an assignment submitted to Deakin University, School of IT, Unit SIT210 - Embedded Systems Development.
OVERVIEW
The current outbreak of the novel coronavirus also known as SARS-CoV-2, the virus causing COVID-19 was declared as a public health emergency by the World Health Organization (WHO) where over 6.5 million people have been affected by the disease with over 384, 642 deaths till date as of 02/06/2020.
In the meantime, there are many ways for the population as a whole to help prevent or reduce the spread of disease. Following are two of the currently practiced strategies we aim to improve in this project:
1. Hand hygiene It is a way of cleaning one’s hands that substantially reduces potential pathogens (harmful microorganisms) on the hands. Hand hygiene is considered a primary measure for reducing the risk of transmitting infection among patients and health care personnel.
Hand hygiene is in already in practice in most of Australia. However, this practice is not supervised and does not guarantee that every individual does this step. My system aims to ensure that every individual complies with this step in order to enter the public complex.
2. Temperature CheckAlthough not as accurate as other modes of measurement, temporal temperature checks prove to be a good screening technique to detect one of the early symptoms of COVID-193.
Currently in Australia temperature checks are done manually, by staff being physically present and using temporal infrared scanners.
My model aims to reduce possible exposure to the corona virus by replacing human intervention with smart systems that will enable customers to get their temporal temperatures recorded before entering public complexes.
_______________________________________________
DESIGN PRINCIPLES AND PROJECT SUMMARY- The system is only triggered once a customer places their hands below the sanitizer dispenser which is detected by the ultrasonic sensor.
- Once triggered, the sanitizer is sprayed onto the customer’s hands.
- The temperature sensor then detects the customer’s temporal temperature.
- These sensors read in the data through the commands from argon and publishes messages to the MQTT server for the RasberryPi to receive. The argon also publishes messages to IFTTT which in turn will notify relevant staff members if data outside the normal range is detected.
- The RasberryPi gets the data from argon through MQTT and implements the final check: - Has the customer sanitized their hands? - is their temporal temperature within the given normal range?
- If both the checks are satisfied the door is opened.
Below is a detailed flowchart of how my system is inter-connected
_________________________________________________
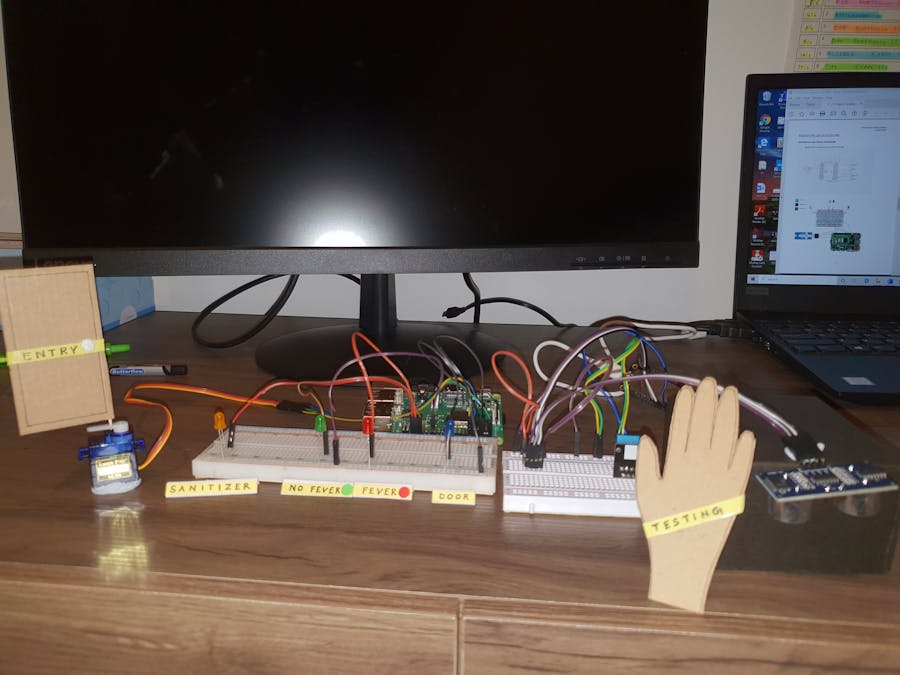
TESTING AND DESIGN APPROACH- I tested my system by using:
- A hand prop, which I will be manually controlling to create movement in front of the ultrasonic sensor which will trigger the system and dispense sanitizer, which in my case is displayed as a yellow LED.
- A door prop, which is stuck to my micro-servo motor to represent the working of the entrance doors.
- A Blue LED which lights up when my the door opens
- A Green and Red LED that is used to show the result of the temperature check, If the temperature is within ideal range – the green LED blinks. If the temperature is higher than the ideal range – the red LED blinks.
- The first scenario is when the customer’s temperature is regular and intends on entering the shop, at the entrance the hand is placed in front of the ultrasonic sensor, which lights up the yellow LED. Then the temperature is checked and the green LED blinks, Since both the conditions were satisfied, the door is opened and the blue LED blinks
- The second scenario is when the customer’s temperature is higher than regular and intends on entering the shop, at the entrance the hand is placed in front of the ultrasonic sensor, which lights up the yellow LED. Then the temperature is checked and the red LED blinks, Since both the conditions were not satisfied, the door remains closed and IFTTT sends an email notification to relevant staff member.
- The third scenario is when the customer does not agree to sanitize their hands, the first condition is not satisfied and therefore the door will remain closed.
_________________________________________________
GETTING STARTEDOnce you have to gather all the required hardwares and installed the softwares as mentioned in the start of this teaching case.
- Set up your RaspberryPi and install the NOOBS OS onto your SD card.
- Set up your Argon by connecting it to a wifi network and then claim the device. You can do this by checking out the tutorial given by Particle.
- Make sure you have set up power supply cables/adapters for both your devices and should also be connected to a desktop/ laptop.
- Test all your products to see if they work as expected.
- Watch videos and read up on how MQTT works and how to make connections between the rasberryPi and the Particle Argon.
________________________________________________
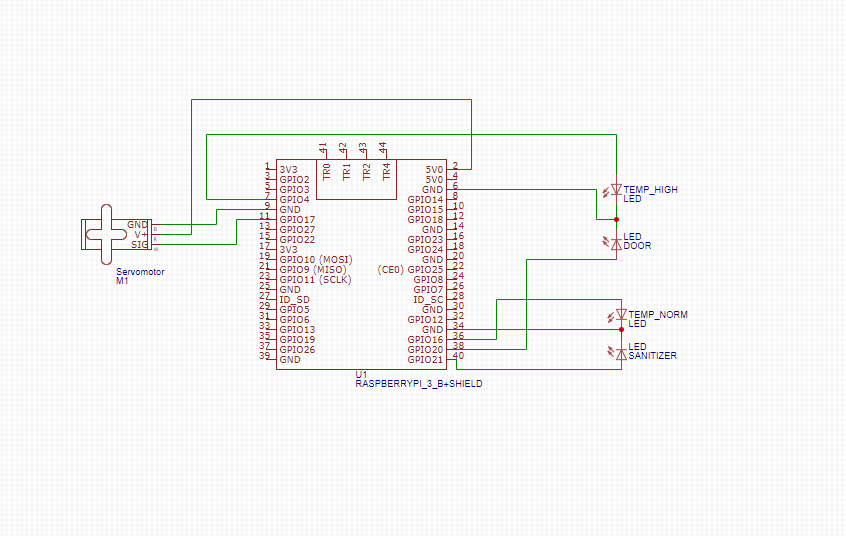
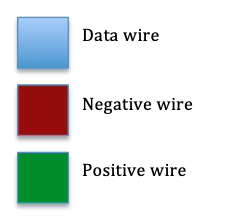
MAKING CONNECTIONS- Use the schematic diagrams that I have attached in this teaching case to start up your connections, You do not need to have the same design and exact pins, create your own but keep in my mind the positives/negatives and the data wires are all critical that you get them right.
- If you were not able to buy the same hardware you can always look for alternatives and change the design/code accordingly.
______________________________________________
CODINGThe code in any project can either be the most exciting part, or the most challenging part of your project, depending on how well your knowledge of coding was prior to this. However the codes I have used are not too complicated and will be explained clearly.
The 2 devices that control my system are:
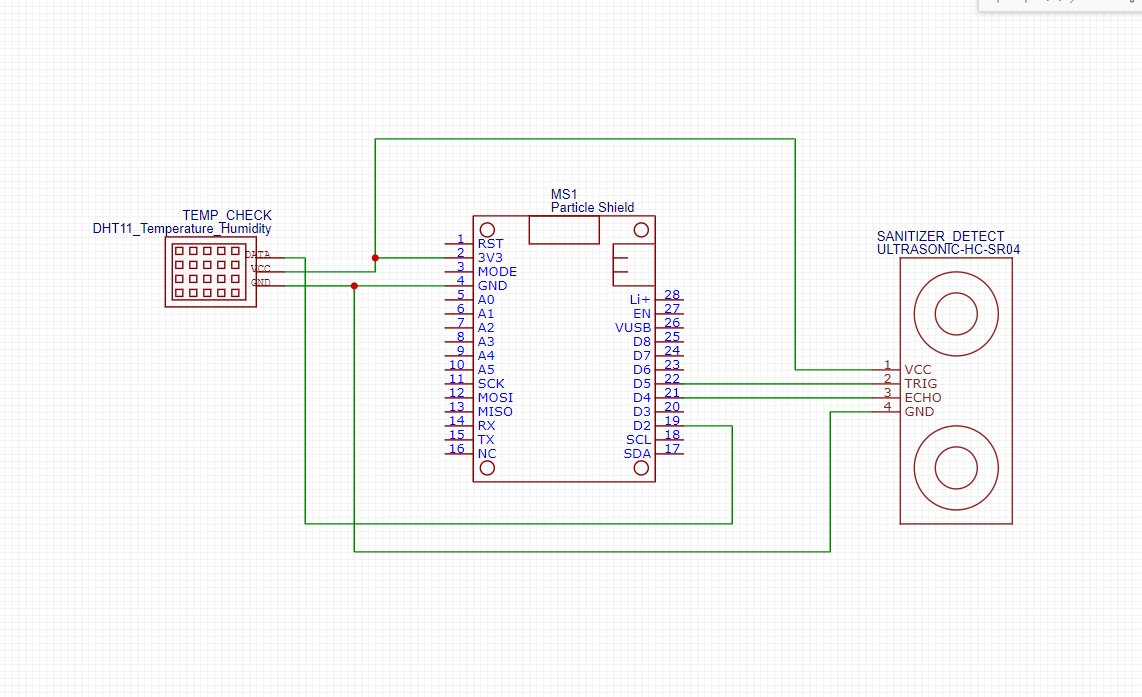
- Argon with the sensing systems (ultrasonic and temperature)
- RasberryPi with the outputs of my system (micro-servo motor, LED's)
- After claiming your Argon device you can start coding in the Particle IDE.
- First write a trial code just to see if the MQTT server is communicating fine and there are no issues with the connections, once the communication is established start coding.
We first code our argon, create a new code and include relevant libraries that we will use in our code. In our project we have used 3 libraries:
#include <Adafruit_DHT.h> #Used for my DHT11 Temperature and humidity sensor
#include <HC_SR04.h> #Used for my HC-SR04 Ultrasonic Sensor
#include <MQTT.h> #used for MQTT server connection- We then define DHTPIN and DHTTYPE for the DHT11 temperature sensor.
- Use a secondary library for the MQTT connections
MQTT client("test.mosquitto.org", 1883, callback);- Declare variables for each of your data pins connected from your argon
int distance = 0;
int trigPin = D5;
int echoPin = D4;
int led = D7;  // The on-board LED
HC_SR04 rangeFinder = HC_SR04(trigPin, echoPin,0,300);- In your ‘void setup’ connect to your MQTT server you created with a unique name, This must be unique as this would be the name of the server we are sending our messages to, you do not want to give a common name and let other users publish messages onto your server, or vice versa.
client.connect("ArgonProject513");- In your void loop you publish the events that the sensors records only ifanything has been detected by the ultrasonic sensor, As mentioned earlier the system is only triggered when the ultrasonic sensor detects movement. Create your if statement for which you publish it to MQTT only if the distance is less than a certain amount over here I have given 15cm as my demo is pretty small in dimensions, but make sure not to keep a too high number because your hand will be within a certain distance from the sensor. Once a hand is detected it publishes the message to MQTT telling that a hand has been detected.
distance = rangeFinder.getDistanceCM();
Particle.publish("Distance", String(distance));
// Only try to send messages if we are connected
if (client.isConnected()) {
if (distance < 15)
{
client.publish("ProjectExposure", "hand");
delay(4000);
float t = dht.getTempCelcius();
Particle.publish("Temperature", String(t));
if (t< 37.5 )
{
client.publish("ProjectExposure", "Open");
}
else
{
Particle.publish("Notify", "High temperature customer detected");
client.publish("ProjectExposure", "Close");
}
}- The 2nd if condition is after the ultrasonic sensor has detected a hand and that is the temperature check where if the temperature is below 37.5 which is the ideal it sends the message to MQTT with a message saying to open the door, but if the temperature is too high, it sends a message to MQTT not to open the door and sends a message to IFTTT that in turn sends an email to notify a staff member.
- Loop the program as this has to sense customers continously.
- First you test the system if you are receiving messages from the MQTT servers, start coding once you have seen that communications are established.
- Run these commands in the raspberry pi command terminal before getting started, they are updates that are required for MQTT communication
sudo apt-get update
sudo apt-get install python-smbus
sudo apt-get install mosquitto
sudo apt-get install python3-pip
sudo pip3 install paho-mqtt- Import the required libraries, for our project the libraries we use are:
import paho.mqtt.client as mqtt         # Import the MQTT library
import time                 # The time library is useful for delays
import RPi.GPIO as GPIO- Set variables for your data output according to the GPIO PINS you have connected the devices to:
servoPIN = 17
LED = 4
LEDSAN = 21
LEDWARN = 20
LEDOK = 16- Initialize all your outputs and set them to your required start positions
GPIO.setup(LED,GPIO.OUT)
GPIO.setup(LEDSAN,GPIO.OUT)
GPIO.setup(LEDWARN,GPIO.OUT)
GPIO.setup(LEDOK,GPIO.OUT)
GPIO.setup(servoPIN, GPIO.OUT)
pwm = GPIO.PWM(servoPIN, 50) # GPIO 17 for PWM with 50Hz
pwm.start(2.5) # Initialization
Define your functions for your outputs which are the servo motor and the LEDs. warn() is what blinks my red LED in the event temperature above 37.5 is detected.sanitize() is what switches on my yellow LED showing that sanitizer is being dispensed.openServo() is what turns my servo motor to represent my door opening and also switches on my blue LED, which is an extra feature, you do not need to add it if you dont want to.messageFunction() is used to recieve messages and then print a message on the RPi console whatever the adjacent event being published is.
def warn():
    i=0
while i<10:
    GPIO.output(LEDWARN,GPIO.HIGH)
    time.sleep(0.1)
    GPIO.output(LEDWARN,GPIO.LOW)
    time.sleep(0.1)
    i+= 1
def sanitize():
    GPIO.output(LEDSAN,GPIO.HIGH)
    time.sleep(2)
    GPIO.output(LEDSAN,GPIO.LOW)
def openServo():
    i=0
    while i<10:
        GPIO.output(LEDOK,GPIO.HIGH)
        time.sleep(0.1)
        GPIO.output(LEDOK,GPIO.LOW)
        time.sleep(0.1)
        i+= 1
    GPIO.output(LED,GPIO.HIGH)
    pwm.ChangeDutyCycle(4)
    time.sleep(4)
    pwm.ChangeDutyCycle(7.5)
    GPIO.output(LED,GPIO.LOW)
    time.sleep(0.5)
    pwm.ChangeDutyCycle(0)
# Our "on message" event
def messageFunction (client, userdata, message):
    topic = str(message.topic)
    message = str(message.payload.decode("utf-8"))
    print(topic + message)
    if (message == "hand"):
        sanitize()
        print('SANITIZING')
    if (message == "Open"):
        openServo()
    if (message == "Close"):
warn()- Connect and subscribe to the MQTT client objects to make the RPi react to messages that it recieves these functions are implemented
ourClient = mqtt.Client("arshadraspi234")     # Create a MQTT client object
ourClient.connect("test.mosquitto.org", 1883)   # Connect to the test
MQTT broker
ourClient.subscribe("ProjectExposure")            # Subscribe to the
topic AC_unit
ourClient.on_message = messageFunction      # Attach the
messageFunction to subscription
ourClient.loop_start() # Start the MQTT client- And finally loop the program and give short delay after every loop.
while(1):
time.sleep(1)- Look for ways to improve your code and add new functionalities wherever possible.
Some improvments I would suggest are:
- Using motion sensors to detect a person coming which then triggers the system asking the customer to place hand under sanitizer.
- Using a camera to make sure that there is only 1 person entering
- Adding an exit door too and then limiting the number of people inside the complex.
_________________________________________________
CONCLUSIONThe project can be implemented for a very low cost compared to the amounts spent on labor to do the same job manually. This can be used even in entities that don’t have automatic doors, as motors can be installed to do the function just like in my prototype.
This project was a very a exciting way to put in the use my knowledge gained through this unit. I thoroughly enjoyed the experience of continuously failing to connect the devices properly, writing code and making tiny errors that takes ages to figure out and of course testing of system with your family and getting better ideas, it was all part of the journey.
All in all, I would consider this project an amazing experience and a definite personal success, I would recommend anyone looking to build up small projects like this to use this as a reference.
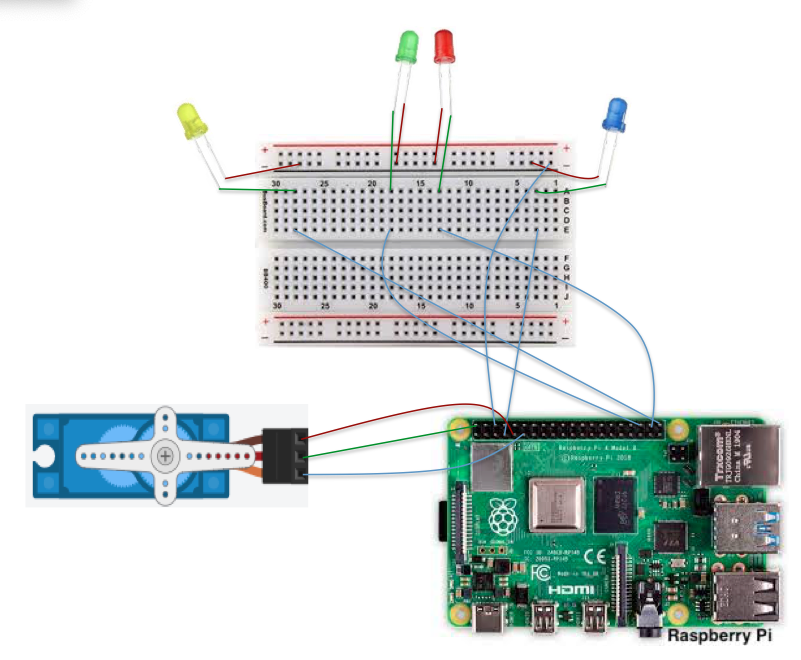
SCHEMATICS DIAGRAM - Rasberry Pi
SCHEMATICS DIAGRAM - Particle Argon
LEGEND for Visual Diagrams
Visual Display - Rasberry Pi


Comments
Please log in or sign up to comment.