


Hardware components | ||||||
| × | 2 | ||||
 |
| × | 1 | |||
| × | 1 | ||||
| × | 1 | ||||
| × | 1 | ||||
 |
| × | 1 | |||
 |
| × | 1 | |||
| × | 1 | ||||
| × | 1 | ||||
| × | 1 | ||||
| × | 1 | ||||
| × | 2 | ||||
Software apps and online services | ||||||
| ||||||
| ||||||
 |
| |||||
| ||||||
| ||||||
| ||||||
 |
| |||||
| ||||||
| ||||||
Hand tools and fabrication machines | ||||||
 |
| |||||
 |
| |||||
Elderly people or people with disabilities find it difficult to lift and carry objects. It becomes difficult when there is no one around to help them in their daily chores. Making multiple trips back and forth say from kitchen to bedroom can cause a lot of physical pain. In this project. We want to develop a robot for elderly and physically disabled people that can lift and carry objects for them. We aim to build a self-navigating robot that can carry objects to desired destination and also has functionality to be driven manually from remote place. This robot will use AI & IoT technologies for navigation (automatic and manual). IoT technology such as oneM2M will be used to drive robot manually from remote place by a person sitting anywhere in the world.
Demo videoProject scopeThe target class for this IoT device will be elderly and physically disabled people. This device will greatly help them to carry out their normal daily activities such as carrying objects from one place to another without having to make multiple trips. It will reduce the risk of harm for elderly and physically disabled people. It will also give a platform for the people who want to help their family and friends but are staying away.
What is oneM2M? And why did we use it in our project?Simple devices that we use daily such as watch, bulb, mirror, coffee maker etc. are getting smart everyday by implementing innovative IoT technologies. Today, interconnected IoT devices are becoming increasingly popular. They are shaping our future. However, communication between different IoT devices is not always possible because of limited vendor-specific applications and protocols. IoT market is highly fragmented today with limited vendor-specific support for communication between different IoT devices. One often needs to rewrite applications for enabling communication between IoT devices from different vendors.
This is where oneM2M comes to rescue. oneM2M standard is accessible, interoperable, scalable, secure and internationally recognized IoT solutions while being open with a transparent development process. It is vendor independent and promotes a global standard in contrast to national variants or proprietary approaches. oneM2M brings together all components in the IoT solution stack. It avoids reinvention in favor of reusing existing technology components and standards. oneM2M standards allow any IoT application to discover and interact with any IoT device which is ideal for distributed and cooperative solutions in areas such as smart buildings, smart cities, and intelligent factories. Many organizations around the world in different industry sectors are deploying solutions based on oneM2M standards such as smart buildings, intelligent transport and smart regions. It has potential to unify IoT platform hence, business to focus on innovations.
oneM2M defines an architectural framework based on a middleware technology that sits in the horizontal layer between IoT applications and a lower layer of communications networks and connected devices. The middleware layer provides a rich set of functions that are needed to manage end-to-end IoT systems. oneM2M takes the form of a middleware service layer consisting of a suite of common service functions (CSFs). oneM2M's common service functions (CSFs) are exposed to applications and to IoT devices via RESTful APIs. A oneM2M service layer and/or applications can reside in field devices and sensors, on gateways and in back-end or cloud applications. This supports cooperative intelligence in distributed IoT systems. The oneM2M functional architecture comprises of (1) Application Entity (AE), (2) Common Services Entity (CSE), and (3) Underlying Network Services Entity (NSE).
You can learn more about oneM2M standard and its benefit at: https://www.onem2m.org/using-onem2m/what-is-onem2m
You can learn more about oneM2M architecture at: https://www.onem2m.org/using-onem2m/developers/basics
Deliverables- Self-Driving- Car can self-drive itself on well defined path on a plane surface
- Drivable from remote place - Car can be driven manually from remote place using oneM2M communication standards
- AI object detection - Car can detect people using AI and stops when there is a person in front of it. Uses oneM2M standards for communication between AI device and robo car
- Control robotic arm from remote place - Has a robotic arm for lifting and carrying objects which can be controlled from remote place using oneM2M communication standards
We are using ACME oneM2M CSE for all communication between IoT devices and website. Live streaming from RiP4 (Raspberry Pi) webcam is achieved through MEDIAMTX RTSP server. Hackthon website for controlling robo car and robotic arm is setup using Flask. Jetson nano is used for object detection while self-driving. All servers are hosted on AWS.
First, Raspberry Pi creates roboCar AE in ACME server and a container inside roboCar AE.
The whole process starts by capturing live feed from webcam attached to Raspberry Pi. Raspberry pi sends live feed from webcam to MEDIAMTX RTSP server. Jetson nano then pulls live stream from RTSP server for object detection. Simultaneously flask server pulls live stream from RTSP server and displays it on website. When jetson nano detects person in live feed then it creates a contentInstance inside container (which is inside roboCar AE) on ACME server with content = "carStop". Robo car pulls last created contentInstance from ACME server every 0.1 sec (if it exists) and reads "content" field from contentInstance. If content is "carStop" then robo car stops until there no one in front of car. When there is no person in front of car then jetson nano creates new contentInstance with content = "carAutoDrive". Robo car pulls that command and starts self-driving on the track. After pulling latest contentInstance robo car deletes that instance from ACME this way it does not keep pulling same contentInstance over and over again. When any button is pressed on the website it also creates a new contentInstance with content=<command> and robo car again pulls that contentInstance to execute that command.
Based on our deliverables our robot has three modes of control/operation which includes two modes of driving and one mode of robotic arm control:
- Manual driving from website using oneM2M (Mode 1)
- AI enabled self-driving using oneM2M (Mode 2)
- Robotic arm controlfrom website using oneM2M (Mode 3)
In this project, we are using artificial intelligence to detect person in front of robo car from camera feed so that it does not crash into it. Because this project is aim toward elderly and physically disabled people their safely is utmost important. And AI along with oneM2M help us achieve that. We are using Jetson Nano for detecting person. Decided to not add Jetson Nano on robo car this way we can reduce its weight, cost and risk of damage. oneM2M enables Jetson Nano to control car while self-driving. When it detect person Jetson Nano creates contentInstance in ACME with content="carStop" and robo car pulls that contectInstance reads the content stopping the car. Similarly, Jetson Nano create "carAutoDrive" contentInstance when there no person in front of robo car.
Object detection is a computer technology related to computer vision and image processing that deals with detecting instances of semantic objects of a certain class (such as humans, buildings, or cars) in digital images and videos. In project, we are using "SSD-Mobilenet-v2" trained on 91-class MS COCO dataset because it achieves realtime inferencing performance on Jetson Nano. The SSD (Single Shot Detector) architecture is a single convolution network that learns to predict bounding box locations and classify these locations in one pass. Hence, SSD can be trained end-to-end. The SSD network consists of base architecture (MobileNet in this case) followed by several convolution layers:
In this project we are using Jetson Nano Developer Kit for implementing object detection. There are many cloud based options available today in the market for AI. However, these option are not suitable for our use case because of following limitations:
- We generally need to rent a GPU which are not cheap & can add a significant cost to our device.
- They may not come pre-configured with necessary packages.
- In addition, cloud AI can add latency in communication where are aiming for close to real-time performance.
Because of these limitations, we chose to go with Jetson Nano which has GPU on board. It also comes with all necessary packages that can be easily installed. Because image processing is taking on the hardware itself, it can deliver real-time video processing performance which is required for our project.
Hardware Setup1) Assembling Robo Car: Robo car chassis assembly and wiring is demonstrated in the videos below:
After assembling robo car chassis with motors and 4-wheels place the RPi4 computer along with the breadboard and GPIO T-type expansion board on the RoboCar, secure them with rubber bands. Then place the SparkFun Motor Driver board on the breadboard. Wire the following RPi4 signals to the motor driver board: GPIO pins 12, 13, 05, 06, 22, 23, 3.3V VCC, 5.0V VM, and GND
RPi4 pin GPIO12 <-> Motor Driver Board pin PWMA = left motor speed control
RPi4 pin GPIO13 <-> Motor Driver Board pin PWMB = right motor speed control
RPi4 pin GPIO05 <-> Motor Driver Board pin AI1 = left motor direction control
RPi4 pin GPIO06 <-> Motor Driver Board pin AI2 = left motor direction control
(AI1, AI2: 10=>forward, 01=>backward, 00=>stop, 11=>short break)
RPi4 pin GPIO22 <-> Motor Driver Board pin BI1 = right motor direction control
RPi4 pin GPIO23 <-> Motor Driver Board pin BI2 = right motor direction control
(BI1, BI2: 10=>forward, 01=>backward, 00=>stop, 11=>short break)
RPi4 pin GND, Ground <-> Motor Driver Board pin GND, all three pins
RPi4 pin 3.3V, Logic level DC Power <-> Motor Driver Board pin VCC
RPi4 pin 5V, DC Power <-> Motor Driver Board pin VM, motor power
The remaining pins of the motor driver board need to be connected as follows: AO1 and AO2 pins to the left motor, BO1 and BO2 pins to the right motor, STBY pin to 3.3V VCC.
Motor Driver Board pin AO1 <-> Left motor upper pin = left motor plus (+) terminal
Motor Driver Board pin AO2 <-> Left motor lower pin = left motor minus (-) terminalMotor
Driver Board pin BO1 <-> Right motor upper pin = right motor minus (-) terminal
Motor Driver Board pin BO2 <-> Right motor lower pin = right motor plus (+) terminal
Motor Driver Board pin STBY <-> Motor Driver Board pin VCC = RPi4 pin 3.3V
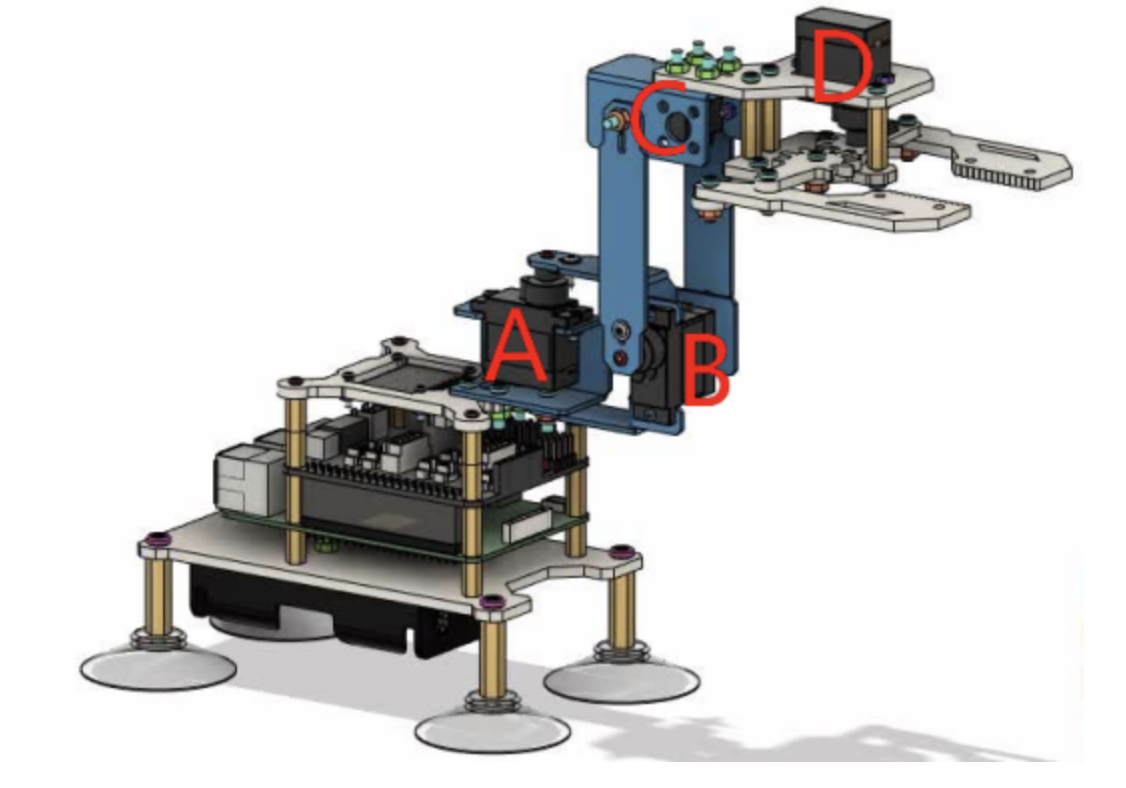
2) Assembling Robotic Armand Final Setup: Please follow the instructions given here & video below for assembling robotic arm. You will need to add third layer to your robo car for attaching robotic arm. We have attached RobotHAT driver board to 40 pin male to female to male Rainbow Cable rather than directly on raspberry pi. This way we can still connect to Motor Driver via T-type expansion board. Then attach Servo A to pin 2, Servo B to pin 5, Servo C to pin 8 and Servo D to pin 15 on RobotHAT driver board.
In our assembly we have breadboard with motor driver on 2nd layer and RPi4 on 3rd layer with robotic arm.
Then attach 2 IR sensors in the front.
Connect the left front IR sensor output to GPIO24 pin, and connect the right front IR sensor output to GPIO25 pin. Each IR sensor also needs 3.3V power and GND ground connections.
Finally on third layer, attach USB webcam to RPi4, high current batteries to RobotHAT. On second layer add power bank as backup power source.
3) Jetson Nano Developer Kit setup: Connect Jetson Nano with an (1) HDMI display, (2) a USB keyboard, (3) a USB mouse, (4) 64GB pendrive, and (5) ethernet. Now power up the Jetson Nano by connecting the wall adapter power supply. You can also share internet from your laptop to Jetson Nano via ethernet.
1) Install Raspberry Pi OS: Please follow this tutorial to install Raspberry Pi OS.
2) Install Robotic Arm software: Detailed instruction for downloading and installing the relevant code program to control the robotic arm cab be found here. After installing robotic arm software clone hackathon project repo in RPi4.
git clone https://github.com/timqin123/oneM2M-Hackathon-IoT-Care-PSU.git3) Setup Jetson Nano: Please follow the instructions given here for setting up Jetson Nano. Then clone jetson-inference and hackathon project repositories.
git clone --recursive https://github.com/dusty-nv/jetson-inference
cd jetson-inference/data
git clone https://github.com/timqin123/oneM2M-Hackathon-IoT-Care-PSU.git
It is important to clone hackathon repo in "jetson-inference/data" because we are using docker for running our neural network. Anything we put in "jetson-inference/data" is accessible inside container. You can start docker container for object detection using
docker/run.shYou can have a look at this page for more information on launching docker container.
4) Create AWS EC2 instance: For creating AWS EC2 instance please have a look at this tutorial. After creating ec2 instance open following ports by editing Inbound rules in the security groups attached to ec2 instance.
Then log into ec2 and clone hackathon project repo.
git clone https://github.com/timqin123/oneM2M-Hackathon-IoT-Care-PSU.git5) ACME installation: Login to ec2 instance created in the previous step and install ACME server using the instructions given here.
6) RTSP server setup: Login to ec2 instance created in the previous step and install RTSP server using instructions given here.
7) Flask server setup: Login to ec2 instance created in previous step and install Flask using instructions given here.
IP Address ConfigurationBefore we can start operating our robot from website we need to configure IP addresses so that devices and services and communicate with each other using oneM2M.
1) First, Log into Raspberry Pi and go at following location in hackathon project repo. Open "config.py" file via any text editor
cd <path-to-hackathon-project-repo>/oneM2M-Hackathon-IoT-Care-PSU/src/acmeLib
nano confi.py
And change "host" field to
http://<public-ip-of-ec2-instance>:80802) Then goto following location in Raspberry Pi & open "startCamera.sh" and change ip address of RTSP server to the public ip of ec2 instance
cd <path-to-hackathon-project-repo>/oneM2M-Hackathon-IoT-Care-PSU/src/
nano startCamera.sh3) Then open "detectnet.py" and enter public ip of ec2 instance on the line shown below
4) Then log into aws ec2 instance. Goto ACME repo and update "networkInterface" field to 0.0.0.0 & "cseHost" field to public ip of ec2 instance
For video streaming we need to configure IP address in "app.py" located in
<path-to-hackathon-project-repo>/oneM2M-Hackathon-IoT-Care-PSU/src/flaskSite1) The argument passed to cv2.VideoCapture() is a string that represents the video source.
In this case, the video source is an RTSP (Real-Time Streaming Protocol) URL: "rtsp://44.203.203.28:8554/mystream".
The RTSP URL specifies the IP address (44.203.203.28) and the port (8554) where the video stream can be accessed.
2) This is a generator function named generate_frames.
It continuously reads frames from a camera.
It uses the OpenCV library to encode the frames into JPEG format and convert them to bytes.
It yields each frame as a multipart response with the appropriate content type.
3) The video function returns a Response object.
The Response object is created using the generate_frames generator function as the data source.
The mimetype parameter is set to "multipart/x-mixed-replace; boundary=frame" to indicate that the response will consist of multiple parts with a boundary named "frame".
4) syntax for passing image to the template
1) Log into ec2 instance.
2) Start ACME server.
cd <path-to-ACME-repo>/ACME-oneM2M-CSE
python3 -m acme --headless
You can access ACME webui at following address
http://<public-ip-of-ec2>:8080/webui/3) Start RTSP server.
cd <path-to-mediamtx-installation>/mediamtx
./mediamtx
4) Login into Raspberry Pi.
5) Start webcam streaming. It is important to start webcam streaming before starting flask server otherwise you will not see stream on website.
cd <path-to-hackathon-project-repo>/oneM2M-Hackathon-IoT-Care-PSU/src
./startCamera.sh
6) Start Flask server on ec2 instance (log back into ec2 instance and start flask server).
cd <path-to-hackathon-project-repo>/oneM2M-Hackathon-IoT-Care-PSU/src/flaskSite
flask run --host=0.0.0.0
7) Finally, start main program on Raspberry Pi.
cd <path-to-hackathon-project-repo>/oneM2M-Hackathon-IoT-Care-PSU/src
python main.py
After these steps open web browser and goto
http://<public-ip-of-ec2-instace>:5000And you should see following webpage. On this webpage you can see live feed from webcam and buttons to control robo car!
1) Log into ec2 instance.
2) Start ACME server.
cd <path-to-ACME-repo>/ACME-oneM2M-CSE
python3 -m acme --headless
You can access ACME webui at following address
http://<public-ip-of-ec2>:8080/webui/3) Start RTSP server.
cd <path-to-mediamtx-installation>/mediamtx
./mediamtx
4) Login into Raspberry Pi.
5) Start webcam streaming. It is important to start webcam streaming before starting flask server otherwise you will not see stream on the website.
cd <path-to-hackathon-project-repo>/oneM2M-Hackathon-IoT-Care-PSU/src
./startCamera.sh
6) Start Flask server on ec2 instance (log back into ec2 instance and start flask server).
cd <path-to-hackathon-project-repo>/oneM2M-Hackathon-IoT-Care-PSU/src/flaskSite
flask run --host=0.0.0.0
7) Start Jetson Nano and run object detection program.
cd <path-to-jetson-inference-repo>/jetson-inference/
./docker/run.sh
pip install ipython
cd jetson-inference/data/oneM2M-Hackathon-IoT-Care-PSU
python3 detectnet.py
8) Finally, start main program on Raspberry Pi.
cd <path-to-hackathon-project-repo>/oneM2M-Hackathon-IoT-Care-PSU/src
python main.py
After these steps, you should see a window on monitor attached to Jetson Nano. This window will show objects detect in live feed from webcam attached to robo car. If there is no person in camera view then robo car will start auto driving on track. If person steps in front of robo car then it will stop moving. When person moves out of camera view then car will start self-driving again.
Start robo car in either mode 1 or mode 2 and goto desired location to pick up item. Then stop the robo car. When car is in AI controlled self-driving mode (mode 2) we need to stop program running on Jetson Nano to stop the car. After robo car is stopped goto hackathon website
http://<public-ip-of-ec2-instace>:5000And control robotic arm servos from the buttons in middle panel!
1) Possibility of 5G connections: Due to OneM2M standard, implementing a new module such as 5G connection is relatively easy. but the project will require one additional hardware module
SIMCom Wireless Solutions SIM8200EA-M2 5G HAT
Follow the SIM8200EA-M2 5G HAT - Waveshare Wiki to setup on the Raspberry Pi module. Test if the 5G hat is configured correctly by
sudo apt-get install minicomsudo minicom -D /dev/ttyUSB2Copy
Remember to enable it afterwards by
sudo./simcom-cmCopy
**a new ip address will be given through wwan0 and wwan1 portal. Manually change the IP address in both ACME and RTSP connection to activate the 5G connection.*
2) Reinforcement Learning: We can automate robotic arm for picking up objects by implementing reinforcement learning which is another form of AI.
3) Stairs: Right now, our robot cannot navigate on stairs. So in future we can consider how to make robot to climb up and down on stairs.


_3u05Tpwasz.png?auto=compress%2Cformat&w=40&h=40&fit=fillmax&bg=fff&dpr=2)


Comments