

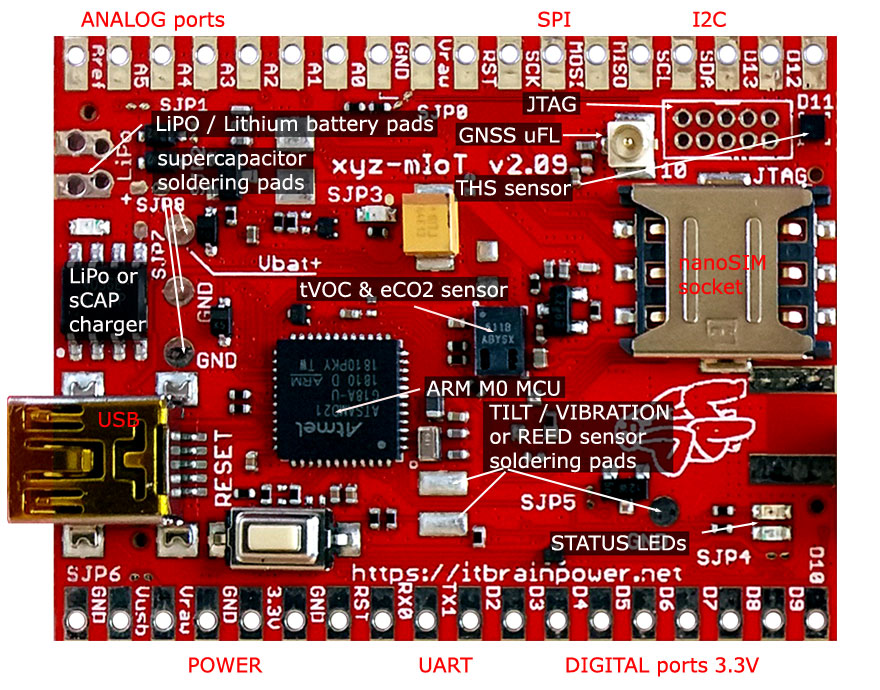
Hardware components | ||||||
![xyz-mIoT by itbrainpower.net [ARM0 + BC95G (NB IoT modem), no embedded sensors]](https://hackster.imgix.net/uploads/attachments/932249/xyz-mIoT-BC95G_880px.jpg?auto=compress%2Cformat&w=48&h=48&fit=fill&bg=ffffff) |
| × | 1 | |||
| × | 1 | ||||
| × | 1 | ||||
| × | 1 | ||||
Software apps and online services | ||||||
| ||||||
 |
| |||||
Next, I will show you how to upload sensor data to cloud using NB IoT UDP and JSON.
Our friends from AllThingsTalk (Belgium located CLOUD solution provider) offer free CLOUD based NB IoT services - having very convenient and versatile UDP messaging API (w. JSON, CBOR and ABCL data packing). Really GREAT JOB!
In a nutshell, the xyz-mIoT shield Vbat and Vraw voltages are read and then uploaded to the AllThingsTalk cloud each 120secondes. As further step, you may like to expand this demo using the xyz-mIoT shield embedded sensors or by using other external sensors connected trough available UART, SPI, I2C, PWM, digital or analog ports.
Native "NB IOT [UDP mode] itbrainpower.net class" it is used, exactly as in episode1. We've choose for UDP data uploading the JSON packing - see the buildJsonPayload() function - adapted for AllThinkTalk UDP data format.
Step 1: Hardware Preparation - Soldering and WiringIf your previously run the "taste the NB IoT flavor (BC95G) flavor episode 1", you may skip to next step. Else, follow the hardware setup described in "episode 1 (step1 and 2)".
Step 2: Arduino Classes Download and Install. Software Settings.All the software described bellow is available, for registered users, here. If your previously run the "taste the NB IoT flavor (BC95G) flavor episode 1", you may skip directly to paragraph c - last line (SERVER_ADDRESS and SERVER_PORT).
a. Download and install "xyz-mIoT shields Arduino class". Optional (not required for this test), you may download an install the "xyz-mIoT shields SENSORS support Arduino class". Install directives can be found on the download page.
b. Download and install "NB IOT [UDP mode] support for xyz-mIoT shield" class. Same, the install directives can be found on download pages.
c. Let's make some settings in h files inside the "itbpNBIoTClass":
- in "itbpGPRSIPdefinition.h" update the APN value, using the APN value of your NB IoT provider,
- in "itbpGPRSIPdefinition.h" update the NETWORKID with the numeric network id code for your NB IoT provider ("22601" for Vodafone Romania),
- in "itbpGPRSIPdefinition.h" update the LTE_BAND with numeric band code used for NB IoT service (20 - LTE band B20 for Vodafone Romania),
- in "itbpGSMdefinition.h" goto lines 60&61 and select __itbpModem__ xyzmIoT,
- in "itbpGSMdefinition.h" goto lines 64&65 and select __Qmodule__ BC95G,
- in "itbpGPRSIPdefinition.h" update the SERVER_ADDRESS and SERVER_PORT with values "40.68.172.187" and "8891" - AllThingsTalk UDP server address and port.
a. Go to AllThingsTalk cloud and make a new account.
b. Select "DEVICES" section, then click on "NEW DEVICE" button.
Scroll down the interface and choose "Your own" device. Name the device as: " my amazing xyz-mIoT BC95G NB IoT shield" ;), then click the "CONNECT" button to save the new created cloud device.
c. Create xyz-mIoT shield Vbat and Vin sensors. Click on "CREATE ASSET" and write "Vbat" in "Name" field, then "Choose type" as "number". Confirm new declared sensor (click on "CREATE ASSET").
Repeat the same guidelines to declare the "Vraw" as sensor.
d. Copy your new created device token and id. Click on "SETTINGS" button (placed in top-right corner of the screen), click on "Autentication" option.
Copy the "Device ID" and "Device Tokens" values and keep them for next step 4 (use those values in the Arduino code as shown below).
Step 4: Arduino - Compile, Upload and Run the NB IoT Echo TestOpen in Arduino the xyz_mIoT_NBIoT_Class_example_AllThingsTalk.ino project from "File/Examples/itbpNBIoTClass" Arduino menu.
a. Use previously defined "Device ID" and "Device Token" values to setup the "DEVICE_ID" and "DEVICE_TOKEN" parameters in Arduino code.
Save the Arduino code. Now all are set for code compiling.
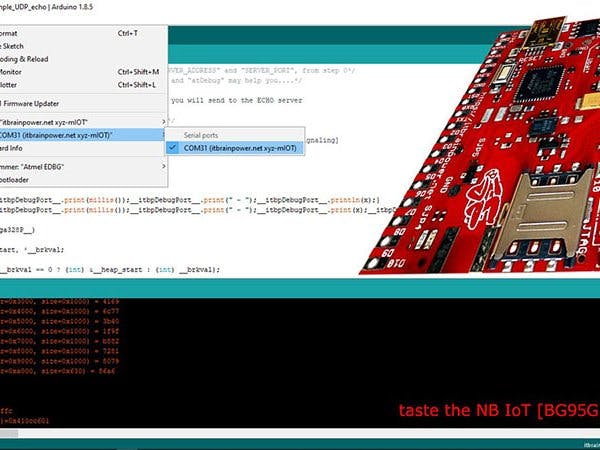
b. Select board and the programming port [select port after enter programming mode for xyz-mIoT boards by double pressing-fast the RESET button].
c. Compile and upload the code.
In order to visualize the debug output, use the Arduino Serial Monitor or other terminal by selecting the debug port with following settings: 57600bps, 8N, 1.
The xyz-mIoT shield Vbat and Vraw voltages are sampled and uploaded to the AllThingsTalk cloud at each 120 seconds.
Uploaded data can be seen in AllThingsCloud interface via "PINBOARD" option...btw: create yours.
What to do next: read and upload data from xyz-mIoT shield embedded sensors...just use the xyz-mIoT embedded sensors class mentioned before.
ENJOY!
TUTORIAL PROVIDED WITHOUT ANY WARRANTY!!! USE IT AT YOUR OWN RISK!!!!
Originally published by me on itbrainpower.net projects and how to section.


Comments