

Hardware components | ||||||
| × | 1 | ||||
Software apps and online services | ||||||
 |
| |||||
 |
| |||||
 |
| |||||
| ||||||
| ||||||
| ||||||
This is a project made for the third assignment of the Internet Of Things course, at Sapienza University of Rome.
Before starting to show the features of this project, I strongly suggest you to see my previous articles to better understand this one:
If you have already cloned my GitHub repository just pull it, otherwise you have to clone it to see the work done.
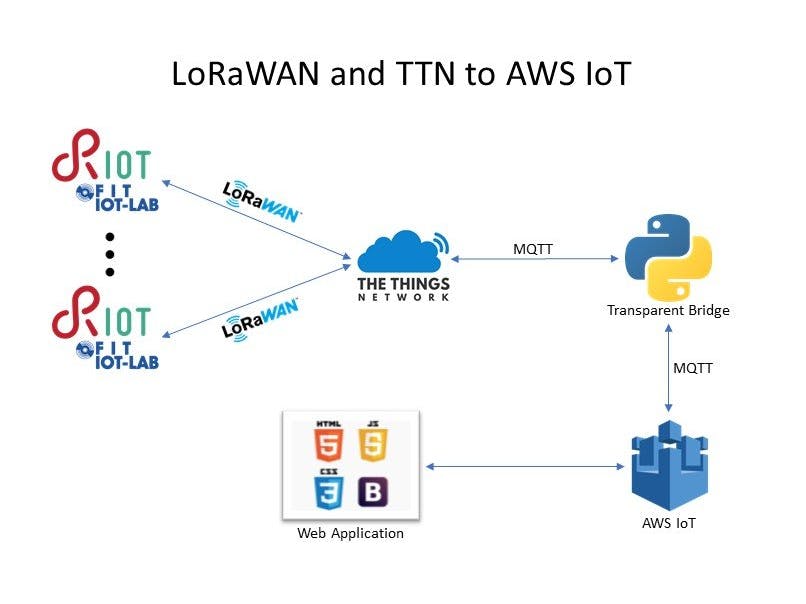
In this article I will present you how to replace the MQTT protocol and the short-range wireless medium with LoRaWAN and The Things Network developing a new RIOT-OS application that will be executed on the B-L072Z-LRWAN1 LoRa kit. Then I have used The Things Network to interconnect the sensor devices with the cloud infrastructure via the MQTT protocol.
Since that I have no real devices of that type, I used IoT-LAB to execute the RIOT-OS application on real sensors.
The system is composed by a set of RIOT-OS nodes that represent virtual environmental stations, which generate periodically a set of random values for 5 different sensors (temperature, humidity, wind direction, wind intensity, rain height), a TTN MQTT broker and a MQTT transparent bridge.
The following sections are a hands-on tutorial on how to setup and implement this system.
IoT-LABIoT-LAB is an open testbed which provides a very large scale infrastructure facility suitable for testing small wireless sensor devices and heterogeneous communicating objects.
IoT-LAB testbeds are located at six different sites across France which gives forward access to 1786 wireless sensors nodes: Inria Grenoble (640), Inria Lille (293), Inria Saclay (264), ICube Strasbourg (400), Institut Mines-Télécom Paris (160) and CITI Lab Lyon (29). We will work on the Saclay site for this project.
First of all you have to sign up to FIT IoT-LAB (if you haven't done it previously), and follow this guide to configure your SSH access.
LoRa and LoRaWANLoRa is the physical layer or the wireless modulation utilized to create the long range communication link. The advantage of LoRa is in the technology’s long range capability. A single gateway or base station can cover entire cities or hundreds of square kilometers.
The LoRaWAN specification is a Low Power, Wide Area (LPWA) networking protocol designed to wirelessly connect battery operated ‘things’ to the internet in regional, national or global networks, and targets key Internet of Things (IoT) requirements such as bi-directional communication, end-to-end security, mobility and localization services. It defines the communication protocol and system architecture for the network while the LoRa physical layer enables the long-range communication link. The protocol and network architecture have the most influence in determining the battery lifetime of a node, the network capacity, the quality of service, the security, and the variety of applications served by the network.
The nodes in a LoRaWAN network are asynchronous and communicate when they have data ready to send whether event-driven or scheduled, avoiding the battery consumption typical of synchronous networks. Moreover, to optimize a variety of end application profiles, LoRaWAN utilizes different device classes. The device classes trade off network downlink communication latency versus battery lifetime.
The LoRaWAN specifications define 3 classes of end-devices: A, B, C. Each of which has specific access to the physical layer. For more details, please refer to the LoRa specifications provided by the LoRa Alliance here.
LoRaWAN utilizes two layers of security: one for the network and one for the application. The network security ensures the authenticity of the node in the network, while the application security layer ensures that the network operator does not have access to the end user’s application data. The AES-128 encryption is used with the key exchange utilizing an IEEE EUI64 identifier.
The Things NetworkThe Things Network is a contributor member of the LoRa Alliance®, which is a non-profit association of more than 500 member companies, committed to enabling large scale deployment of Low Power Wide Area Networks (LPWAN) IoT through the development and promotion of the LoRaWAN® open standard.
Like the previous step, if you are not already registered, sign up to TTN and create the application. Therefore, going on the console:
Now you have created your first application, and you will be redirected to the Application Overview.
Then register some devices clicking on the Devices tab, generating automatically their EUI (i.e., a unique identifier for each device on the network):
And finally on the Device Overview there are the Device EUI, Application EUI and Application Key that will serve in the application.
Remember that you have to create one device for each running RIOT-OS applications. So, for instance, if you would create three RIOT-OS applications, there must be exactly three TTN devices.
RIOT-OS ApplicationOnce you have downloaded the GitHub repository, you have to enter into the ThirdAssignment folder, and copy the lora folder into your Saclay site host with the "secure copy protocol" command:
> scp -r lora <login>@saclay.iot-lab.info:~In this way you are able to manage the application directly by IoT-LAB. Therefore, the next step are performed following this guide, in order to flash the application on our node.
Firstly, connect to the Saclay site host:
> ssh <login>@saclay.iot-lab.infoAnd start an experiment:
> iotlab-auth -u <login>
> iotlab-experiment submit -n <exp-name> -d <minutes> -l <number-of-devices>,archi=st-lrwan1:sx1276+site=saclay
Where the choice of that parameters is up to you, and the <number-of-devices> term depends on how much applications you want to start simultaneously.
Wait a moment until the experiment is launched (state is Running) and get the nodes list replacing the <exp-id> with the experiment ID returned on your console by the last command:
> iotlab-experiment get -i <exp-id> -s
> iotlab-experiment get -i <exp-id> -r
Then get the code of the RIOT repository from GitHub:
> git clone https://github.com/RIOT-OS/RIOT.gitRIOT doesn’t support the arm gcc version installed by default on the SSH frontend, e.g. 4.9. So use the following command to use gcc 7.2 by default:
> export PATH=/opt/gcc-arm-none-eabi-7-2018-q2-update/bin:$PATHVerify that you have the right gcc version:
> arm-none-eabi-gcc --versionNow build the node imported some steps ago:
> cd lora
> make clean all
And use the CLI-Tools to flash the node with the LoRaWAN firmware that you have just built. You have to replace the <device-number> with one of the generated devices (for instance, take xx from the device st-lrwan1-xx):
> iotlab-node --update bin/b-l072z-lrwan1/lora.elf -l saclay,st-lrwan1,<device-number>You can now access the RIOT shell running on your node using netcat:
> nc st-lrwan1-<device-number> 20000Now find the Device EUI, Application EUI and Application key information in the Overview tab of the device on the TTN web console. Then set them to the RIOT firmware (replace the values with yours), set a fast datarate and finally join the node to the network using the OTAA:
> loramac set deveui <dev-eui>
> loramac set appeui <app-eui>
> loramac set appkey <app-key>
> loramac set dr 5
> loramac join otaa
LoRaWAN offers two methods of device activation: OTAA (Over The Air Activation) and ABP (Activation by Personalization). I choose OTAA because it offers more security, more flexibility, as well as scalability, according to TTN recommendations.
Finally, you can start the LoRaWAN station:
> start <station-id>To collect and publish data from sensors you have to indicate also the ID of the station, so make sure that is different from the other ones.
The RIOT-OS program is based on the implementation of the semtech_loramac test available in the RIOT folder, but I have modified a little bit the file main.c to have only one command (start) that generates periodically random data from a station and starts the transmission.
static int cmd_start(int argc, char **argv){
if (argc < 2) {
printf("Usage: %s <station_id>\n", argv[0]);
return 1;
}
/* sensors struct */
t_sensors sensors;
/* json that it will published */
char json[128];
while(1) {
/* takes the current date and time */
char datetime[20];
time_t current;
time(¤t);
struct tm* t = localtime(¤t);
int c = strftime(datetime, sizeof(datetime), "%Y-%m-%d %T", t);
if(c == 0) {
printf("Error! Invalid format\n");
return 0;
}
/* updates sensor values */
gen_sensors_values(&sensors);
/* fills the json document */
sprintf(json, "{\"id\": \"%d\", \"datetime\": \"%s\", \"temperature\":
"\"%d\", \"humidity\": \"%d\", \"windDirection\": \"%d\",
"\"windIntensity\": \"%d\", \"rainHeight\": \"%d\"}",
atoi(argv[3]), datetime, sensors.temperature,
sensors.humidity,sensors.windDirection,
sensors.windIntensity, sensors.rainHeight);
puts(json);
/* send a message */
uint8_t res = semtech_loramac_send(&loramac, (uint8_t *)json,
strlen(json));
if (res == SEMTECH_LORAMAC_TX_DONE || res == SEMTECH_LORAMAC_TX_OK) {
puts("Message sent with success");
} else {
printf("Fail to send: %d\n", res);
xtimer_sleep(10);
continue;
}
/* it sleeps for five seconds */
xtimer_sleep(5);
}
return 0;
}Until now we have some RIOT-OS applications running on IoT-LAB and sending random values to TTN, the last step to do is to take these values from TTN and display them on the web application passing through AWS.
Therefore we have to interface with both parts, and we can do it with a Python script that represents the transparent bridge. For this purpose we connect with TTN and AWS thanks to the Paho MQTT library and the AWS IoT SDK (presented in the previous articles):
# clients for TTN and AWS
TTNClient = mqtt.Client()
AWSClient = AWSIoTMQTTClient("TTNbridge")

...

# connect the clients
TTNClient.connect("eu.thethings.network", 1883, 60)
AWSClient.connect()
Keep in mind that you have to replace these parameters for the correct functioning of the application:
TTNClient.username_pw_set("<application-id>", "<access-key>")You can find them easily in the TTN site, going on the Application Overview tab (as in the step where the application was created). In my case, the <application-id> is virtual-environmental-station and the <access-key> for privacy is hidden but you can unlock it clicking on the button next to the corresponding field.
The bridge retrieves all the messages send over the MQTT channel, so the on_connect function subscribes to the topic +/devices/+/up and the on_message function, that converts the payload to a JSON file and send it to AWS and DynamoDB:
def on_connect(client, userdata, flags, rc):
    print("Connected with result code "+str(rc))
    # subscribing in on_connect() means that if we lose the connection and
    # reconnect then subscriptions will be renewed
    client.subscribe("+/devices/+/up")

def on_message(client, userdata, msg):
    jsonP = json.loads(str(msg.payload)[2:-1])
    print("Uplink received from", jsonP['dev_id'])
    new_payload = base64.b64decode(jsonP['payload_raw'])
    new_msg = json.loads(str(new_payload)[2:-1])
    new_msg['datetime'] = datetime.datetime.fromtimestamp(time.time()).strftime('%Y-%m-%d %H:%M:%S')
    print(new_msg,"\n")
    AWSClient.publish("sensor/station"+new_msg['id'], json.dumps(new_msg), 0)
    dynamoTable.put_item(Item=new_msg)
Eventually you can start the bridge, going into the MQTT_LoRa_bridge folder:
> python3 MQTTClientTTN.pyThat's all, now the application is able to retrieve data in this new way with IoT-LAB, LoRaWAN and The Things Network. You can find the display of all data on the website.
Thank you for the attention!


Comments