

Software apps and online services | ||||||
 |
| |||||
 |
| |||||
This is a project made for the second assignment of the Internet Of Things course, at Sapienza University of Rome.
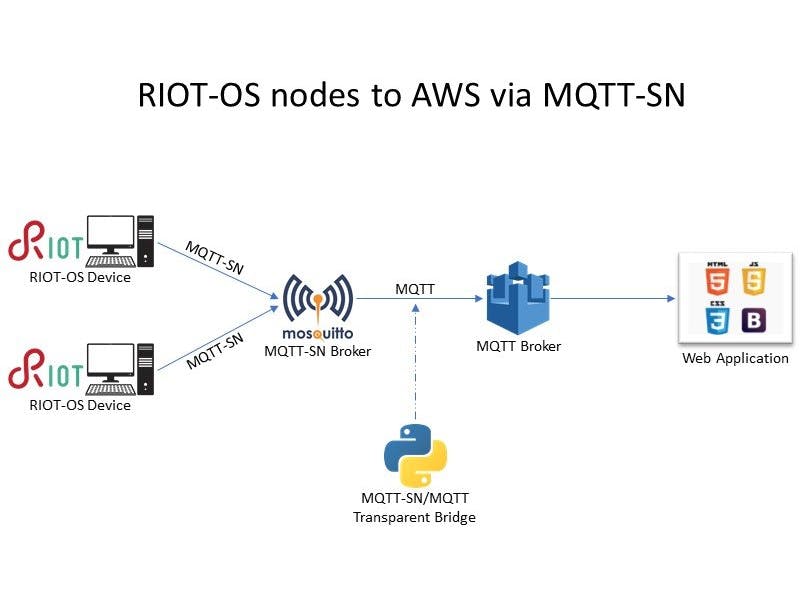
I have implemented virtual environmental stations with the native emulator of RIOT-OS that generate values which will be published over MQTT-SN, and then need to arrive to the cloud via the MQTT.
This project is an expansion compared to the previous one (see here), so I suppose that all the actions indicated there have already been done.
The system is composed by a RIOT-OS device, a Mosquitto broker (RSMB) and a Python script that represents the bridge between the MQTT-SN protocol and the MQTT one.
In my GitHub repository you will find all the files that I have used for this project. All the required files are in the folder SecondAssignment.
In the next sections you will see a hands-on tutorial on how to implement the system.
MQTT-SN BrokerThe first thing that we can do is to setup the MQTT-SN broker. I have used the Mosquitto Really Small Message Broker (RSMB), available here, so download it. After that, go into the source folder and build the RSMB with the Linux terminal:
> cd rsmb/src
> make
When the compilation is finished, create a file named config.conf, and save the following into this configuration file:
# add some debug output
trace_output protocol
# listen for MQTT-SN traffic on UDP port 1885
listener 1885 INADDR_ANY mqtts
ipv6 true
# listen to MQTT connections on tcp port 1886
listener 1886 INADDR_ANY
ipv6 true
Now we are able to start the broker, so type in the terminal:
> ./broker_mqtts config.confThe broker is waiting for connections using port 1885 for MQTT-SN and 1886 for MQTT, with the IPv6 enabled.
As you see in the image above, we can communicate on the MQTT-SN channel with the specified port, and in the next section we will configure the application that communicates with this object.
RIOT-OS ApplicationSince we have to use RIOT-OS to implement an application that will connect to the broker, clone on your local system the repository from this link.
Before starting the configuration, so copy the directory emcute_MQTTSN from my GitHub project and insert it into the folder RIOT/examples. You will also put the folder everywhere you want, but you must be careful to edit the Makefile correctly by entering the correct path to the RIOT folder. Therefore modify this line in the Makefile:
RIOTBASE ?= $(CURDIR)/../..
Only if you have choosen a path different from mine.
Now we must configure some global addresses, as the RSMB doesn't seems to be able to handle link-local addresses. So for a single RIOT native instance, we can do the following:
- Setup the interfaces and the bridge using RIOT's tapsetup script:
> sudo ./RIOT/dist/tools/tapsetup/tapsetup -c 2- Assign a site-global prefix to the tapbr0 interface:
> sudo ip a a fec0:affe::1/64 dev tapbr0- Open the RIOT-OS application, so in the folder just downloaded (emcute_MQTTSN):
> make all term PORT=tap0- In the RIOT-OS instance, assign a site-global address:
> ifconfig 5 add fec0:affe::99Now we have opened the application, and we can start to communicate with the broker.
static int cmd_start(int argc, char **argv) {
if (argc < 4) {
printf("usage: %s <address> <port> <id>\n", argv[0]);
return 1;
}
/* sensors struct */
t_sensors sensors;
/* name of the topic */
char topic[32];
sprintf(topic,"sensor/station%d", atoi(argv[3]));
/* json that it will published */
char json[128];
while(1) {
/* it tries to connect to the gateway */
if (con(argv[1], atoi(argv[2]))) {
continue;
}
/* takes the current date and time */
char datetime[20];
time_t current;
time(¤t);
struct tm* t = localtime(¤t);
int c = strftime(datetime, sizeof(datetime), "%Y-%m-%d %T", t);
if(c == 0) {
printf("Error! Invalid format\n");
return 0;
}
/* updates sensor values */
gen_sensors_values(&sensors);
/* fills the json document */
sprintf(json, "{\"id\": \"%d\", \"datetime\": \"%s\", \"temperature\":
"\"%d\", \"humidity\": \"%d\", \"windDirection\": \"%d\",
"\"windIntensity\": \"%d\", \"rainHeight\": \"%d\"}",
atoi(argv[3]), datetime, sensors.temperature,
sensors.humidity,sensors.windDirection,
sensors.windIntensity, sensors.rainHeight);
/* publish to the topic */
pub(topic, json, 0);
/* it disconnects from the gateway */
discon();
/* it sleeps for five seconds */
xtimer_sleep(5);
}
return 0;
}This is the function that start a virtual environmental station, handling the command start. This function permits us to open the connection with the MQTT-SN broker and publish into that some messages every 5 seconds.
At first there are some declaractions of variables and structures, like sensors, the topic on which the messages arrive and the text of the JSON file. Furthermore we have to upload the values of the sensors, so we call the function gen_sensors_values(t_sensors* sensors):
static void gen_sensors_values(t_sensors* sensors){
  sensors->temperature = rand_val(-50,50);
  sensors->humidity = rand_val(0, 100);
  sensors->windDirection = rand_val(0, 360);
  sensors->windIntensity = rand_val(0, 100);
  sensors->rainHeight = rand_val(0, 50);
}
Where the value of each sensor is computed by the function rand_val(int min, int max):
int rand_val(int min, int max){
  srand(time(NULL));
  return (rand() % (int)((max-min+1) * 100)) / 100 + min;
}
As you can see, is important to use the function srand(time(NULL)), that allows us to generate different values at every run, and consequently to have always random numbers.
Initially we have to specify which arguments are allowed, so after the command name we will specify the address of the broker, the port and the ID of the station just opened. So, for instance, insert the command in the RIOT-OS application:
> start fec0:affe::1 1885 1And you will see that the station is connected to the broker and it begin the sending of messages, as in the image below.
As I said before, the station sends random values every 5 seconds to the broker on the channel with the address and the port specified in the command line. You can see also that the JSON file is published on the topic linked to that specific station.
In the application are called some other functions, like connect,disconnect and publish, that serve respectively to connect to the broker, disconnect from the broker and publish on the topic the message just generated. Here there is the implementation of those functions:
static int con(char* addr, int port){
  sock_udp_ep_t gw = { .family = AF_INET6, .port = EMCUTE_PORT };
  gw.port = port;

  /* parse address */
  if (ipv6_addr_from_str((ipv6_addr_t *)&gw.addr.ipv6, addr) == NULL) {
      printf("Error parsing IPv6 address\n");
      return 1;
  }

  if (emcute_con(&gw, true, NULL, NULL, 0, 0) != EMCUTE_OK) {
      printf("Error: unable to connect to [%s]:%i\n", addr, port);
      return 1;
  }
  printf("Successfully connected to gateway at [%s]:%i\n", addr, port);
  return 0;
}

static int discon(void){
    int res = emcute_discon();
    if (res == EMCUTE_NOGW) {
        puts("Error: not connected to any broker");
        return 1;
    }
    else if (res != EMCUTE_OK) {
        puts("error: unable to disconnect");
        return 1;
    }
    puts("Disconnect successful");
    return 0;
}

static int pub(char* topic, char* data, int qos){
  emcute_topic_t t;
  unsigned flags = EMCUTE_QOS_0;

  switch (qos) {
      case 1:
        flags |= EMCUTE_QOS_1;
        break;
      case 2:
        flags |= EMCUTE_QOS_2;
        break;
      default:
        flags |= EMCUTE_QOS_0;
        break;
  }


  /* step 1: get topic id */
  t.name = topic;
  if (emcute_reg(&t) != EMCUTE_OK) {
      puts("Error: unable to obtain topic ID");
      return 1;
  }

  /* step 2: publish data */
  if (emcute_pub(&t, data, strlen(data), flags) != EMCUTE_OK) {
      printf("Error: unable to publish data to topic '%s [%i]'\n",
              t.name, (int)t.id);
      return 1;
  }

  printf("published %s on topic %s\n", data, topic);

  return 0;
}
If you want to open another RIOT-OS node, you have to assign it an interface that is unused so far. So, if you used tap0 for the first node and an address, you are forced to use tap1 for the second one with a different address, making sure also to change the ID of the corresponding station.
Therefore, making a brief summary, to start the first RIOT-OS device:
> make all term PORT=tap0 EMCUTE_ID=station1And in the node:
> ifconfig 5 fec0:affe::99
> start fec0:affe::1 1885 1
Similarly for the second RIOT-OS node:
> make all term PORT=tap1 EMCUTE_ID=station2And in the node:
> ifconfig 5 fec0:affe::100
> start fec0:affe::1 1885 2Now we have configured the RIOT-OS device, the MQTT-SN broker that is connected to the application, but we still have to set up communication with AWS.
Since that is not supported the direct bridge between RSMB and our service, we have to create it with a Python script, named MQTTSNbridge.py. The purpose is to receive messages only connecting to the desired topics, and send them to AWS IoT via MQTT; furthermore, for the correct functioning of the Web Application (in which the sensor values will be shown), the bridge insert all the data into a table in the DynamoDB service.
You can find the Python scripts in the folder client_MQTTSN. Let's start with the visualization of the code:
from AWSIoTPythonSDK.MQTTLib import AWSIoTMQTTClient
import MQTTSNclient
import json
import boto3

# connection to DynamoDB and access to the table EnvironmentalStationDB
dynamodb = boto3.resource('dynamodb', region_name='us-east-1')
dynamoTable = dynamodb.Table('EnvironmentalStationDB')
jsonP = ''

# clients for MQTT and MQTTS
MQTTClient = AWSIoTMQTTClient("MQTTSNbridge")
MQTTSNClient = MQTTSNclient.Client("bridge", port=1885)
Firstly we have to import some libraries, that can be installed in this way (opening the folder client_MQTTSN with the terminal):
> pip installThen we establish the connection with the DynamoDB service, and set up the bridge with the MQTT-SN broker and the MQTT one.
class Callback:
  # function that replies a message from the MQTTSN broker to the MQTT one
  # and inserts into the database the message just arrived
  def messageArrived(self, topicName, payload, qos, retained, msgid):
      message = payload.decode("utf-8")
      jsonP = json.loads(message)
      print(topicName, message)
      MQTTClient.publish(topicName, message, qos)
      dynamoTable.put_item(Item=jsonP)
      return True

# path that indicates the certificates position
path = "../certs/"

# configure the access with the AWS MQTT broker
MQTTClient.configureEndpoint("a3um1mnv6jt2hg-ats.iot.us-east-1.amazonaws.com", 8883)
MQTTClient.configureCredentials(path+"root-CA.crt",
                                path+"private.pem.key",
                                path+"certificate.pem.crt")

# configure the MQTT broker
MQTTClient.configureOfflinePublishQueueing(-1)  # Infinite offline Publish queueing
MQTTClient.configureDrainingFrequency(2)  # Draining: 2 Hz
MQTTClient.configureConnectDisconnectTimeout(10)  # 10 sec
MQTTClient.configureMQTTOperationTimeout(5)  # 5 sec

# register the callback
MQTTSNClient.registerCallback(Callback())

# make connections to the clients
MQTTClient.connect()
MQTTSNClient.connect()
Now we are interested to manage the system, so we make actions when a message arrives to the bridge. With the Callback class, and more specifically in the messageArrived function, we are able to publish the message just arrived to AWS and insert the JSON file in the database. Also we configure the AWS endpoint and the certificates, to establish a correct connection with it, and after we register the callback, we can connect with the clients properly. I haven't inserted directly the certificates in the folder certs, because I don't want to make this sensitive information public, but make attention to put your files in the correct position (as the previous project).
# let's ask the user which stations he wants to subscribe to
# RiotOS MQTTSN clients publish to the topic sensor/station + id
# the user will define only the id
station_ids = ""
print("Enter the ID of the station, one by one, that you want to subscribe to.")
print("Type 'stop' to interrupt the process.\n")
while True:
    current_id = input("")
    if current_id == 'stop':
        break
    else:
        station_ids += current_id + " "

# subscribe to the topics choosen by the user
for id in station_ids:
    MQTTSNClient.subscribe("sensor/station" + id)
print("Subscribed to stations with ID: " + station_ids)

# cycle that wait for a command to close the program
while True:
    if input("Enter 'quit' to exit from the program.\n")=="quit":
        break

# disconnect from the clients
MQTTSNClient.disconnect()
MQTTClient.disconnect()
In this part the user decides which topics (conseguently, which stations) he wants to subscribe to, so with a while cycle will be inserted values that represent the environmental station from which to get information. So the client will subscribe to the listed topics, and when the user decide to interrupt the process will enter 'quit' on the terminal to disconnect from the MQTT-SN and the MQTT clients.
The other scripts are the same of those you can find in the folder mosquitto.rsmb/rsmb/src/MQTTSClient/Python, but I modified them to make possible the run with Python 3.
Let's start to see how to run the bridge. In the directory client_MQTTSN:
> python3 MQTTSNbridge.pyFor instance I decide to subscribe to the stations with ID 1 and 2, so:
And I start to receive data and send it to AWS. Remember that there is a possibility that subscribing to a station, it is not certain that all stations are active (in this example is active only the station 1):
That's it! The system is properly built and we can see on the Dashboard that the values are passed correctly over the channels.


Comments