There are lot's of projects which turn on and off your Electric devices using Arduino (with very complex circuit diagrams) but there are no clues how to control Electric devices through Web or Mobile phone (using simple circuits) and if there is any way to do this, its very long and tedious. So someone needs to take a long step, so i decide to take long step first to cut other people efforts. To accomplish this I 've created a common web platform by which you can control any of your devices with very simple steps without any programming other than Arduino and working with circuits with relay only. So this was the core Idea behind this great project. It's one of the good examples of DIY projects that can be implemented by anyone easily and it will cost less than $5, because it uses only a 5v Relay and some wire/plugs.
How It Works?We've created a open and free Web platform by using that you can easily manage your Electrical devices or Automate your Home Appliances very easily.It can be very useful device. Suppose if you are out of the house and you have forgotten to turn On/Off any of the Appliances, there are no worries because you can control it from your mobile phone or desktop by accessing website's page.To use this Project you only need to copy and paste the Arduino code which reads Serial input from processing and controls relay that helps in turning On / Off the appliance . So there might be a question in your mind that how the Relay and Arduino program is working and what to do with processing ? Let's find out answers step by step.
Programming and CircuitFrom Arduino Side:
We are using Arduino to read serial inputs from Processing program and Writing it to Serial port to on and off the Relay device or circuit we've made. As you'll see the code below in which we are reading data from serial which is coming from processing and checking with some of our data which if we get "1" then switch on the relay or if its "0" then switch off Relay device.How relay works is our next step.
//Some of the part of actual code
if(Serial.available()>0){ //Reading Serial data
     readSerial = Serial.read();
     delay(100);
     if(readSerial == '1'){ //if its 1 then switch on the relay
       digitalWrite(RELAY1,HIGH);
     }
     if(readSerial == '0'){ //If its 0 then switch off the relay
       digitalWrite(RELAY1,LOW);;
     }
Working Of Relay: (If already know you can skip)
How to use relay for controlling AC?AC is alternating current 220v (india) which powers the ac lights. Arduino cannot control high volt n amp, but a relay can do this job, which is the sole design of it. so we are using relay as switch to control high power devices.What is NO,NC and COM in relay?
- COM = Common Connection
- NC = Normally Closed Connection
- NO = Normally Open Connection
I have explained NO,NC and COM elaborately below, refer it if you feel it bit confusing.We're going to use NO Normally Open Connection
- COM - Common connection it is the centre terminal, It is hot as power to the load is connected at this terminal.
- NO (Normally open) - It acts like a switch,since it is open - there will be no contact between COM and NO, When we trigger the relay module, it connects to COM by the electromagnet inside the relay and supply to the load is provided,which powers up the light.Thus the circuit is closed until we trigger the state to low in relay.
- NC (Normally closed) - It is always in contact with COM, even when relay is not powered.when we trigger the relay it opens the circuit, so the connection is lost. it behaves just opposite to NO.
From Processing Side:
Here Processing code is the heart of our project which is communicating with both of the applications viz. Web application and Arduino you imagine it as a bridge or postman of old days who collect your mail from mail box and deliver it to given address. Here Processing is calling an API which is created by us at http://www.parikshacrack.com/gadgetProgrammers/homeAutomation/xxxxx
(Site we are using is only demo purpose) by calling this api through processing software we'll get our switch current state which we'll read in processing and send it to Arduino program as earlier discussed and at last Arduino write it to Board. From Web/Mobile Side:To access web we are using gadget programmers platform as given below:
Goto: http://www.parikshacrack.com/gadgetProgrammers/homeAutomation
Go here and switch on and off your device it will be read by your processing code.
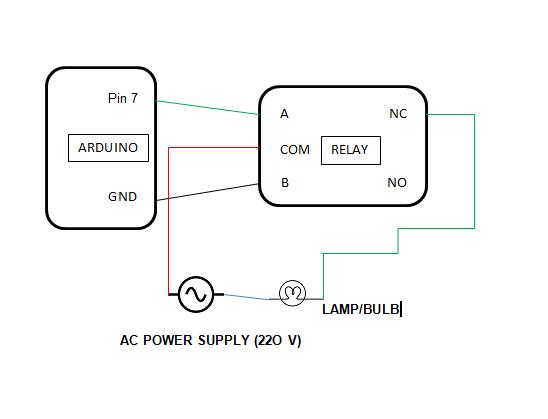
Circuits: As shown in Diagram
- Connect Pin 7 of Arduino to Relay IN1.
- Connect 5v of Arduino to Vcc of Relay.
- Connect AC Power one end wire to Common Pin of relay (middle one)
- Connect Lamp(Bulb) one end pin with NC Pin of Relay
- Connect one Left extra wire from Lamp and another Left extra wire from AC wire to main AC power supply.
- Copy and paste Arduino code as given to Arduino editor.
- Upload the code to Arduino .
- Download Processing zip and choose ext file according to your OS.
- Now run exe (For windows) file from zip of processing according to your os.
- Goto Web
http://www.parikshacrack.com/gadgetProgrammers/homeAutomation
Press button to on and off lights.
Final WordsHoooray! If everything goes alright you will see your lights work.
Thanks For your time and if you have any question or query please shout in comments.


_ztBMuBhMHo.jpg?auto=compress%2Cformat&w=48&h=48&fit=fill&bg=ffffff)


Comments
Please log in or sign up to comment.