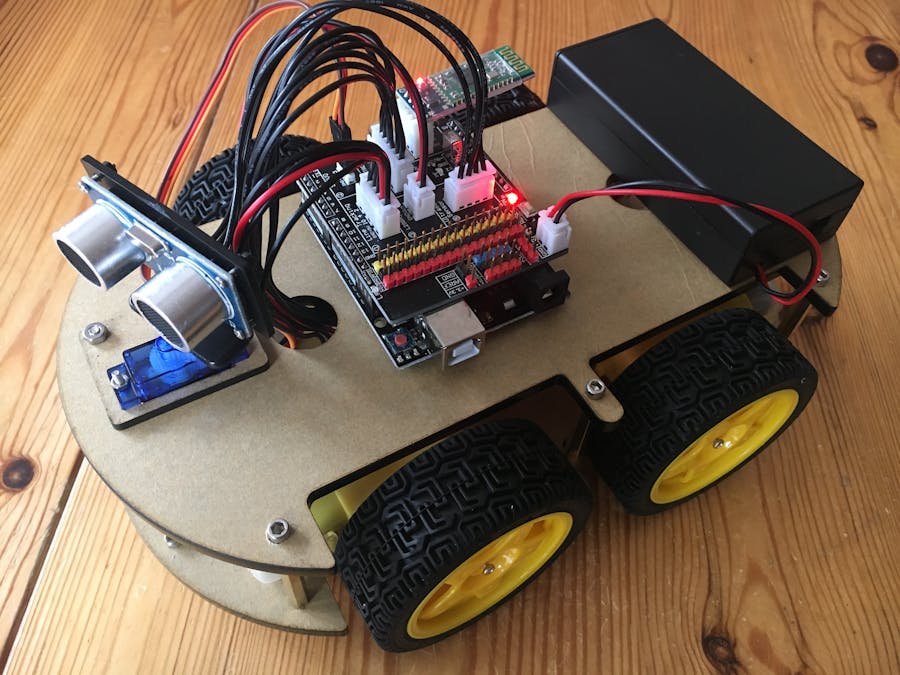
In autumn, it's time again to take care of Christmas gifts: here is a suitable candidate, which is just as interesting for interested electronics beginners, as for experienced Arduino IDE disciples who will tickle out the last performance from the 4 DC motors. It's about the Car Kit v3.0 from Elegoo, which shows from the beginning that it is a mature kit (v3.0 and completeness seal on the packaging).
Priced (70 Euros) in the upper segment, but already on the next day by an online shipping available ;-).
what you getThe components are carefully packed in a box over 2 layers and packed individually. It is all included: even a charger with 2x 18650 batteries (the mobile fuel of our century), simple screwdrivers and a CD-ROM with INO files for the included Arduino UNO including USB cable and PDF documents in different languages like German, English, Espanol, Francias, Italia and Chinese.
Power the batteries (you see an Europe adapter plug).
Its time to watch a assembly video to decide which acrylic layer is bot and top (both have an "A").
The left is above: it still contains a cutout for the "blue" SG90 Micro Servo motor for the ultrasound sensor. Do not forget to remove the protective foil from the two acrylic plates in black.
ContactIf you need more help, please feel free to contact Elegoo. They have two E-Mail addresses: euservice@elegoo.com (EU / JP) and service@elegoo.com (US / CA).
Support VideosReview video:
Unboxing and Assembling Tutorial:
ThirdNow the exciting part of the actual assembly - please calculate with about 2 hours of time.
For each component to be fixed there is a labeled bag with counted content. As a coffee drinker, I got saucers to keep my tiny screws. You could also use the Layer one Piece from the box.
In the case of the aluminum profiles for the 4 yellow DC motors, care must be taken not to tighten the profiles directly with the small M3 screw, or even better: to fasten the profiles first to the motors with the two long M3 screws.
Through JST adapter or also called "XH2.54 ports", the cables can be connected error-free with the Arduino Shield or Motor Shield.
At the ends of the cable for the line tracker (below the lower acrylic plate), make sure that the only red cable (5) for the power supply is at position 1 (connect to line tracker) and sometimes at position 2 (connect to Arduino Shield) can be found. Check it twice and put the right ends to the adapters.
There are also marriages in the project: married the Arduino Shield after fixing the Arduino Uno on the upper acrylic plate. For this purpose, 3 fixing screws are provided.
Here are a few pictures of the BlueTooth-Modul HC-08 and the Ultrasonic Echo: this is fixed with 4 tiny screws on a black plate, which is then put on the blue SG90 Micro Servo motor on it.
Note that the screws are a little too short. A real maker solves it in the only goal-oriented way: if not already the screws can be extended, must be worked with a knife the black plate. So short cut a little the 4 corners.
After powering with the 2 batteries all components say "Hello" with lighting there led.
Do not be surprised that only the LEDs light up after switching on, but otherwise no movement is possible. This is only the case as soon as one of the INO files available on CD-ROM (or Download) has been transferred to the UNO and has been restarted.
https://www.elegoo.com/tutorial/Elegoo%20Smart%20Robot%20Car%20Kit%20V3.0.2018.06.06.zip
Help 5Note that you remove the Bluetooth module from the shield for the upload process!
To control with a smartphone invites you the corresponding "Elegoo BLE" app in the stores of choice for free. Configures a connection to the Bluetooth module "HC-08" AND defines triggers to which the car should react.
As you can tell from the chat, the code responds to transmitted letters. If you want to adjust these, you have to intervene in the sketch "bluetooth_car.ino".
The definitions are:
- Light on / off: "a"
- Forward: "f"
- Back: "b"
- Left: "l"
- Right: "r"
- Stop: "s"
void loop() {
 getstr = Serial.read();
 switch(getstr){
   case 'f': forward(); break;
   case 'b': back();   break;
   case 'l': left();   break;
   case 'r': right();  break;
   case 's': stop();   break;
   case 'a': stateChange(); break;
   default:  break;
 }
}
Quite fast on the way the little one: You can play with the code parameters and increase to 255 ;-)
unsigned char carSpeed = 150;
In addition to the Bluetooth mode presented here are other modes available: infrared control, obstacle avoidance and line tracking. You can also find the different sketches on the CD-ROM or in the download-area as ZIP-File.
ConclusionI will sit down now and brush off the protective film of the two acrylic plates... are still a few days until Christmas. Remember that gifts are not the most important thing about this celebration, but Jesus' birth.
Despite its simplicity, the kit is not for young school-beginners: here my Bristle-Bot project is recommended. My recommendation, this kit for children from 9 years with an adult on the side in teamwork composition. Teens and teenagers will do it alone.


Comments
Please log in or sign up to comment.