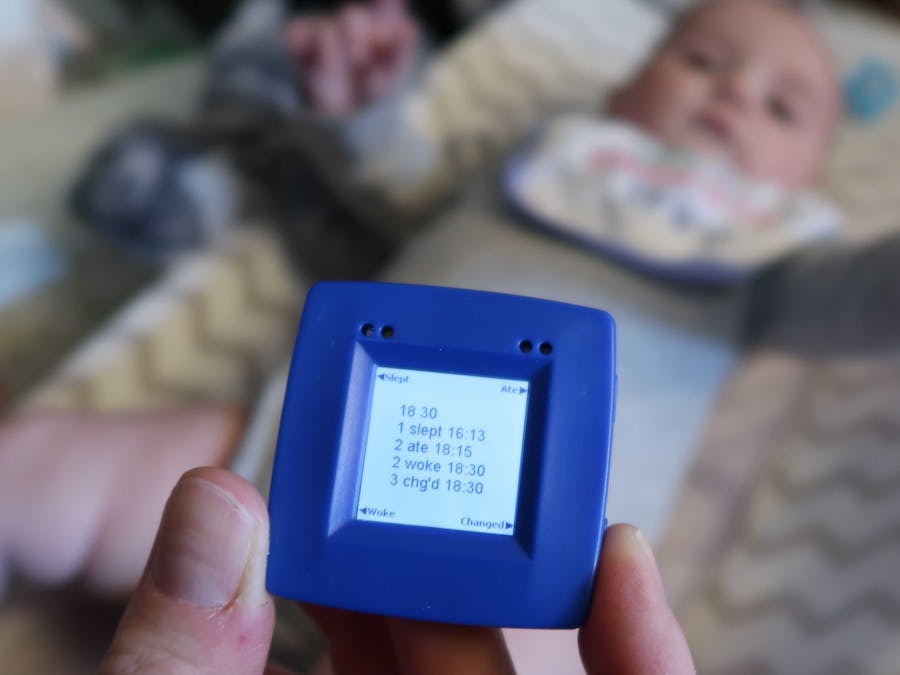
My wife and I recently had a baby, and often find that when we hand off responsibility for her to each other, we lack the necessary context possessed only by the previous caregiver, e.g. when she last ate, had her diaper changed, or how much/when she last slept. When I learned about NXP's Rapid IoT Prototyping Kit it seemed like the ideal platform to prototype my idea - a robust wearable that users can keep on their wrists like a watch, so that they never have to wonder where they left it or fumble around for it while already trying to hold/feed/sooth a baby. In conjunction with the Atmosphere cloud-based IDE, I was able to quickly realize a sophisticated prototype of my planned functionality. 💭👶📟💡
Getting Started 🔰 👩💻The NXP Rapid IoT Prototyping Kit comes with a great demo out of the box, which demonstrates the device's display, buttons, and capacitive input, as well as on-board sensors. Once you're familiar with the device, you can jump into development right away with NXP's Rapid IoT Studio, a branded version of Atmosphere's cloud-based IDE, by following their handy Getting Started guide. Similar to the Hexiwear's beginner-friendly mbed workflow, Rapid IoT Studio allows you to compile in the cloud, then download a binary which can be dragged onto an emulated mass storage device once you connect the SLN-RPK-NODE device and enter bootloader mode:
I was lucky enough to already own a Hexiwear Docking Station from a previous contest (the SLN-RPK-NODE is effectively the next-generation Hexiwear), so I updated it to work with the new device:
First, download the Docking station DAP-LINK firmware for SLN-RPK-NODE `REV 0246`, then:
- set the docking station power switch to off
- set the jumper switches to
11001000:
- connect the docking station to your PC via USB
- hold the MK64 (NOT MKW40) reset button while moving the docking station power switch to the on position, and continue to hold for a further two seconds
- wait for the
MAINTENANCEemulated mass storage device to appear, and drag the downloaded DAP-LINK firmware onto it (as when flashing the SLN-RPK-NODE) - toggle the power switch off, then on
- wait for the
IOT-DAPLINKemulated mass storage device to appear - drag your downloaded firmware binary from Rapid IoT Studio onto the
IOT-DAPLINKdrive, and wait for it to copy - press the MK64 reset button, and wait for the device to restart, now running your firmware!
(repeat the download/drag/reset steps as you iterate and test your firmware)
With the docking station updated, deployment is as simple as download - drag - reset! 💾➡️♻️
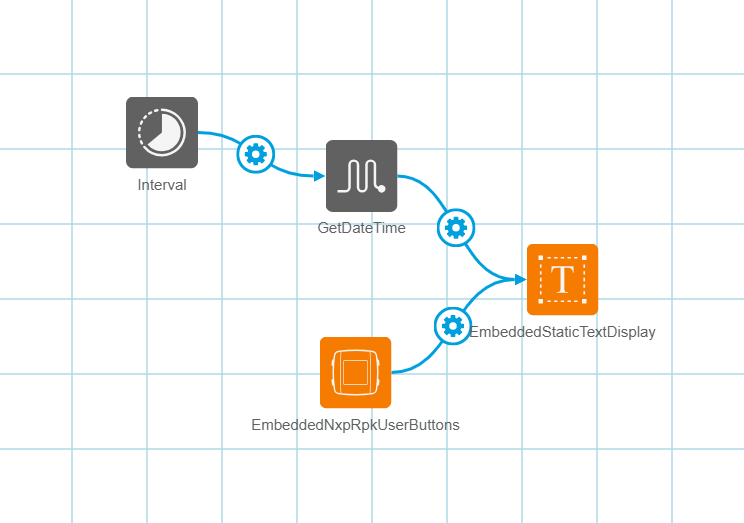
Development Process 💪 💻With the development tools and firmware flashing tools all ready to go, it's time to start fleshing out the functionality! Rapid IoT Studio makes it extremely easy to prototype ideas - it's literally as easy as dragging elements from the toolbox onto the canvas!
Once you've got a few elements in place and configured, you can connect them with events - which provide a lot of the functionality you need - for example, setting the display text on a Text Page to the value of a given sensor - and when you need to customize things even further, you can switch to the Code Editor, which allows you to override default functionality with your own custom code. For example, in order to update the sleepcounter and timestamp - as well as execute a complicated display update (I hacked the default one-line display to show the five lines of information that I needed - refreshing each second or on button press) - when the bottom left button was pushed, I customized the corresponding function thus:
ATMO_Status_t EmbeddedNxpRpkUserButtons_bottomLeftPushed(ATMO_Value_t *in, ATMO_Value_t *out) {

    s_wakes++;
    ATMO_DateTime_GetDateTime(0, &s_wake_time);

    refresh_display();

    ATMO_CreateValueString(out, s_display);
    return ATMO_Status_Success;

}
One initially peculiar-seeming Atmosphere convention is that in order to support the drag-and-drop interactivity between elements, all functions have the same (ATMO_Value_t *in, ATMO_Value_t *out) parameters - which really takes some getting used to - since this is the only way to pass data (well, it's the Atmosphere way - I ended up using a bunch of global variables as well...! 😅). Another surprise was Atmosphere's own proprietary drivers such asATMO_DateTime_Time_t in place of the standard C fixtures time_t / tm / strftime(). Once I'd got my head around the Atmosphere way of doing things, however, I was able to incorporate RTC functionality into my project in order to display the clock and button press timestamps (shown in the final UI here as delta compared to current time - vs. the original timestamps in the cover image at the top of this page - for the convenience of tired parents who don't want to do the math in their heads! 😫):
Due to the limited display real estate (and just the general desire to do things properly), you might want to take advantage of the well-hidden debugging functionality built into Rapid IoT Studio and the SLN-RPK-NODE device. Note that you will need your updated docking station from earlier! I just happened to notice ATMO_PLATFORM_DebugPrint() in some sample code - and it seemed like it could be extremely helpful in diagnosing some of the strange behavior I experienced while trying to grok the RTC functionality and support for standard C time functions - so I investigated how to actually get it to work, and wanted to share in case it's of use to others; I'm using WSL on Windows 10 but similar steps can be followed from the Linux or macOS CLI. First, I located the dock's serial connection on COM3, translated that into the corresponding WSL dev, then configured and connected with stty and cu:
sudo chmod 666 /dev/ttyS3
stty -F /dev/ttyS3 -a
stty -F /dev/ttyS3 sane 115200
cu -l /dev/ttyS3 -s 115200
I was then treated to this fun boot-up output after resetting, and eventually to my desired ATMO_PLATFORM_DebugPrint() output at the bottom (counting the number of times the Changed button had been pressed:
Connected.
####         ######      ##### ##########
######      # ######    ##### #############
#######     ## ######  ##### ###############
########    ### ########### ####       #####
#### #####  #### ######### #####       #####
####  ##### #### ######### #################
####   ######## ########### ###############
####     ##### ######  ##### ############
####      ### ######    ##### ##
####       # ######      ##### #
SHELL build: Feb 11 2019
Copyright (c) 2017 NXP Semiconductors
Initializing BLE
Got MAC Address: xx:xx:xx:xx:xx
BLE Initialized
Adding Characteristic[0] to Service 0
Adding Characteristic[1] to Service 0
Adding Characteristic[2] to Service 0
Adding Characteristic[3] to Service 0
Adding Characteristic[0] to Service 5
Adding Characteristic[1] to Service 5
RX Service Handle: 01
RX Char Handle: 03
RX Char Handle: 05
RX Char Handle: 07
RX Service Handle: 08
RX Char Handle: 0A
Error opening file thread_enabled
Thread Enabled: 0
Stored Build UUID: f8641bc1-7256-4981-91ee-e272f8dea205
Current Build UUID: f34f3c34-d1b5-417b-ac8Error opening file ota_complete
Uuid Match 0 Boot After OTA: 0
Wiping Flash
Error opening file registrationInfo
Error opening file ble_enabled
BLE Enabled: 1
Adding Characteristic[0] to Service 8
Setting device name: PB026
Setting service uuid
Setting advertised UUID: a552a66a-5bb9-4316-9772-b6c7d0871d8b
Starting advertising
Adding Page: 0
RX Time: 1555344000
RX Service Handle: 0C
RX Char Handle: 0E
RX Char Handle: 10
RX Char Handle: 12
RX Char Handle: 14
RX Service Handle: 16
RX Char Handle: 18
RX Service Handle: 1A
RX Char Handle: 1C
Properties: 08
Registering cb for handle 0012
Properties: 28
Registering cb for handle 0018
Properties: 04
Registering cb for handle 0000
Properties: 1A
Registering cb for handle 001C
GATTDBFindCccdHandleForCharValueHandleIndicationCCCD[3] Atmo Handle 04 Kw41z Handle 14 CCCD Handle: 15
GATTDBFindCccdHandleForCharValueHandleIndicationCCCD[4] Atmo Handle 06 Kw41z Handle 18 CCCD Handle: 19
GATTDBFindCccdHandleForCharValueHandleIndicationCCCD[6] Atmo Handle 09 Kw41z Handle 1C CCCD Handle: 1D
Writing auth info
[NFC] Registration Set
1 changes
2 changes
3 changes
One really fun aspect of this project was using it for real in our daily lives - my wife and I tested WhenDi "in production" with our infant, and went through several iterations of optimizing the inputs, UI, and data presentation for maximum convenience and utility to the caregiver! 😊📟🏆
The combination of the Rapid IoT Studio online IDE and the SLN-RPK-NODE device allows for incredibly rapid prototyping - and once you get your head around their particular conventions, you can move from a simple prototype to a complex application backed by your own custom code. I feel like despite all of the time I put into this project, I really only scratched the surface of the available sensors, inputs, and Studio elements (you can even create your own if you don't find everything you need!) - not to mention the app and cloud functionality - I can't wait to explore it all! 🗺️🚀
Next Steps/Future Enhancements 🔜 🔮The Rapid IoT Studio online IDE and SLN-RPK-NODE device have so many amazing features! I'd like to use the built-in Buzzer to provide haptic alerts when it's time to feed or change the baby or put her to bed. I'd like to expand the feed functionality to indicate ounces using the capacitive bezel as input or measure time nursing. I'd like to improve power management (during Field Testing the device lasted less than 3 hours) - perhaps disabling the backlight until motion is detected or the capacitive bezel is touched. Maybe use NFC to scan tags near the diaper changing station or crib to automatically log changes/sleep without manual interaction. I'd like to add syncing of the RTC via the Application View app, and syncing of events and sensor values to the cloud for viewing by other caregivers and pattern analysis (e.g. how feedings affect sleep duration etc.). There's just so much to explore with the Rapid IoT Prototyping Kit - and I can't wait to discover everything it has to offer! 💡🤯


Comments
Please log in or sign up to comment.