


Hardware components | ||||||
| × | 1 | ||||
 |
| × | 1 | |||
 |
| × | 1 | |||
 |
| × | 1 | |||
Software apps and online services | ||||||
| ||||||
Hand tools and fabrication machines | ||||||
 |
| |||||
When you want to explore how you could use small displays as an interface for your product, prototype or project it could be difficult to quickly explore different options. Through tools like image2cpp,you can convert your drawn images into Arduino code and upload these to the Arduino. But ideally would be when you can draw directly onto the screen, just like how Figma Mirror works with mobile phones, where you can make edits to the design and see changes immediately happening on the phone.
One quick and dirty way of prototyping small screens is to put a phone ‘into’ your prototype and only use a small part of the phone screen for the display, while other parts of the phone could be used to ‘fake’ LEDs or capacitive buttons (I could do this up until 1.5mm, depending on the touchscreen). This could be done with tools like Figma, but when more complexity is needed with p5 or Framer. If you want to make the content on the phone interactive beyond the touchscreen you could make an ESP32 act as a keyboard for the phone, which can then be used to create the physical knobs, sliders or buttons. But at some point, it is good to move to the real hardware, to check the quality, brightness, exact pixel density and sometimes your prototype can not be the size of a modern phone ;)
This code contains a Processing sketch that captures pixels at the cursor's current position (and a box to the right bottom of the cursor). These pixels are sent to the Arduino which sends this to the display using the u8g2 library. The principle is similar to the From Pixel to Neopixel project. In this way, any tool for making graphics on the computer (from Paint to After Effects, from GameMaker to p5, from Sketch to Figma) could be used to control the pixels on the display, which is great for experience prototypes (where you want to give people the experience of the product, while still being able to make agile changes to the flow, content and copy.
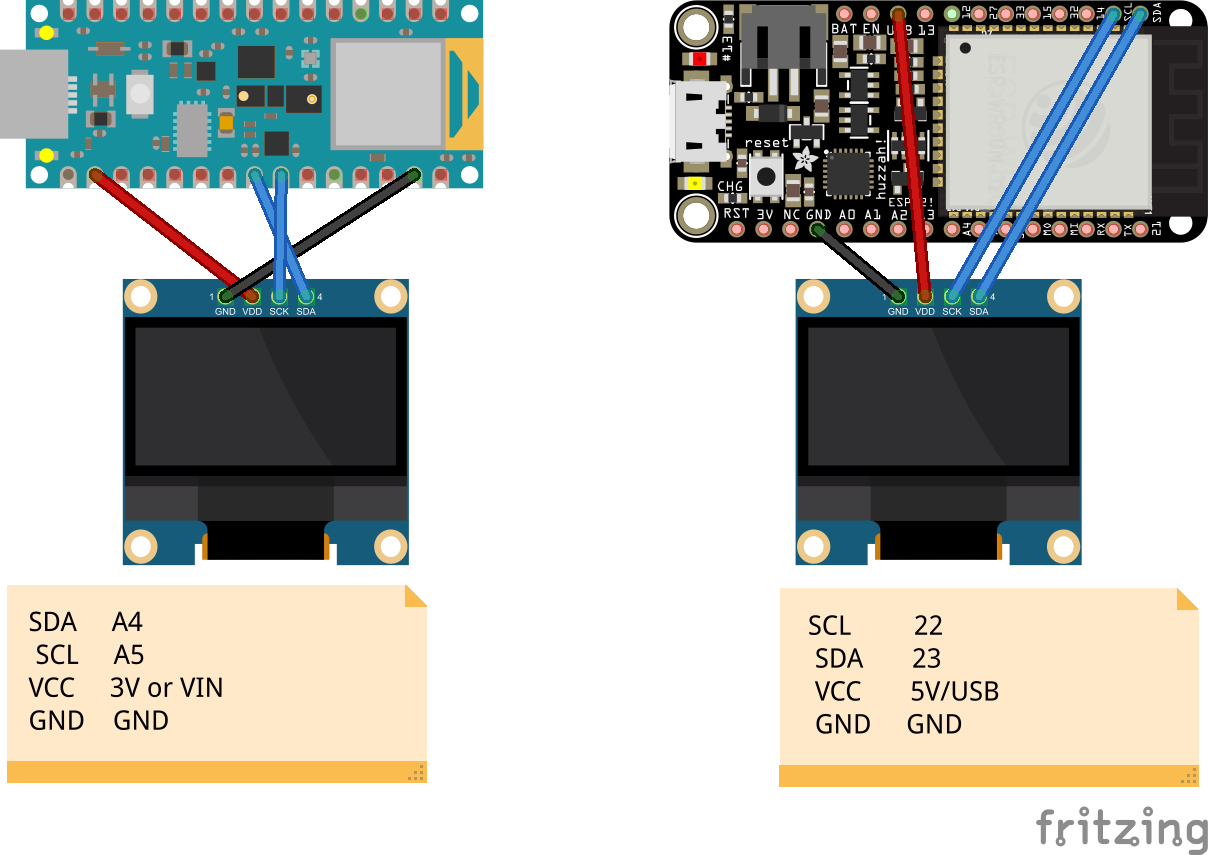
Steps to make it work- Get the hardware described above (The display should be supported by the u8g2 library)
- Get an Arduino, any Arduino will do, as long as it connects to a computer using a serial connection. And download the Arduino (pro) IDE (or use the web editor)
- Download the Processing IDE (if you haven't already got it), the code should work both on Mac OSx and Windows, so hopefully, it continues to work in the future. It might be seen as spyware because it literally looks at what happens on your screen, but it doesn't send it anywhere else than to the Arduino.
- Get the library by going to Sketch> Include Library > Manage Libraries and search for u8g2 and install the library by Oliver
- Download, or copy and paste the code and upload the code to Arduino.
- Run the Processing sketch and you should be ready to explore animations, interfaces and dynamic content on your display
- In Processing make sure the right port is selected
- If you want to use Figma to create the screens a good trick is to open Figma mirror in Chrome or Chromium and open the inspector, toggle the device toolbar and scale the screen down to the exact resolution of the display.
The Arduino code is ‘simply’ taking the data from Processing and passing it onto the display. To know that a message has started it waits for an ‘S’ and a ‘.’ This is not really scientific, but it seems to work most of the time after that one byte is interpreted as the brightness of the display, all the bytes after that are being saved in an array and then passed to the display, this takes some memory from the Arduino, so ‘streaming’ it might be a better solution, but for now this works without having to go too deep into the u8g2 library. The serial baud rate is something that you can play with, I now got it working on 2Mbps but this depends on your microcontroller
Processing code explainedIn processing it takes a screenshot of the current bounding box starting at the cursor’s position, going down and right based on the width and height of the screen. You can, of course, change that as well to a fixed position; if you want to be able to still use the cursor.
Since I’m using this with a 1-bit Monochrome display every bit represents a pixel. This makes converting from pixels into bytes a bit more complicated, it takes the brightness from each pixel and checks if the brightness is above 126, if so it adds a 1 to the bitstream, otherwise, it adds a 0.
If you are using f.e. a 4-bit Grayscale display you need to make some changes to the code to make it work properly, similar for Multi-color displays. I've got it to work with 1.8" coloured TFT displays, with a framerate of 1fps; let me know if you're interested in that or have good ideas to increase the speed.
Processing takes the first Serial port it can find; sometimes this is the right one, sometimes you need to change this to select the right Serial port. This can be done by changing the Serial.list()[0]; to something like Serial.list()[1]; or Serial.list()[2]; in the monitor underneath the Processing sketch you can see the different Serialports that your operating system can find. In Arduino, you can see what the right name of the current port is at the right bottom of the window.Disclaimer
The fact that it is easier to prototype content on small displays is not an argument to put screens everywhere and in all products. (Dynamic) Screens can be a real burden for people with visual impairments and for people that can’t focus their eyes on the screen. Consider well-positioned LED’s since they don’t change positions you can more easily learn the positions. Consider pushbuttons that give the user haptic re-assuring feedback. Consider mechanical switches (that both visually and physically represent the state). The time that we gain with prototyping should be used to explore test and build a variety of options.
pngdisplay uses the curl command on the commandline to push an image to the display.
ESPscreenMirror uses the LILYGO AMOLED and pushes a full colour image from processing to the Arduino. Unfortuntaly the refresh rate is rather slow.


Comments
Please log in or sign up to comment.